狠狠撸

狠狠撸Share a Scribd company logo
Setting Employee Schedules
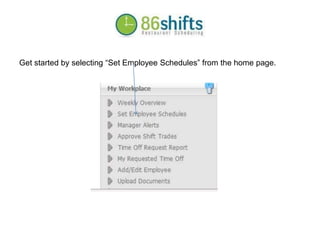
Get started by selecting “Set Employee Schedules” from the home page.
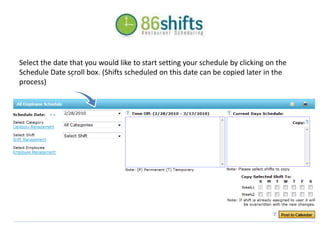
Select the date that you would like to start setting your schedule by clicking on the Schedule Date scroll box.?(Shifts scheduled on this date can be copied later in the process)
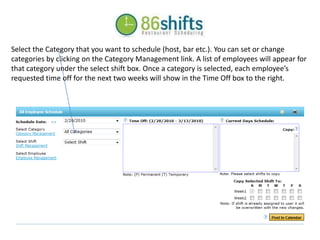
Select the Category that you want to schedule (host, bar etc.).?You can set or change categories by clicking on the Category Management link.?A list of employees will appear for that category under the select shift box.?Once a category is selected, each employee’s requested time off for the next two weeks will show in the Time Off box to the right.?
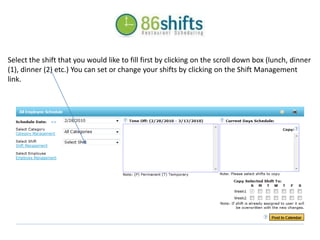
Select the shift that you would like to fill first by clicking on the scroll down box (lunch, dinner (1), dinner (2) etc.)?You can set or change your shifts by clicking on the Shift Management link.
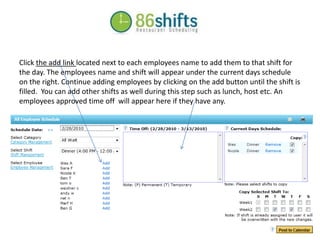
Click the add link located next to each employees name to add them to that shift for the day.?The employees name and shift will appear under the current days schedule on the right.?Continue adding employees by clicking on the add button until the shift is filled.? You can add other shifts as well during this step such as lunch, host etc. An employees approved time off  will appear here if they have any.
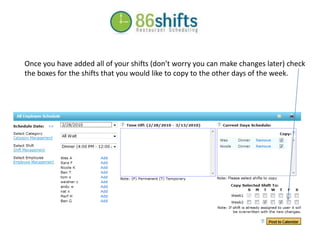
Once you have added all of your shifts (don’t worry you can make changes later) check the boxes for the shifts that you would like to copy to the other days of the week.?
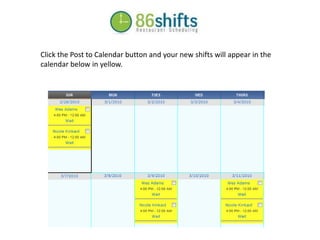
Click the Post to Calendar button and your new shifts will appear in the calendar below in yellow.
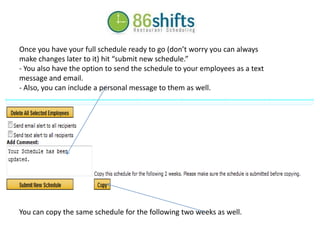
Once you have your full schedule ready to go (don’t worry you can always make changes later to it) hit “submit new schedule.” - You also have the option to send the schedule to your employees as a text message and email. - Also, you can include a personal message to them as well. You can copy the same schedule for the following two weeks as well.
That’s all there is to it - Just hit submit and you’re on your way!
More Related Content

Set Your Schedule

  • 2. Get started by selecting “Set Employee Schedules” from the home page.
  • 3. Select the date that you would like to start setting your schedule by clicking on the Schedule Date scroll box.?(Shifts scheduled on this date can be copied later in the process)
  • 4. Select the Category that you want to schedule (host, bar etc.).?You can set or change categories by clicking on the Category Management link.?A list of employees will appear for that category under the select shift box.?Once a category is selected, each employee’s requested time off for the next two weeks will show in the Time Off box to the right.?
  • 5. Select the shift that you would like to fill first by clicking on the scroll down box (lunch, dinner (1), dinner (2) etc.)?You can set or change your shifts by clicking on the Shift Management link.
  • 6. Click the add link located next to each employees name to add them to that shift for the day.?The employees name and shift will appear under the current days schedule on the right.?Continue adding employees by clicking on the add button until the shift is filled.? You can add other shifts as well during this step such as lunch, host etc. An employees approved time off will appear here if they have any.
  • 7. Once you have added all of your shifts (don’t worry you can make changes later) check the boxes for the shifts that you would like to copy to the other days of the week.?
  • 8. Click the Post to Calendar button and your new shifts will appear in the calendar below in yellow.
  • 9. Once you have your full schedule ready to go (don’t worry you can always make changes later to it) hit “submit new schedule.” - You also have the option to send the schedule to your employees as a text message and email. - Also, you can include a personal message to them as well. You can copy the same schedule for the following two weeks as well.
  • 10. That’s all there is to it - Just hit submit and you’re on your way!