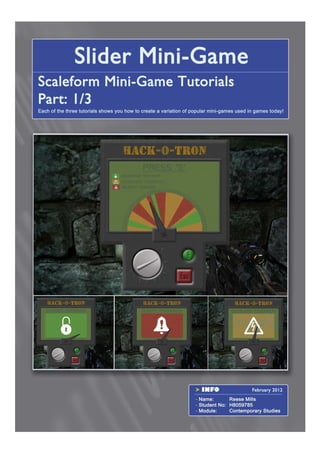
Scaleform Mini-Games Tutorial 1/3
0 likes1,507 views

This document provides a 3-part tutorial for creating a slider mini-game in UDK and Adobe Flash using Scaleform. Part 1 covers setting up the flash file to create a cursor animation controlled by keyboard input that triggers different outcomes. It also covers importing the SWF into UDK and using Kismet to link the flash commands to animations, triggers, and other game logic. The tutorial establishes the gameplay mechanics and interface within the first part.
![Setting Up The Tutorial Files
To start these tutorials, the user first needs to open
the ŌĆ£Tutorial CD FilesŌĆØ folder on the supplied disc
and access the ŌĆ£Tutorial_FilesŌĆØ folder. This folder
contains the flash files and UDK maps we require
throughout these tutorials.
Alternatively, you can download these folders from the following link:
http://www.gamefront.com/files/21548379/Tutorial+CD+Files.rar
The ŌĆ£Scaleform_FlashŌĆØ folder needs to be copied
and pasted to the following directory:
[UDKUDK-2011-10UDKGameFlash]
The ŌĆ£Scaleform_UDK_MapsŌĆØ folder needs to be
copied and pasted to the following directory:
[UDKUDK-2011-10UDKGameContentMaps]
To start this tutorial, we will use the files in the ŌĆ£║▌║▌▀ŻrŌĆØ folder in the copied
ŌĆ£Scaleform_FlashŌĆØ folder.
Here we will use the ŌĆ£║▌║▌▀Żr_Start.flaŌĆØ for this tutorial, but the user can view a
completed version in the ŌĆ£║▌║▌▀Żr_End.flaŌĆØ for reference.
3](https://image.slidesharecdn.com/millsreeseh8059785-contemporarystudies-120903222208-phpapp02/85/Scaleform-Mini-Games-Tutorial-1-3-3-320.jpg)

Scaleform Mini-Games Tutorial 1/3
- 1. SCALEFORM MINI-GAME TUTORIALS PART 1/3 1
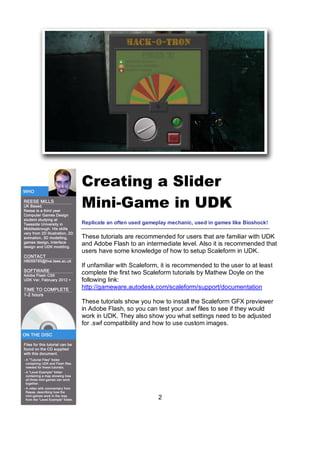
- 2. Creating a ║▌║▌▀Żr Mini-Game in UDK Replicate an often used gameplay mechanic, used in games like Bioshock! These tutorials are recommended for users that are familiar with UDK and Adobe Flash to an intermediate level. Also it is recommended that users have some knowledge of how to setup Scaleform in UDK. If unfamiliar with Scaleform, it is recommended to the user to at least complete the first two Scaleform tutorials by Mathew Doyle on the following link: http://gameware.autodesk.com/scaleform/support/documentation These tutorials show you how to install the Scaleform GFX previewer in Adobe Flash, so you can test your .swf files to see if they would work in UDK. They also show you what settings need to be adjusted for .swf compatibility and how to use custom images. 2
- 3. Setting Up The Tutorial Files To start these tutorials, the user first needs to open the ŌĆ£Tutorial CD FilesŌĆØ folder on the supplied disc and access the ŌĆ£Tutorial_FilesŌĆØ folder. This folder contains the flash files and UDK maps we require throughout these tutorials. Alternatively, you can download these folders from the following link: http://www.gamefront.com/files/21548379/Tutorial+CD+Files.rar The ŌĆ£Scaleform_FlashŌĆØ folder needs to be copied and pasted to the following directory: [UDKUDK-2011-10UDKGameFlash] The ŌĆ£Scaleform_UDK_MapsŌĆØ folder needs to be copied and pasted to the following directory: [UDKUDK-2011-10UDKGameContentMaps] To start this tutorial, we will use the files in the ŌĆ£║▌║▌▀ŻrŌĆØ folder in the copied ŌĆ£Scaleform_FlashŌĆØ folder. Here we will use the ŌĆ£║▌║▌▀Żr_Start.flaŌĆØ for this tutorial, but the user can view a completed version in the ŌĆ£║▌║▌▀Żr_End.flaŌĆØ for reference. 3
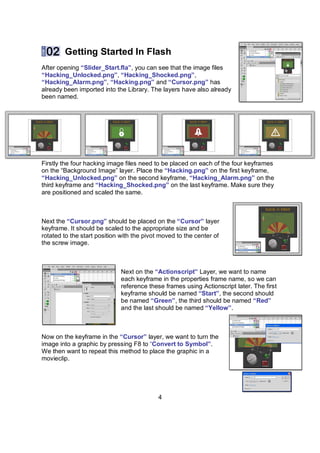
- 4. Getting Started In Flash After opening ŌĆ£║▌║▌▀Żr_Start.flaŌĆØ, you can see that the image files ŌĆ£Hacking_Unlocked.pngŌĆØ, ŌĆ£Hacking_Shocked.pngŌĆØ, ŌĆ£Hacking_Alarm.pngŌĆØ, ŌĆ£Hacking.pngŌĆØ and ŌĆ£Cursor.pngŌĆØ has already been imported into the Library. The layers have also already been named. Firstly the four hacking image files need to be placed on each of the four keyframes on the ŌĆ£Background ImageŌĆØ layer. Place the ŌĆ£Hacking.pngŌĆØ on the first keyframe, ŌĆ£Hacking_Unlocked.pngŌĆØ on the second keyframe, ŌĆ£Hacking_Alarm.pngŌĆØ on the third keyframe and ŌĆ£Hacking_Shocked.pngŌĆØ on the last keyframe. Make sure they are positioned and scaled the same. Next the ŌĆ£Cursor.pngŌĆØ should be placed on the ŌĆ£CursorŌĆØ layer keyframe. It should be scaled to the appropriate size and be rotated to the start position with the pivot moved to the center of the screw image. Next on the ŌĆ£ActionscriptŌĆØ Layer, we want to name each keyframe in the properties frame name, so we can reference these frames using Actionscript later. The first keyframe should be named ŌĆ£StartŌĆØ, the second should be named ŌĆ£GreenŌĆØ, the third should be named ŌĆ£RedŌĆØ and the last should be named ŌĆ£YellowŌĆØ. Now on the keyframe in the ŌĆ£CursorŌĆØ layer, we want to turn the image into a graphic by pressing F8 to ŌĆ£Convert to SymbolŌĆØ. We then want to repeat this method to place the graphic in a movieclip. 4
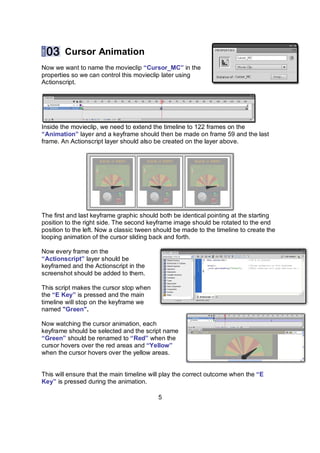
- 5. Cursor Animation Now we want to name the movieclip ŌĆ£Cursor_MCŌĆØ in the properties so we can control this movieclip later using Actionscript. Inside the movieclip, we need to extend the timeline to 122 frames on the ŌĆ£AnimationŌĆØ layer and a keyframe should then be made on frame 59 and the last frame. An Actionscript layer should also be created on the layer above. The first and last keyframe graphic should both be identical pointing at the starting position to the right side. The second keyframe image should be rotated to the end position to the left. Now a classic tween should be made to the timeline to create the looping animation of the cursor sliding back and forth. Now every frame on the ŌĆ£ActionscriptŌĆØ layer should be keyframed and the Actionscript in the screenshot should be added to them. This script makes the cursor stop when the ŌĆ£E KeyŌĆØ is pressed and the main timeline will stop on the keyframe we named "Green". Now watching the cursor animation, each keyframe should be selected and the script name ŌĆ£GreenŌĆØ should be renamed to ŌĆ£RedŌĆØ when the cursor hovers over the red areas and ŌĆ£YellowŌĆØ when the cursor hovers over the yellow areas. This will ensure that the main timeline will play the correct outcome when the ŌĆ£E KeyŌĆØ is pressed during the animation. 5
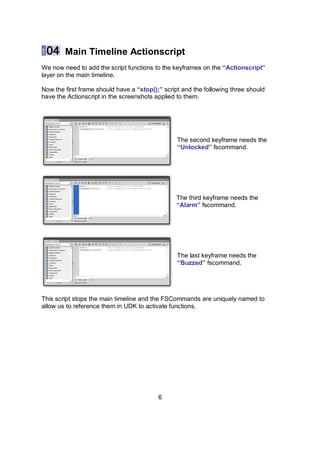
- 6. Main Timeline Actionscript We now need to add the script functions to the keyframes on the ŌĆ£ActionscriptŌĆØ layer on the main timeline. Now the first frame should have a ŌĆ£stop();ŌĆØ script and the following three should have the Actionscript in the screenshots applied to them. The second keyframe needs the ŌĆ£UnlockedŌĆØ fscommand. The third keyframe needs the ŌĆ£AlarmŌĆØ fscommand. The last keyframe needs the ŌĆ£BuzzedŌĆØ fscommand. This script stops the main timeline and the FSCommands are uniquely named to allow us to reference them in UDK to activate functions. 6
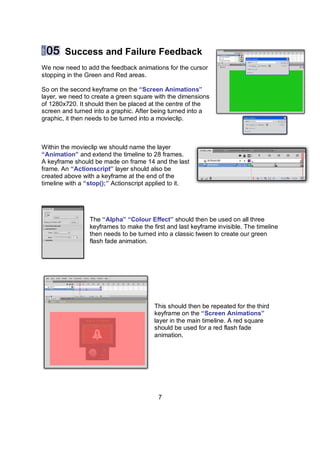
- 7. Success and Failure Feedback We now need to add the feedback animations for the cursor stopping in the Green and Red areas. So on the second keyframe on the ŌĆ£Screen AnimationsŌĆØ layer, we need to create a green square with the dimensions of 1280x720. It should then be placed at the centre of the screen and turned into a graphic. After being turned into a graphic, it then needs to be turned into a movieclip. Within the movieclip we should name the layer ŌĆ£AnimationŌĆØ and extend the timeline to 28 frames. A keyframe should be made on frame 14 and the last frame. An ŌĆ£ActionscriptŌĆØ layer should also be created above with a keyframe at the end of the timeline with a ŌĆ£stop();ŌĆØ Actionscript applied to it. The ŌĆ£AlphaŌĆØ ŌĆ£Colour EffectŌĆØ should then be used on all three keyframes to make the first and last keyframe invisible. The timeline then needs to be turned into a classic tween to create our green flash fade animation. This should then be repeated for the third keyframe on the ŌĆ£Screen AnimationsŌĆØ layer in the main timeline. A red square should be used for a red flash fade animation. 7
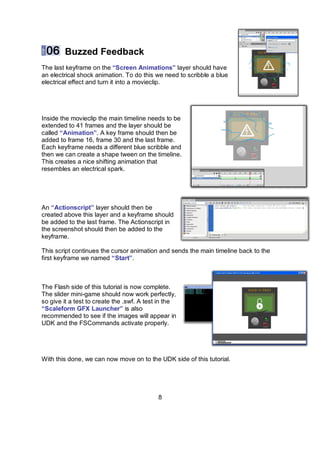
- 8. Buzzed Feedback The last keyframe on the ŌĆ£Screen AnimationsŌĆØ layer should have an electrical shock animation. To do this we need to scribble a blue electrical effect and turn it into a movieclip. Inside the movieclip the main timeline needs to be extended to 41 frames and the layer should be called ŌĆ£AnimationŌĆØ. A key frame should then be added to frame 16, frame 30 and the last frame. Each keyframe needs a different blue scribble and then we can create a shape tween on the timeline. This creates a nice shifting animation that resembles an electrical spark. An ŌĆ£ActionscriptŌĆØ layer should then be created above this layer and a keyframe should be added to the last frame. The Actionscript in the screenshot should then be added to the keyframe. This script continues the cursor animation and sends the main timeline back to the first keyframe we named ŌĆ£StartŌĆØ. The Flash side of this tutorial is now complete. The slider mini-game should now work perfectly, so give it a test to create the .swf. A test in the ŌĆ£Scaleform GFX LauncherŌĆØ is also recommended to see if the images will appear in UDK and the FSCommands activate properly. With this done, we can now move on to the UDK side of this tutorial. 8
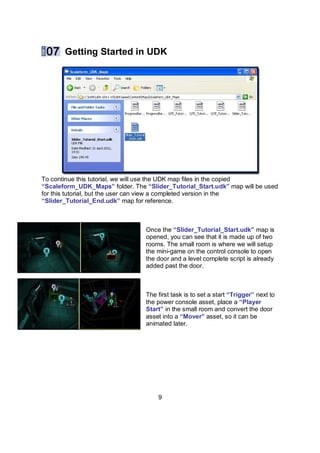
- 9. Getting Started in UDK To continue this tutorial, we will use the UDK map files in the copied ŌĆ£Scaleform_UDK_MapsŌĆØ folder. The ŌĆ£║▌║▌▀Żr_Tutorial_Start.udkŌĆØ map will be used for this tutorial, but the user can view a completed version in the ŌĆ£║▌║▌▀Żr_Tutorial_End.udkŌĆØ map for reference. Once the ŌĆ£║▌║▌▀Żr_Tutorial_Start.udkŌĆØ map is opened, you can see that it is made up of two rooms. The small room is where we will setup the mini-game on the control console to open the door and a level complete script is already added past the door. The first task is to set a start ŌĆ£TriggerŌĆØ next to the power console asset, place a ŌĆ£Player StartŌĆØ in the small room and convert the door asset into a ŌĆ£MoverŌĆØ asset, so it can be animated later. 9
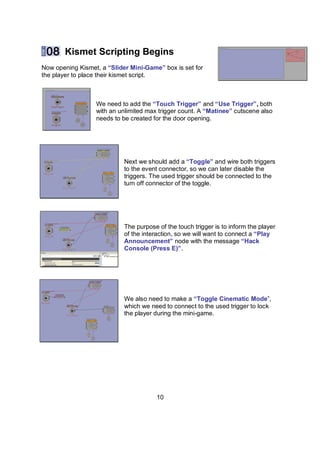
- 10. Kismet Scripting Begins Now opening Kismet, a ŌĆ£║▌║▌▀Żr Mini-GameŌĆØ box is set for the player to place their kismet script. We need to add the ŌĆ£Touch TriggerŌĆØ and ŌĆ£Use TriggerŌĆØ, both with an unlimited max trigger count. A ŌĆ£MatineeŌĆØ cutscene also needs to be created for the door opening. Next we should add a ŌĆ£ToggleŌĆØ and wire both triggers to the event connector, so we can later disable the triggers. The used trigger should be connected to the turn off connector of the toggle. The purpose of the touch trigger is to inform the player of the interaction, so we will want to connect a ŌĆ£Play AnnouncementŌĆØ node with the message ŌĆ£Hack Console (Press E)ŌĆØ. We also need to make a ŌĆ£Toggle Cinematic ModeŌĆØ, which we need to connect to the used trigger to lock the player during the mini-game. 10
- 11. Kismet Scripting Continued At this point the user should import .swf created from the ŌĆ£║▌║▌▀Żr_Start.flaŌĆØ file into UDK using the content browser. A package called ŌĆ£Scaleform_FlashŌĆØ will then be created from the folder structure. Here we can now communicate with the .swf from the package. To do this we need to add an ŌĆ£openGFXmovieŌĆØ node and a ŌĆ£closeGFXmovieŌĆØ node. The openGFXmovie node needs to be connected to the closeGFXmovie node, using a ŌĆ£VariableŌĆØ wiring them both by their ŌĆ£Movie PlayerŌĆØ connectors. The .swf then needs to be applied to the ŌĆ£MovieŌĆØ property for the openGFXmovie and the variable connected to the ŌĆ£Movie PlayerŌĆØ connecters. The openGFXmovie node should then be wired into the used trigger to activate the mini-game. The closeGFXmovie node needs to be wired to the toggle cinematic mode to turn it off, so the player can move when the mini-game closes. 11
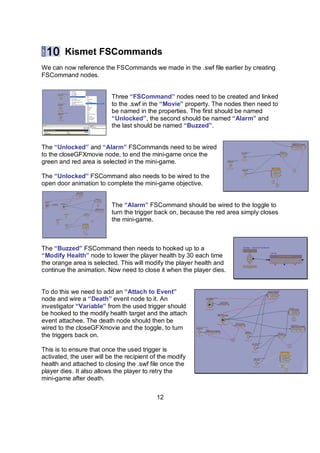
- 12. Kismet FSCommands We can now reference the FSCommands we made in the .swf file earlier by creating FSCommand nodes. Three ŌĆ£FSCommandŌĆØ nodes need to be created and linked to the .swf in the ŌĆ£MovieŌĆØ property. The nodes then need to be named in the properties. The first should be named ŌĆ£UnlockedŌĆØ, the second should be named ŌĆ£AlarmŌĆØ and the last should be named ŌĆ£BuzzedŌĆØ. The ŌĆ£UnlockedŌĆØ and ŌĆ£AlarmŌĆØ FSCommands need to be wired to the closeGFXmovie node, to end the mini-game once the green and red area is selected in the mini-game. The ŌĆ£UnlockedŌĆØ FSCommand also needs to be wired to the open door animation to complete the mini-game objective. The ŌĆ£AlarmŌĆØ FSCommand should be wired to the toggle to turn the trigger back on, because the red area simply closes the mini-game. The ŌĆ£BuzzedŌĆØ FSCommand then needs to hooked up to a ŌĆ£Modify HealthŌĆØ node to lower the player health by 30 each time the orange area is selected. This will modify the player health and continue the animation. Now need to close it when the player dies. To do this we need to add an ŌĆ£Attach to EventŌĆØ node and wire a ŌĆ£DeathŌĆØ event node to it. An investigator ŌĆ£VariableŌĆØ from the used trigger should be hooked to the modify health target and the attach event attachee. The death node should then be wired to the closeGFXmovie and the toggle, to turn the triggers back on. This is to ensure that once the used trigger is activated, the user will be the recipient of the modify health and attached to closing the .swf file once the player dies. It also allows the player to retry the mini-game after death. 12
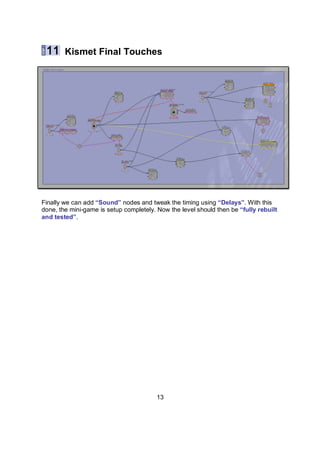
- 13. Kismet Final Touches Finally we can add ŌĆ£SoundŌĆØ nodes and tweak the timing using ŌĆ£DelaysŌĆØ. With this done, the mini-game is setup completely. Now the level should then be ŌĆ£fully rebuilt and testedŌĆØ. 13
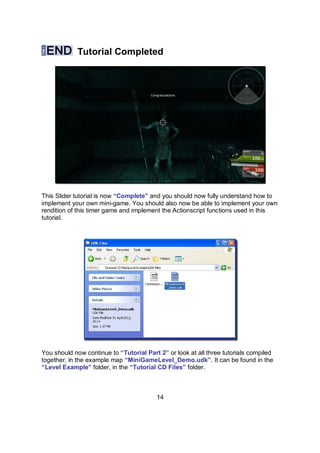
- 14. Tutorial Completed This ║▌║▌▀Żr tutorial is now ŌĆ£CompleteŌĆØ and you should now fully understand how to implement your own mini-game. You should also now be able to implement your own rendition of this timer game and implement the Actionscript functions used in this tutorial. You should now continue to ŌĆ£Tutorial Part 2ŌĆØ or look at all three tutorials compiled together, in the example map ŌĆ£MiniGameLevel_Demo.udkŌĆØ. It can be found in the ŌĆ£Level ExampleŌĆØ folder, in the ŌĆ£Tutorial CD FilesŌĆØ folder. 14