Tugasan 4 : Menggunakan motion tween & motion guide
•Download as DOC, PDF•
0 likes•286 views

This document provides instructions for creating an animation in Flash using motion tweening and motion guides. It instructs the user to draw circles on different layers and convert them to symbols, then create motion tweens to move the circles across the stage from frame 1 to frame 20. Next, it has the user add text layers and create motion tweens to animate the letters. Finally, it describes using the motion guide tool to draw path lines that the circles and letters will follow in their motion tweens from frame 40 onwards. The full animation is then tested and saved.


Tugasan 4 : Menggunakan motion tween & motion guide
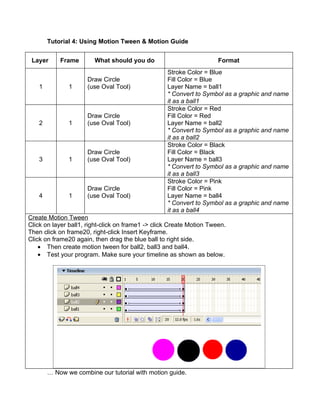
- 1. Tutorial 4: Using Motion Tween & Motion Guide Layer Frame What should you do Format Stroke Color = Blue Draw Circle Fill Color = Blue 1 1 (use Oval Tool) Layer Name = ball1 * Convert to Symbol as a graphic and name it as a ball1 Stroke Color = Red Draw Circle Fill Color = Red 2 1 (use Oval Tool) Layer Name = ball2 * Convert to Symbol as a graphic and name it as a ball2 Stroke Color = Black Draw Circle Fill Color = Black 3 1 (use Oval Tool) Layer Name = ball3 * Convert to Symbol as a graphic and name it as a ball3 Stroke Color = Pink Draw Circle Fill Color = Pink 4 1 (use Oval Tool) Layer Name = ball4 * Convert to Symbol as a graphic and name it as a ball4 Create Motion Tween Click on layer ball1, right-click on frame1 -> click Create Motion Tween. Then click on frame20, right-click Insert Keyframe. Click on frame20 again, then drag the blue ball to right side. • Then create motion tween for ball2, ball3 and ball4. • Test your program. Make sure your timeline as shown as below. … Now we combine our tutorial with motion guide.
- 2.  Click on layer ball4, insert 4 another layer.  Then, set the following properties. Layer Frame What should you do Format Font Color = Red Click on Frame20 Font Size = 59 5 1 Right-click -> Insert Keyframe Layer Name = M Type the text M * Convert to Symbol as a graphic and name it as a M Font Color = Green Click on Frame20 Font Size = 59 6 2 Right-click -> Insert Keyframe Layer Name = R Type the text R * Convert to Symbol as a graphic and name it as a R Font Color = Blue Click on Frame20 Font Size = 59 7 3 Right-click -> Insert Keyframe Layer Name = S Type the text S * Convert to Symbol as a graphic and name it as a S Font Color = Yellow Click on Frame20 Font Size = 59 8 4 Right-click -> Insert Keyframe Layer Name = M Type the text M * Convert to Symbol as a graphic and name it as a M Create Motion Tween For layer M, R, S and M, Build up the animation containing the motion tween. Refer to previous step (or previous module) to set up this animation. Use frame40 to insert keyframe. Create Motion Guide  Click on layer M -> right-click, choose Add Motion Guide.  Automatically, layer Guide:M appears.  Then, click on layer Guide:M.  Choose Pencil Tool from the Panel Tool. Set Smooth at Panel Options.  Draw the line on the stage as follow.  For layer ball1, ball2, ball3 and ball4, insert extra Keyframe at frame40.  Make sure your timeline as shown as below.
- 3.  Test your program.  Then, create another motion tween and motion guide for layer R, S and M.  Save the file a Tutorial 4.
- 4.  Well done !!!!!!