Rytech sites template building
- 1. Customize a Template Make a template your very own! RytechSites.com
- 2. Topics 1. What should it look like 2. Why select a specific template 3. Templates vs. Styles 4. Basic Config Settings 5. Hide Article on home page 6. New Style and how to customize 7. Add new class to module 8. Find Gradient background trick 9. Apply new background style to custom.css 10.Verify everything works!
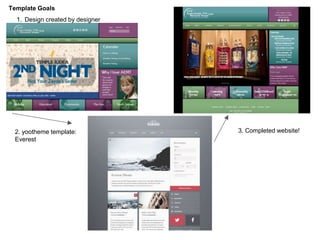
- 3. 1. Design created by designer 2. yootheme template: Everest 3. Completed website! Template Goals
- 4. Why use Everest Template? 1.Menu ‘system’ and layout is similar 2.Overall structure is similar 3.Module positions exist as needed
- 5. A little information about YooTheme Templates 1. Every template company uses a different ‘framework’ 2. Rocketheme → Gantry 3. Yootheme → Warp 4. The frame work determines how the customizaton works 5. Even Warp Frameworks (depending on version 6 or 7, work completely differently. 6. Any frame work takes time to learn, and get used to, there are pros and cons with all of the various frameworks
- 6. Templates - Styles vs. Templates Styles This screen shows the list of templates, click on the template NAME to get options for that template (depending on framework used) Templates This list the templates and the FILES associated with them, to edit the files (custom.css) this is the place to go. Or click on the template in the last column to get to template files
- 7. Important Basic Configuration Settings 1. Settings 2. Layouts 3. Modules Determine what types of screens modules appear on, and module styling
- 8. Set home page to NOT display article For this site, the design was determined to not include an article on the home page For Yootheme to do this, the layout needs to have ‘checked’ NOT to DISPLAY content, but it needs to display content on other pages. 1. Create NEW LAYOUT → called home 2. Click Hide System Output 1. Select Assignment Menu to just HOME PAGE
- 9. Make a copy of a style in Customize View 1. click on customizer 2. Select style that looks the ‘closest’ to what you are trying to build 3. Click Copy 4. Type name ‘aemt’ this name can not be changed later 5. A folder is created in the ‘styles’ folder of the template with this name.
- 10. Changes to make in Customizer The ‘Customizer’ View allows you to make many changes to the template. Sometimes it is ‘trial’ and error to verify that the changes are what you would like to do. Each time these changes are applied, they apply to the NEW STYLE only. Be sure to select the STYLE FIRST that is being adjusted 1. Click on Advanced mode to see all options 2. To change screen width 3. Change color of Text 4. Change Font styles for Body 5. Change font styles for heading 6. For any options click on ‘MORE’ to expand options 7. Click SAVE to save changes
- 11. Apply new Style to Template 1. Click on Options 2. Click on Layouts on ‘left side’ 3. Select Style as the new style
- 12. Assign a module to utilize a gradient background, or new styling Why I love AEMT This is a simple NEWSFLASH type module, it randomly selects an article from a category that is selected. Each time the screen is refreshed a different article will appear. The ‘title’ of the article is the person’s name 1. some basic options in newsflash 2. in Module Class Suffix put ‘ box-purple’ (notice the space to the left of ‘box’)
- 13. Create Gradient for colors 1. Determine the ‘css code’ for the gradient that is needed 2. visit: http://colorzilla.com/gradient- editor 3. Select color range 4. determine orientation (vertical or horizontal) 5. copy the css code 6. paste code into notepad, and save to use for later
- 14. 1. View Folder Structure of the ‘new style’ 2. Click on Template Name ‘ last column’ 3. Click on styles 4. See aemt This is the new ‘folder’ that was created when the style was made 5. To add a new file (custom.css) to this folder is useful if you need to create custom.css rules 6. It is possible to also create an images folder her to store images specific to this style of a template Template Folder Structure
- 15. Create new File in new directory 1. Click on New File 2. Click on the folder name (might have to hit <ctrl> <-> to make screen small enough to view 3. click on file type (css), type in file name, custom 4. Click Create
- 16. Create new style in custom.css 1. Go to the Temple File 2. Find custom.css 3. Copy the data from the gradient into the style: 4. .box-purple 5. .box-purple h3 (this defines the green text for the header) .box-purple h3 { color: #84b07b !important; } .box-purple { padding: 10px !important; color: #fff; /* Permalink - use to edit and share this gradient: http://colorzilla.com/gradient- editor/#864d7a+18,622850+100 */ background: #864d7a; /* Old browsers */ /* IE9 SVG, needs conditional override of 'filter' to 'none' */ background: -moz-linear-gradient(top, #864d7a 18%, #622850 100%); /* FF3.6+ */ background: -webkit-gradient(linear, left top, left bottom, color-stop(18%,#864d7a), color- stop(100%,#622850)); /* Chrome,Safari4+ */ background: -webkit-linear-gradient(top, #864d7a 18%,#622850 100%); /* Chrome10+,Safari5.1+ */ background: -o-linear-gradient(top, #864d7a 18%,#622850 100%); /* Opera 11.10+ */ background: -ms-linear-gradient(top, #864d7a 18%,#622850 100%); /* IE10+ */ background: linear-gradient(to bottom, #864d7a 18%,#622850 100%); /* W3C */ filter: progid:DXImageTransform.Microsoft.gradient( startColorstr='#864d7a', endColorstr='#622850',GradientType=0 ); /* IE6-8 */ }
- 17. Verify styling 1. Right click on the header 2. select ‘inspect element’ 3. View bottom half of the screen to see… .box-purple h3


