Steps on how to move a wheel of car
•Download as PPTX, PDF•
0 likes•404 views

This document provides steps for creating a basic animation of a moving car in Adobe Flash. It defines key animation terms like animation, frames, key frames, and tweening. The steps instruct the user to open Flash, create a new symbol, draw a circle and lines to make wheels, add key frames, apply classic tweening to make the wheels turn, create a car body layer, position the wheels under the body, add more key frames to move the car from side to side, and press play to loop the animation. The document concludes by suggesting an exercise to create your own moving vehicle animation with a background.


Steps on how to move a wheel of car
- 1. This topic are all about STEPS for Making to move a car. Prepared by: Mr. Nestor Miguel T. Pimentel Computer Instructor
- 2. Definitions of term: ï‚— ANIMATION ï‚— Animation is the process of making the illusion of motion and the illusion of change by means of the rapid succession of sequential images that minimally differ from each other.
- 3. References: ï‚— Frame ï‚— The drawings are called "frames" because their position in time is measured in frames on a strip of film. ï‚— Key Frame ï‚— A key frame in animation and filmmaking is a drawing that defines the starting and ending points of any smooth transition..
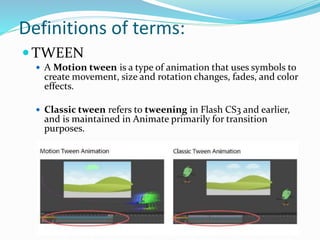
- 4. Definitions of terms: ï‚—TWEEN ï‚— A Motion tween is a type of animation that uses symbols to create movement, size and rotation changes, fades, and color effects. ï‚— Classic tween refers to tweening in Flash CS3 and earlier, and is maintained in Animate primarily for transition purposes.
- 5. Lets get started by following the steps.
- 6. STEPS: ï‚— Open the Adobe Flash Macromedia under Adobe Program.
- 7. STEPS:  Next, once Adobe Flash environment appear like shown below select for ‘ActionScript3’.  Next, Create New Symbol then press Ok.
- 8. STEPS:  The ‘ActionScript3’ will be opened as shown right.  Next, Create now circle then adjust on thickness, outline, fill color based on your preference.
- 9. STEPS:  Next,’ create circle with lines vertically.  Then, create line across or horizontally.  Next, Insert a frame.
- 10. STEPS: ï‚— After Inserting Frame, this time we insert key Frame. ï‚— Next, we apply CLASSIC TWEEN. REF: Frame and Key Frame.
- 11. STEPS: ï‚— So TWEEN is finished, next step is we create NEW LAYER then draw a body of a CAR as show below.
- 12. STEPS: ï‚— Next, let us move the wheel and position it under the body of a car. ï‚— IF FINISH, let us apply now Insert a keyframe at around the 60-frame point depending on how fast you want your car. Then add a CLASSIC TWEEN. Remember that the less frames you have, the quicker your animation will be.
- 13. STEPS: ï‚— Next, to take effect the CLASSIC TWEEN, you must click and choose CREATE CLASSIC TWEEN as show below.
- 14. STEPS: ï‚— CLASSIC TWEEN is applied, make sure you apply key frames of 60. Then move your car to LEFT SIDE. ï‚— Then, move your car to RIGHT SIDE.
- 15. STEPS: ï‚— LAST, press CTRL + Enter. And the car will move in loop.
- 16. DEMO OUTPUT:
- 17. QUESTION?
- 18. EXERCISE: ï‚— CREATE YOUR OWN MOVING CAR OR ANY VEHICLE AND APPLY A ROAD OR CITY BUILDINGS OR FOREST AS BACKGROUND.
- 21. END.