Aec1105
- 1. Lab AEC-1105 Get hands-On Experience with Creating Enhanced Patterns of Expertise in IBM PureApplication System February 2015
- 2. Please Note IBMŌĆÖs statements regarding its plans, directions, and intent are subject to change or withdrawal without notice at IBMŌĆÖs sole discretion. Information regarding potential future products is intended to outline our general product direction and it should not be relied on in making a purchasing decision. The information mentioned regarding potential future products is not a commitment, promise, or legal obligation to deliver any material, code or functionality. Information about potential future products may not be incorporated into any contract. The development, release, and timing of any future features or functionality described for our products remains at our sole discretion. Performance is based on measurements and projections using standard IBM benchmarks in a controlled environment. The actual throughput or performance that any user will experience will vary depending upon many factors, including considerations such as the amount of multiprogramming in the userŌĆÖs job stream, the I/O configuration, the storage configuration, and the workload processed. Therefore, no assurance can be given that an individual user will achieve results similar to those stated here. Acknowledgements and Disclaimers Availability. References in this presentation to IBM products, programs, or services do not imply that they will be available in all countries in which IBM operates. The workshops, sessions and materials have been prepared by IBM or the session speakers and reflect their own views. They are provided for informational purposes only, and are neither intended to, nor shall have the effect of being, legal or other guidance or advice to any participant. While efforts were made to verify the completeness and accuracy of the information contained in this presentation, it is provided AS-IS without warranty of any kind, express or implied. IBM shall not be responsible for any damages arising out of the use of, or otherwise related to, this presentation or any other materials. Nothing contained in this presentation is intended to, nor shall have the effect of, creating any warranties or representations from IBM or its suppliers or licensors, or altering the terms and conditions of the applicable license agreement governing the use of IBM software. All customer examples described are presented as illustrations of how those customers have used IBM products and the results they may have achieved. Actual environmental costs and performance characteristics may vary by customer. Nothing contained in these materials is intended to, nor shall have the effect of, stating or implying that any activities undertaken by you will result in any specific sales, revenue growth or other results. ┬® Copyright IBM Corporation 2015. All rights reserved. ŌĆó U.S. Government Users Restricted Rights - Use, duplication or disclosure restricted by GSA ADP Schedule Contract with IBM Corp. Please update paragraph below for the particular product or family brand trademarks you mention such as WebSphere, DB2, Maximo, Clearcase, Lotus, etc IBM, the IBM logo, ibm.com, Interconnect, [IBM Brand, if trademarked], and [IBM Product, if trademarked] are trademarks or registered trademarks of International Business Machines Corporation in the United States, other countries, or both. If these and other IBM
- 3. trademarked terms are marked on their first occurrence in this information with a trademark symbol (┬« or Ōäó), these symbols indicate U.S. registered or common law trademarks owned by IBM at the time this information was published. Such trademarks may also be registered or common law trademarks in other countries. A current list of IBM trademarks is available on the Web at ŌĆ£Copyright and trademark informationŌĆØ at www.ibm.com/legal/copytrade.shtml If you have mentioned trademarks that are not from IBM, please update and add the following lines: [Insert any special 3rd party trademark names/attributions here] Other company, product, or service names may be trademarks or service marks of others. REMINDER: Please follow the guidelines for copying third party materials. Third party screen shots, logos, presentations and website content are copyrighted materials owned by the third party, and as such we need permission from the third party to use them. Also, be sure the information you put on a chart is verifiable. Be sure to cite the source on your deck when using words, ideas, facts, photos, news clips or other expression that did not originate from yourself. This applies even if the content is publicly available and not confidential. If you have any questions, please contact your IP Attorney.
- 4. Contents Requirements and prerequisites 7 ┬Ā Add script packages to the catalog 8 ┬Ā Create a new pattern using a WebSphere Application Server pattern template 10 ┬Ā Set pattern level parameters 10 ┬Ā Add a database node to the pattern 10 ┬Ā Configure the database node 10 ┬Ā Configure the deployment manager node 12 ┬Ā Configure the custom nodes 13 ┬Ā Configure the IBM HTTP Server node 14 ┬Ā Configure component and script ordering for the pattern 14 ┬Ā Save the pattern 15 ┬Ā Deploy the pattern 16 ┬Ā Test the deployed application 19 ┬Ā
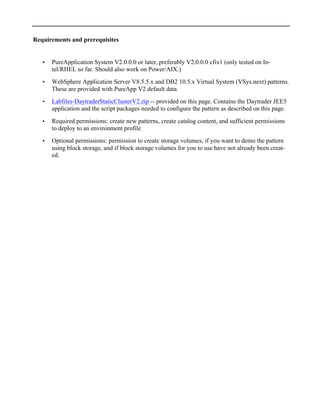
- 6. Requirements and prerequisites ŌĆó PureApplication System V2.0.0.0 or later, preferably V2.0.0.0 cfix1 (only tested on In- tel/RHEL so far. Should also work on Power/AIX.) ŌĆó WebSphere Application Server V8.5.5.x and DB2 10.5.x Virtual System (VSys.next) patterns. These are provided with PureApp V2 default data ŌĆó Labfiles-DaytraderStaticClusterV2.zip -- provided on this page. Contains the Daytrader JEE5 application and the script packages needed to configure the pattern as described on this page. ŌĆó Required permissions: create new patterns, create catalog content, and sufficient permissions to deploy to an environment profile ŌĆó Optional permissions: permission to create storage volumes, if you want to demo the pattern using block storage, and if block storage volumes for you to use have not already been creat- ed.
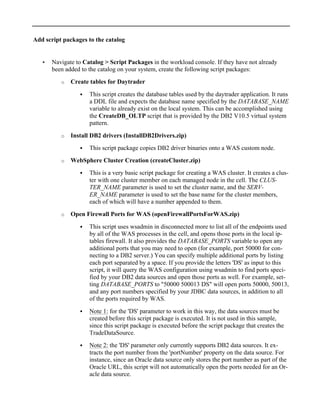
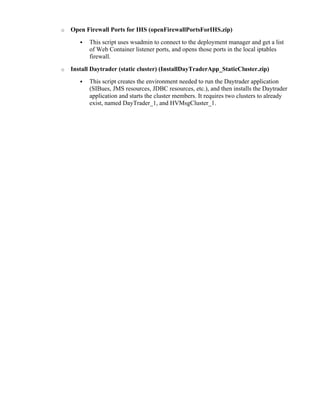
- 7. Add script packages to the catalog ŌĆó Navigate to Catalog > Script Packages in the workload console. If they have not already been added to the catalog on your system, create the following script packages: o Create tables for Daytrader ! This script creates the database tables used by the daytrader application. It runs a DDL file and expects the database name specified by the DATABASE_NAME variable to already exist on the local system. This can be accomplished using the CreateDB_OLTP script that is provided by the DB2 V10.5 virtual system pattern. o Install DB2 drivers (InstallDB2Drivers.zip) ! This script package copies DB2 driver binaries onto a WAS custom node. o WebSphere Cluster Creation (createCluster.zip) ! This is a very basic script package for creating a WAS cluster. It creates a clus- ter with one cluster member on each managed node in the cell. The CLUS- TER_NAME parameter is used to set the cluster name, and the SERV- ER_NAME parameter is used to set the base name for the cluster members, each of which will have a number appended to them. o Open Firewall Ports for WAS (openFirewallPortsForWAS.zip) ! This script uses wsadmin in disconnected more to list all of the endpoints used by all of the WAS processes in the cell, and opens those ports in the local ip- tables firewall. It also provides the DATABASE_PORTS variable to open any additional ports that you may need to open (for example, port 50000 for con- necting to a DB2 server.) You can specify multiple additional ports by listing each port separated by a space. If you provide the letters 'DS' as input to this script, it will query the WAS configuration using wsadmin to find ports speci- fied by your DB2 data sources and open those ports as well. For example, set- ting DATABASE_PORTS to "50000 500013 DS" will open ports 50000, 50013, and any port numbers specified by your JDBC data sources, in addition to all of the ports required by WAS. ! Note 1: for the 'DS' parameter to work in this way, the data sources must be created before this script package is executed. It is not used in this sample, since this script package is executed before the script package that creates the TradeDataSource. ! Note 2: the 'DS' parameter only currently supports DB2 data sources. It ex- tracts the port number from the 'portNumber' property on the data source. For instance, since an Oracle data source only stores the port number as part of the Oracle URL, this script will not automatically open the ports needed for an Or- acle data source.
- 8. o Open Firewall Ports for IHS (openFirewallPortsForIHS.zip) ! This script uses wsadmin to connect to the deployment manager and get a list of Web Container listener ports, and opens those ports in the local iptables firewall. o Install Daytrader (static cluster) (InstallDayTraderApp_StaticCluster.zip) ! This script creates the environment needed to run the Daytrader application (SIBues, JMS resources, JDBC resources, etc.), and then installs the Daytrader application and starts the cluster members. It requires two clusters to already exist, named DayTrader_1, and HVMsgCluster_1.
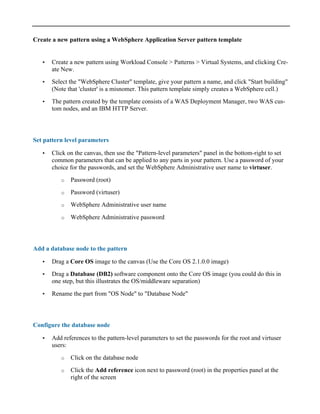
- 9. Create a new pattern using a WebSphere Application Server pattern template ŌĆó Create a new pattern using Workload Console > Patterns > Virtual Systems, and clicking Cre- ate New. ŌĆó Select the "WebSphere Cluster" template, give your pattern a name, and click "Start building" (Note that 'cluster' is a misnomer. This pattern template simply creates a WebSphere cell.) ŌĆó The pattern created by the template consists of a WAS Deployment Manager, two WAS cus- tom nodes, and an IBM HTTP Server. Set pattern level parameters ŌĆó Click on the canvas, then use the "Pattern-level parameters" panel in the bottom-right to set common parameters that can be applied to any parts in your pattern. Use a password of your choice for the passwords, and set the WebSphere Administrative user name to virtuser. o Password (root) o Password (virtuser) o WebSphere Administrative user name o WebSphere Administrative password Add a database node to the pattern ŌĆó Drag a Core OS image to the canvas (Use the Core OS 2.1.0.0 image) ŌĆó Drag a Database (DB2) software component onto the Core OS image (you could do this in one step, but this illustrates the OS/middleware separation) ŌĆó Rename the part from "OS Node" to "Database Node" Configure the database node ŌĆó Add references to the pattern-level parameters to set the passwords for the root and virtuser users: o Click on the database node o Click the Add reference icon next to password (root) in the properties panel at the right of the screen
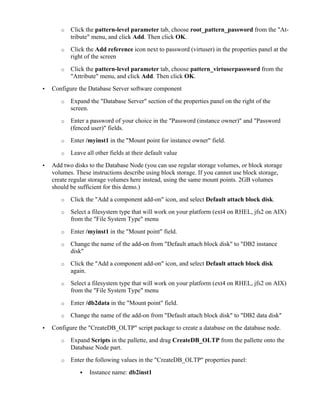
- 10. o Click the pattern-level parameter tab, choose root_pattern_password from the "At- tribute" menu, and click Add. Then click OK. o Click the Add reference icon next to password (virtuser) in the properties panel at the right of the screen o Click the pattern-level parameter tab, choose pattern_virtuserpassword from the "Attribute" menu, and click Add. Then click OK. ŌĆó Configure the Database Server software component o Expand the "Database Server" section of the properties panel on the right of the screen. o Enter a password of your choice in the "Password (instance owner)" and "Password (fenced user)" fields. o Enter /myinst1 in the "Mount point for instance owner" field. o Leave all other fields at their default value ŌĆó Add two disks to the Database Node (you can use regular storage volumes, or block storage volumes. These instructions describe using block storage. If you cannot use block storage, create regular storage volumes here instead, using the same mount points. 2GB volumes should be sufficient for this demo.) o Click the "Add a component add-on" icon, and select Default attach block disk. o Select a filesystem type that will work on your platform (ext4 on RHEL, jfs2 on AIX) from the "File System Type" menu o Enter /myinst1 in the "Mount point" field. o Change the name of the add-on from "Default attach block disk" to "DB2 instance disk" o Click the "Add a component add-on" icon, and select Default attach block disk again. o Select a filesystem type that will work on your platform (ext4 on RHEL, jfs2 on AIX) from the "File System Type" menu o Enter /db2data in the "Mount point" field. o Change the name of the add-on from "Default attach block disk" to "DB2 data disk" ŌĆó Configure the "CreateDB_OLTP" script package to create a database on the database node. o Expand Scripts in the pallette, and drag CreateDB_OLTP from the pallette onto the Database Node part. o Enter the following values in the "CreateDB_OLTP" properties panel: ! Instance name: db2inst1
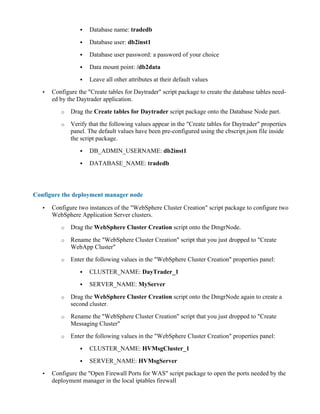
- 11. ! Database name: tradedb ! Database user: db2inst1 ! Database user password: a password of your choice ! Data mount point: /db2data ! Leave all other attributes at their default values ŌĆó Configure the "Create tables for Daytrader" script package to create the database tables need- ed by the Daytrader application. o Drag the Create tables for Daytrader script package onto the Database Node part. o Verify that the following values appear in the "Create tables for Daytrader" properties panel. The default values have been pre-configured using the cbscript.json file inside the script package. ! DB_ADMIN_USERNAME: db2inst1 ! DATABASE_NAME: tradedb Configure the deployment manager node ŌĆó Configure two instances of the "WebSphere Cluster Creation" script package to configure two WebSphere Application Server clusters. o Drag the WebSphere Cluster Creation script onto the DmgrNode. o Rename the "WebSphere Cluster Creation" script that you just dropped to "Create WebApp Cluster" o Enter the following values in the "WebSphere Cluster Creation" properties panel: ! CLUSTER_NAME: DayTrader_1 ! SERVER_NAME: MyServer o Drag the WebSphere Cluster Creation script onto the DmgrNode again to create a second cluster. o Rename the "WebSphere Cluster Creation" script that you just dropped to "Create Messaging Cluster" o Enter the following values in the "WebSphere Cluster Creation" properties panel: ! CLUSTER_NAME: HVMsgCluster_1 ! SERVER_NAME: HVMsgServer ŌĆó Configure the "Open Firewall Ports for WAS" script package to open the ports needed by the deployment manager in the local iptables firewall
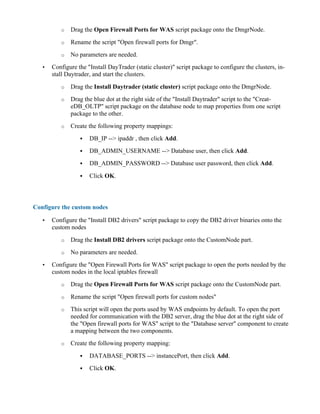
- 12. o Drag the Open Firewall Ports for WAS script package onto the DmgrNode. o Rename the script "Open firewall ports for Dmgr". o No parameters are needed. ŌĆó Configure the "Install DayTrader (static cluster)" script package to configure the clusters, in- stall Daytrader, and start the clusters. o Drag the Install Daytrader (static cluster) script package onto the DmgrNode. o Drag the blue dot at the right side of the "Install Daytrader" script to the "Creat- eDB_OLTP" script package on the database node to map properties from one script package to the other. o Create the following property mappings: ! DB_IP --> ipaddr , then click Add. ! DB_ADMIN_USERNAME --> Database user, then click Add. ! DB_ADMIN_PASSWORD --> Database user password, then click Add. ! Click OK. Configure the custom nodes ŌĆó Configure the "Install DB2 drivers" script package to copy the DB2 driver binaries onto the custom nodes o Drag the Install DB2 drivers script package onto the CustomNode part. o No parameters are needed. ŌĆó Configure the "Open Firewall Ports for WAS" script package to open the ports needed by the custom nodes in the local iptables firewall o Drag the Open Firewall Ports for WAS script package onto the CustomNode part. o Rename the script "Open firewall ports for custom nodes" o This script will open the ports used by WAS endpoints by default. To open the port needed for communication with the DB2 server, drag the blue dot at the right side of the "Open firewall ports for WAS" script to the "Database server" component to create a mapping between the two components. o Create the following property mapping: ! DATABASE_PORTS --> instancePort, then click Add. ! Click OK.
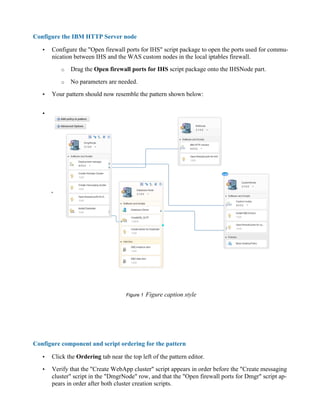
- 13. Configure the IBM HTTP Server node ŌĆó Configure the "Open firewall ports for IHS" script package to open the ports used for commu- nication between IHS and the WAS custom nodes in the local iptables firewall. o Drag the Open firewall ports for IHS script package onto the IHSNode part. o No parameters are needed. ŌĆó Your pattern should now resemble the pattern shown below: ŌĆó Figure 1 Figure caption style Configure component and script ordering for the pattern ŌĆó Click the Ordering tab near the top left of the pattern editor. ŌĆó Verify that the "Create WebApp cluster" script appears in order before the "Create messaging cluster" script in the "DmgrNode" row, and that the "Open firewall ports for Dmgr" script ap- pears in order after both cluster creation scripts.
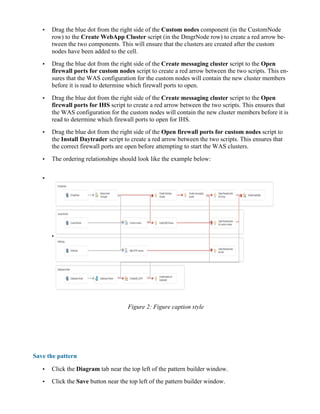
- 14. ŌĆó Drag the blue dot from the right side of the Custom nodes component (in the CustomNode row) to the Create WebApp Cluster script (in the DmgrNode row) to create a red arrow be- tween the two components. This will ensure that the clusters are created after the custom nodes have been added to the cell. ŌĆó Drag the blue dot from the right side of the Create messaging cluster script to the Open firewall ports for custom nodes script to create a red arrow between the two scripts. This en- sures that the WAS configuration for the custom nodes will contain the new cluster members before it is read to determine which firewall ports to open. ŌĆó Drag the blue dot from the right side of the Create messaging cluster script to the Open firewall ports for IHS script to create a red arrow between the two scripts. This ensures that the WAS configuration for the custom nodes will contain the new cluster members before it is read to determine which firewall ports to open for IHS. ŌĆó Drag the blue dot from the right side of the Open firewall ports for custom nodes script to the Install Daytrader script to create a red arrow between the two scripts. This ensures that the correct firewall ports are open before attempting to start the WAS clusters. ŌĆó The ordering relationships should look like the example below: ŌĆó Figure 2: Figure caption style Save the pattern ŌĆó Click the Diagram tab near the top left of the pattern builder window. ŌĆó Click the Save button near the top left of the pattern builder window.
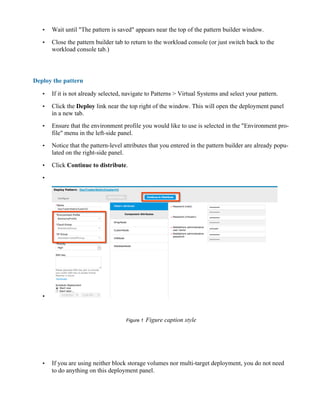
- 15. ŌĆó Wait until "The pattern is saved" appears near the top of the pattern builder window. ŌĆó Close the pattern builder tab to return to the workload console (or just switch back to the workload console tab.) Deploy the pattern ŌĆó If it is not already selected, navigate to Patterns > Virtual Systems and select your pattern. ŌĆó Click the Deploy link near the top right of the window. This will open the deployment panel in a new tab. ŌĆó Ensure that the environment profile you would like to use is selected in the "Environment pro- file" menu in the left-side panel. ŌĆó Notice that the pattern-level attributes that you entered in the pattern builder are already popu- lated on the right-side panel. ŌĆó Click Continue to distribute. ŌĆó ŌĆó Figure 1 Figure caption style ŌĆó If you are using neither block storage volumes nor multi-target deployment, you do not need to do anything on this deployment panel.
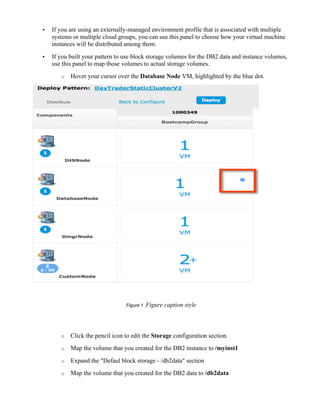
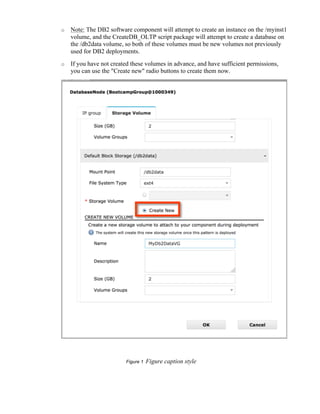
- 16. ŌĆó If you are using an externally-managed environment profile that is associated with multiple systems or multiple cloud groups, you can use this panel to choose how your virtual machine instances will be distributed among them. ŌĆó If you built your pattern to use block storage volumes for the DB2 data and instance volumes, use this panel to map those volumes to actual storage volumes. o Hover your cursor over the Database Node VM, highlighted by the blue dot. Figure 1 Figure caption style o Click the pencil icon to edit the Storage configuration section. o Map the volume that you created for the DB2 instance to /myinst1 o Expand the "Defaul block storage - /db2data" section o Map the volume that you created for the DB2 data to /db2data
- 17. o Note: The DB2 software component will attempt to create an instance on the /myinst1 volume, and the CreateDB_OLTP script package will attempt to create a database on the /db2data volume, so both of these volumes must be new volumes not previously used for DB2 deployments. o If you have not created these volumes in advance, and have sufficient permissions, you can use the "Create new" radio buttons to create them now. Figure 1 Figure caption style
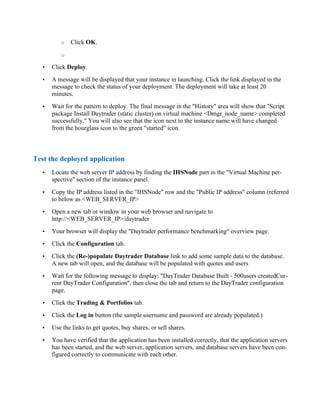
- 18. o Click OK. o ŌĆó Click Deploy. ŌĆó A message will be displayed that your instance in launching. Click the link displayed in the message to check the status of your deployment. The deployment will take at least 20 minutes. ŌĆó Wait for the pattern to deploy. The final message in the "History" area will show that "Script package Install Daytrader (static cluster) on virtual machine <Dmgr_node_name> completed successfully." You will also see that the icon next to the instance name will have changed from the hourglass icon to the green "started" icon. Test the deployed application ŌĆó Locate the web server IP address by finding the IHSNode part in the "Virtual Machine per- spective" section of the instance panel. ŌĆó Copy the IP address listed in the "IHSNode" row and the "Public IP address" column (referred to below as <WEB_SERVER_IP> ŌĆó Open a new tab or window in your web browser and navigate to http://<WEB_SERVER_IP>/daytrader ŌĆó Your browser will display the "Daytrader performance benchmarking" overview page. ŌĆó Click the Configuration tab. ŌĆó Click the (Re-)populate Daytrader Database link to add some sample data to the database. A new tab will open, and the database will be populated with quotes and users ŌĆó Wait for the following message to display: "DayTrader Database Built - 500users createdCur- rent DayTrader Configuration", then close the tab and return to the DayTrader configuration page. ŌĆó Click the Trading & Portfolios tab. ŌĆó Click the Log in button (the sample username and password are already populated.) ŌĆó Use the links to get quotes, buy shares, or sell shares. ŌĆó You have verified that the application has been installed correctly, that the application servers has been started, and the web server, application servers, and database servers have been con- figured correctly to communicate with each other.
- 19. Figure 1 Figure caption style


![Please Note
IBMŌĆÖs statements regarding its plans, directions, and intent are subject to change or
withdrawal without notice at IBMŌĆÖs sole discretion.
Information regarding potential future products is intended to outline our general product
direction and it should not be relied on in making a purchasing decision.
The information mentioned regarding potential future products is not a commitment,
promise, or legal obligation to deliver any material, code or functionality. Information about
potential future products may not be incorporated into any contract. The development,
release, and timing of any future features or functionality described for our products remains
at our sole discretion.
Performance is based on measurements and projections using standard IBM benchmarks in
a controlled environment. The actual throughput or performance that any user will
experience will vary depending upon many factors, including considerations such as the
amount of multiprogramming in the userŌĆÖs job stream, the I/O configuration, the storage
configuration, and the workload processed. Therefore, no assurance can be given that an
individual user will achieve results similar to those stated here.
Acknowledgements and Disclaimers
Availability. References in this presentation to IBM products, programs, or services do not
imply that they will be available in all countries in which IBM operates.
The workshops, sessions and materials have been prepared by IBM or the session
speakers and reflect their own views. They are provided for informational purposes only,
and are neither intended to, nor shall have the effect of being, legal or other guidance or
advice to any participant. While efforts were made to verify the completeness and accuracy
of the information contained in this presentation, it is provided AS-IS without warranty of any
kind, express or implied. IBM shall not be responsible for any damages arising out of the
use of, or otherwise related to, this presentation or any other materials. Nothing contained in
this presentation is intended to, nor shall have the effect of, creating any warranties or
representations from IBM or its suppliers or licensors, or altering the terms and conditions of
the applicable license agreement governing the use of IBM software.
All customer examples described are presented as illustrations of how those customers
have used IBM products and the results they may have achieved. Actual environmental
costs and performance characteristics may vary by customer. Nothing contained in these
materials is intended to, nor shall have the effect of, stating or implying that any activities
undertaken by you will result in any specific sales, revenue growth or other results.
┬® Copyright IBM Corporation 2015. All rights reserved.
ŌĆó U.S. Government Users Restricted Rights - Use, duplication or disclosure
restricted by GSA ADP Schedule Contract with IBM Corp.
Please update paragraph below for the particular product or family brand trademarks you
mention such as WebSphere, DB2, Maximo, Clearcase, Lotus, etc
IBM, the IBM logo, ibm.com, Interconnect, [IBM Brand, if trademarked], and [IBM Product, if
trademarked] are trademarks or registered trademarks of International Business Machines
Corporation in the United States, other countries, or both. If these and other IBM](https://image.slidesharecdn.com/aec1105-150615202839-lva1-app6892/85/Aec1105-2-320.jpg)
![trademarked terms are marked on their first occurrence in this information with a trademark
symbol (┬« or Ōäó), these symbols indicate U.S. registered or common law trademarks owned
by IBM at the time this information was published. Such trademarks may also be registered
or common law trademarks in other countries. A current list of IBM trademarks is available
on the Web at ŌĆ£Copyright and trademark informationŌĆØ at www.ibm.com/legal/copytrade.shtml
If you have mentioned trademarks that are not from IBM, please update and add the
following lines:
[Insert any special 3rd party trademark names/attributions here]
Other company, product, or service names may be trademarks or service marks of
others.
REMINDER: Please follow the guidelines for copying third party materials. Third party
screen shots, logos, presentations and website content are copyrighted materials owned by
the third party, and as such we need permission from the third party to use them. Also, be
sure the information you put on a chart is verifiable. Be sure to cite the source on your deck
when using words, ideas, facts, photos, news clips or other expression that did not originate
from yourself. This applies even if the content is publicly available and not confidential. If
you have any questions, please contact your IP Attorney.](https://image.slidesharecdn.com/aec1105-150615202839-lva1-app6892/85/Aec1105-3-320.jpg)
