Android Development: Build Android App from Scratch

a month ago, i have a change to held a one day workshop about Android development at Phetchaburi Rajabhat University, Thailand. The workshop is attended by students and lecturers. it is a pleasure to me to see many people that excited to learn android development. This is a presentation slide of my presentation. in this presentation you will learn about how to build create a simple to do list app from scratch. content of the presentation slide: - Introduction: what Android is? - Android development tools - Creating Android Project - Understanding the Project Structure - Creating Android Emulator - Running Android Project on Emulator - Running Android Project on Device - Creating User Interface - Manipulating Widget - Creating To Do List App - Integrating SQLite Database to Android Project


Android Development: Build Android App from Scratch
- 1. Android Development: Build Android App from Scratch Taufan Er?yanto, ST. A one day workshop of Android Development at Phetchaburi Rajabhat University, Thailand. In collaboration with Gunadarma University and Phetchaburi Rajabhat University.
- 2. Founder of pongodev.com, mobile application developer and the man who responsible to deliver the app with beautiful user interface and insure that it generates many download with marketing strategy. About taufan@pongodev.com twitter.com/taufan20 linkedin.com/in/taufan20
- 3. portfolio
- 4. Crowdfunding mobile- based application that allows users raise funds for humanity and environmental activities. Donation can be done via smartphone credit and transfer. http://donasia.org
- 5. What do you know about Android?
- 6. 1 billion Android population. Horace dediu
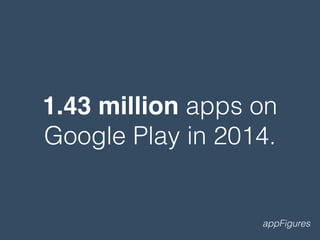
- 7. 1.43 million apps on Google Play in 2014. appFigures
- 8. 268 billion times downloads and generate revenue $77 billion in 2017. Gartner
- 9. Available in all devices, smartphone, watch, tv, and car.
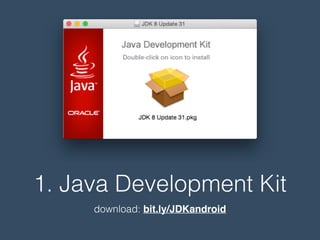
- 11. 1. Java Development Kit download: bit.ly/JDKandroid
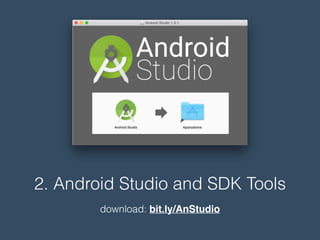
- 12. 2. Android Studio and SDK Tools download: bit.ly/AnStudio
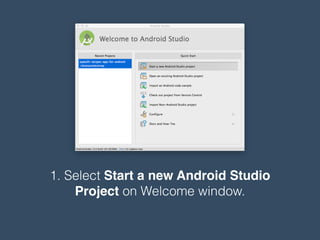
- 14. 1. Select Start a new Android Studio Project on Welcome window.
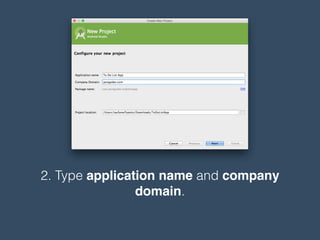
- 15. 2. Type application name and company domain.
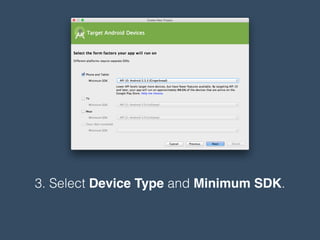
- 16. 3. Select Device Type and Minimum SDK.
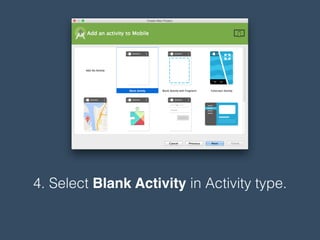
- 17. 4. Select Blank Activity in Activity type.
- 18. 5. Name your ?rst activity and layout ?le.
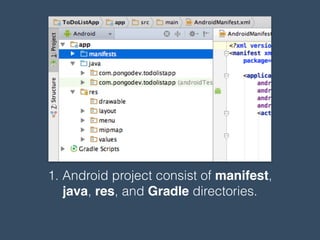
- 20. 1. Android project consist of manifest, java, res, and Gradle directories.
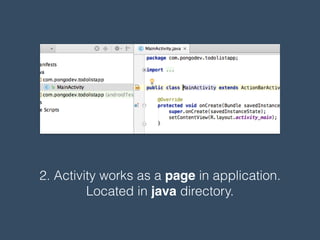
- 21. 2. Activity works as a page in application. Located in java directory.
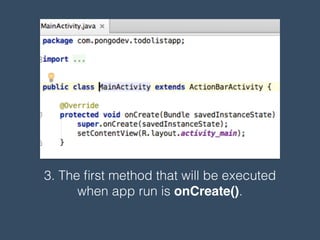
- 22. 3. The ?rst method that will be executed when app run is onCreate().
- 23. 4. Every activity has layout ?le as its user interface. located in res/layout directory.
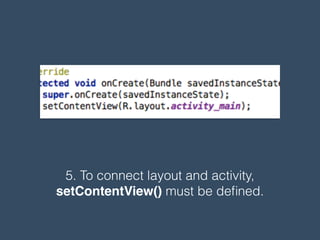
- 24. 5. To connect layout and activity, setContentView() must be de?ned.
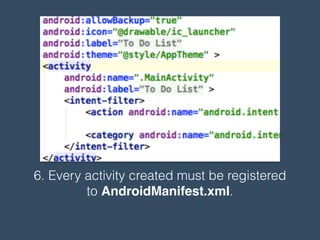
- 25. 6. Every activity created must be registered to AndroidManifest.xml.
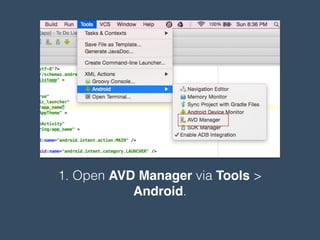
- 27. 1. Open AVD Manager via Tools > Android.
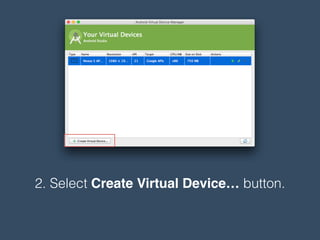
- 28. 2. Select Create Virtual Deviceˇ button.
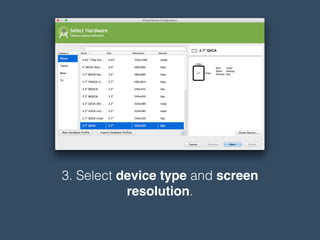
- 29. 3. Select device type and screen resolution.
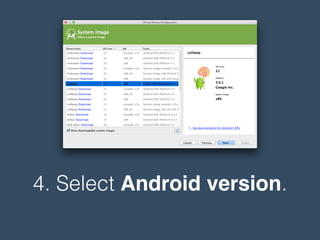
- 30. 4. Select Android version.
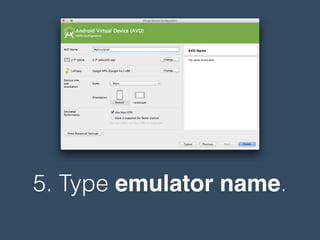
- 31. 5. Type emulator name.
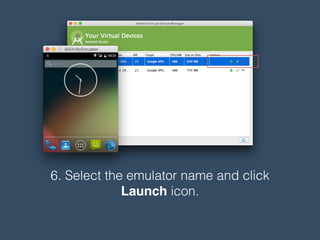
- 32. 6. Select the emulator name and click Launch icon.
- 33. Running Android Project on Emulator
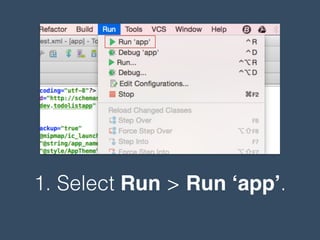
- 34. 1. Select Run > Run ˇ®appˇŻ.
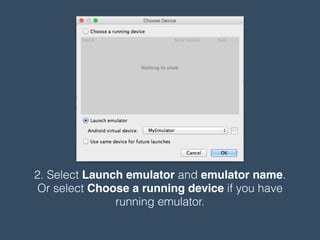
- 35. 2. Select Launch emulator and emulator name. Or select Choose a running device if you have running emulator.
- 36. Running Android Project on Android Device
- 37. 1. On Android device, select Settings > Developer Options. Enable USB Debugging. Note: Android 4.2 and newer go to Settings > About phone and tap Build number seven times.
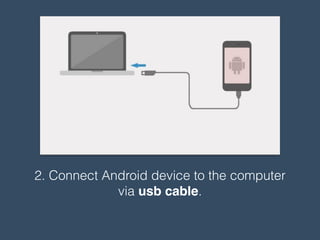
- 38. 2. Connect Android device to the computer via usb cable.
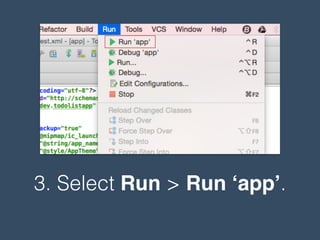
- 39. 3. Select Run > Run ˇ®appˇŻ.
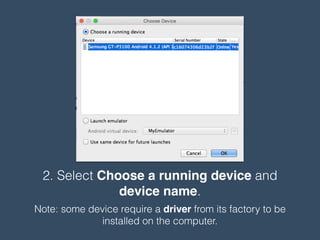
- 40. 2. Select Choose a running device and device name. Note: some device require a driver from its factory to be installed on the computer.
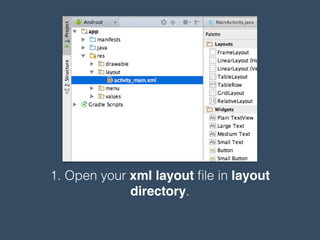
- 42. 1. Open your xml layout ?le in layout directory.
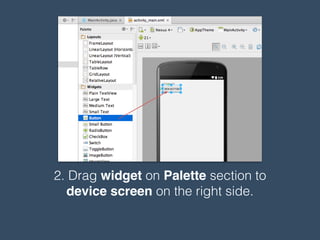
- 43. 2. Drag widget on Palette section to device screen on the right side.
- 44. 3. Con?gure widget properties via properties window on the right bottom corner of the window. Note: important properties are id, layout_width, and layout_height.
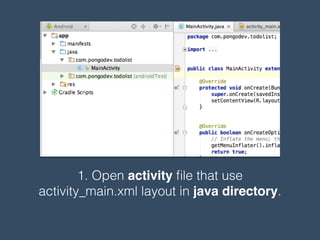
- 46. 1. Open activity ?le that use activity_main.xml layout in java directory.
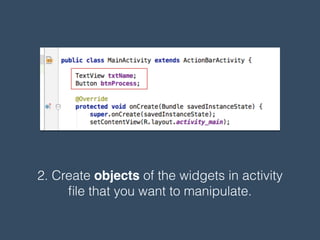
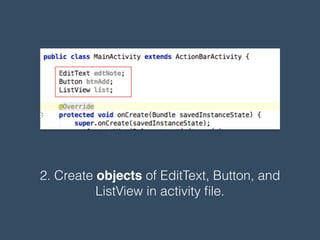
- 47. 2. Create objects of the widgets in activity ?le that you want to manipulate.
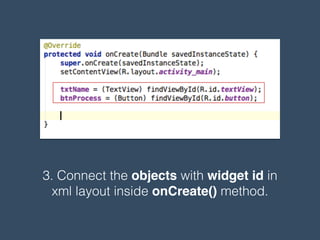
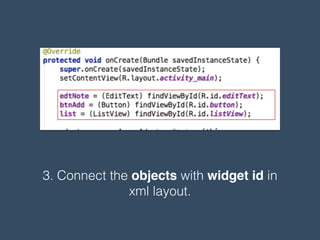
- 48. 3. Connect the objects with widget id in xml layout inside onCreate() method.
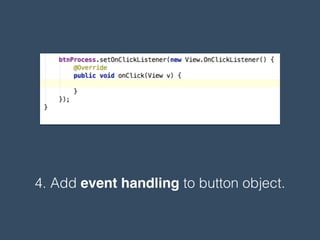
- 49. 4. Add event handling to button object.
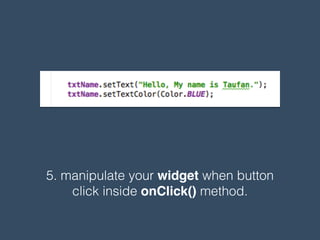
- 50. 5. manipulate your widget when button click inside onClick() method.
- 51. Creating To Do List App
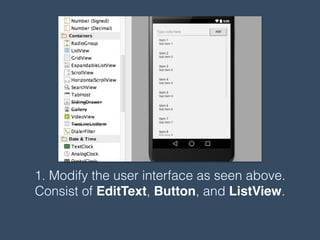
- 52. 1. Modify the user interface as seen above. Consist of EditText, Button, and ListView.
- 53. 2. Create objects of EditText, Button, and ListView in activity ?le.
- 54. 3. Connect the objects with widget id in xml layout.
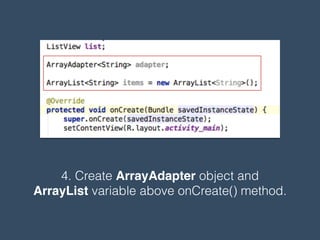
- 55. 4. Create ArrayAdapter object and ArrayList variable above onCreate() method.
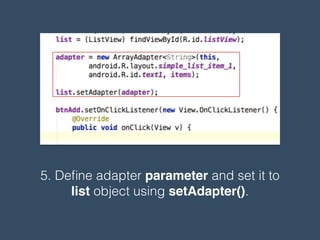
- 56. 5. De?ne adapter parameter and set it to list object using setAdapter().
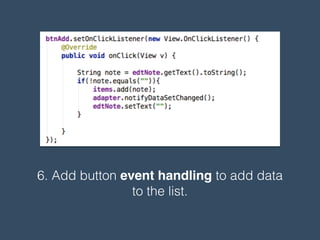
- 57. 6. Add button event handling to add data to the list.
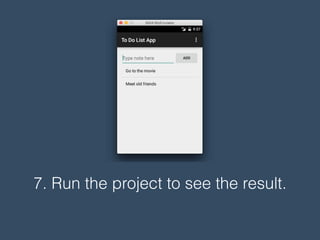
- 58. 7. Run the project to see the result.
- 59. Integrating SQLite Database to Android Project
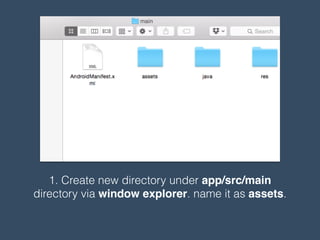
- 60. 1. Create new directory under app/src/main directory via window explorer. name it as assets.
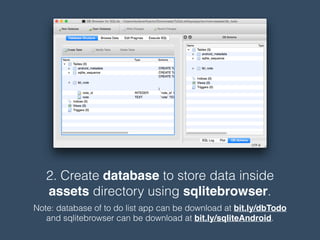
- 61. 2. Create database to store data inside assets directory using sqlitebrowser. Note: database of to do list app can be download at bit.ly/dbTodo and sqlitebrowser can be download at bit.ly/sqliteAndroid.
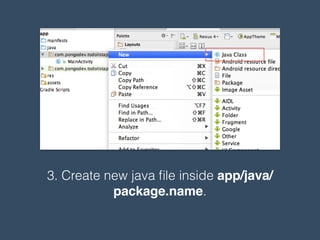
- 62. 3. Create new java ?le inside app/java/ package.name.
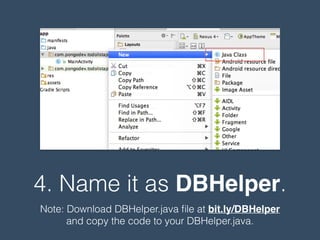
- 63. 4. Name it as DBHelper. Note: Download DBHelper.java ?le at bit.ly/DBHelper and copy the code to your DBHelper.java.
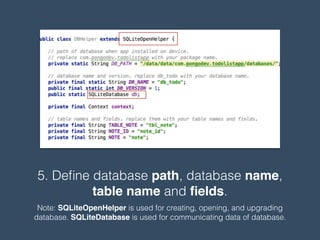
- 64. 5. De?ne database path, database name, table name and ?elds. Note: SQLiteOpenHelper is used for creating, opening, and upgrading database. SQLiteDatabase is used for communicating data of database.
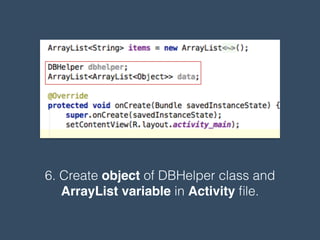
- 65. 6. Create object of DBHelper class and ArrayList variable in Activity ?le.
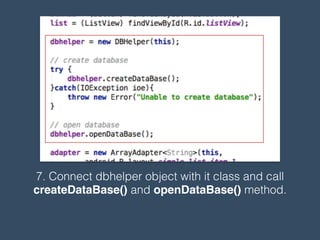
- 66. 7. Connect dbhelper object with it class and call createDataBase() and openDataBase() method.
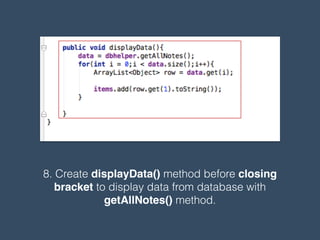
- 67. 8. Create displayData() method before closing bracket to display data from database with getAllNotes() method.
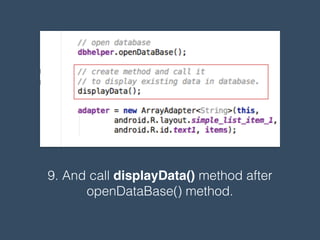
- 68. 9. And call displayData() method after openDataBase() method.
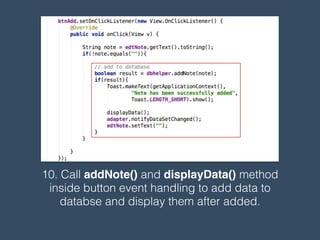
- 69. 10. Call addNote() and displayData() method inside button event handling to add data to databse and display them after added.
- 70. 11. Run the project to see the result.
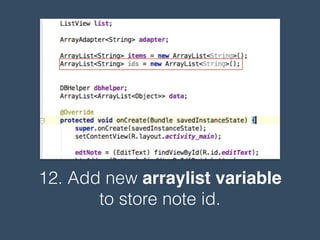
- 71. 12. Add new arraylist variable to store note id.
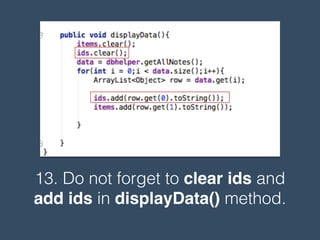
- 72. 13. Do not forget to clear ids and add ids in displayData() method.
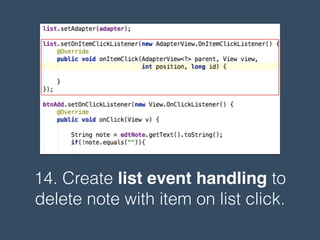
- 73. 14. Create list event handling to delete note with item on list click.
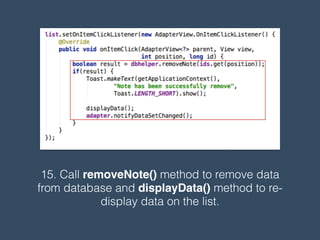
- 74. 15. Call removeNote() method to remove data from database and displayData() method to re- display data on the list.
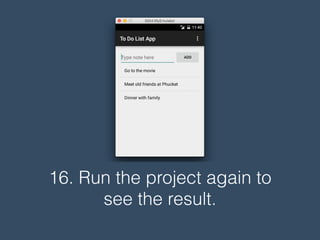
- 75. 16. Run the project again to see the result.
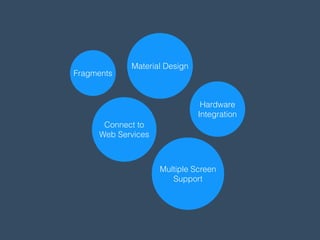
- 76. What do you need to know next to mastering Android development?
- 77. Fragments Material Design Hardware Integration Multiple Screen Support Connect to Web Services
- 78. ¨CJoel Spolsky, Stack Exchange Nothing works better than just improving your product.