![LED (engl. Light Emitting Diode), tj. svjetle?a dioda posebna je vrsta poluvodi?ke diode koja
emitira svjetlost kada je propusno polarizirana, tj. kada kroz nju te?e struja. Prilikom direktne
rekombinacije para elektron-?upljina, emitira se foton svjetla. Takvo svojstvo imaju
poluvodi?i galijev-arsenid (GaAs), galijev-fosfid (GaP) i silicijev-karbid (SiC). Ta pojava se
naziva elektroluminiscencija. Boja emitiranog svjetla ovisi o poluvodi?u, kao i o primjesama
u njemu i varira od infracrvenog preko vidljivog do ultraljubi?astog dijela spektra. Sljede?a
slika prikazuje nekoliko LED dioda.
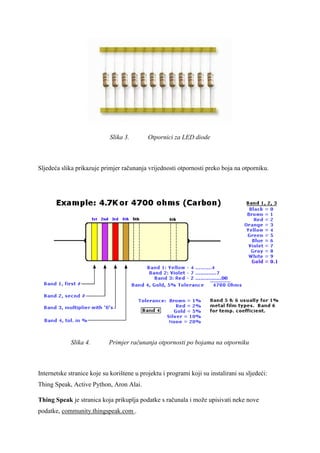
Slika 2. LED diode
Otpornici za LED diode su napravljeni tako da svaka boja na otporniku predstavlja odre?enu
otpornost mjerenu u omima [?]. Za 3.3M otpornike u ovom projektu su kori?teni otponici 3x
(crvena, crvena, ?uta, zlatna boja) jer je ta vrijednost otpornika bila najbli?a na?oj potrebnoj
vrijednosti. Sljede?a slika prikazuje nekoliko otpornika za LED diode.](https://image.slidesharecdn.com/32ef1a3c-b90c-43c7-8caa-51dccd207d58-161209202048/85/Arduino-projekt-3-320.jpg)


More Related Content
Arduino projekt
- 1. SVEU?ILI?TE U SPLITU FAKULTET ELEKTROTEHNIKE, STROJARSTVA I BRODOGRADNJE IZVJE?TAJ O SEMESTARSKOM PROJEKTU ARDUINO EMF DETEKTOR Marija Sunara i Tea ?karica Split, lipanj 2013.
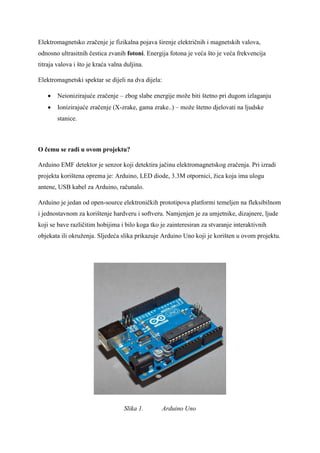
- 2. Elektromagnetsko zra?enje je fizikalna pojava ?irenje elektri?nih i magnetskih valova, odnosno ultrasitnih ?estica zvanih fotoni. Energija fotona je ve?a ?to je ve?a frekvencija titraja valova i ?to je kra?a valna duljina. Elektromagnetski spektar se dijeli na dva dijela: ? Neioniziraju?e zra?enje ®C zbog slabe energije mo?e biti ?tetno pri dugom izlaganju ? Ioniziraju?e zra?enje (X-zrake, gama zrake..) ®C mo?e ?tetno djelovati na ljudske stanice. O ?emu se radi u ovom projektu? Arduino EMF detektor je senzor koji detektira ja?inu elektromagnetskog zra?enja. Pri izradi projekta kori?tena oprema je: Arduino, LED diode, 3.3M otpornici, ?ica koja ima ulogu antene, USB kabel za Arduino, ra?unalo. Arduino je jedan od open-source elektroni?kih prototipova platformi temeljen na fleksibilnom i jednostavnom za kori?tenje hardveru i softveru. Namjenjen je za umjetnike, dizajnere, ljude koji se bave razli?itim hobijima i bilo koga tko je zainteresiran za stvaranje interaktivnih objekata ili okru?enja. Sljede?a slika prikazuje Arduino Uno koji je kori?ten u ovom projektu. Slika 1. Arduino Uno
- 3. LED (engl. Light Emitting Diode), tj. svjetle?a dioda posebna je vrsta poluvodi?ke diode koja emitira svjetlost kada je propusno polarizirana, tj. kada kroz nju te?e struja. Prilikom direktne rekombinacije para elektron-?upljina, emitira se foton svjetla. Takvo svojstvo imaju poluvodi?i galijev-arsenid (GaAs), galijev-fosfid (GaP) i silicijev-karbid (SiC). Ta pojava se naziva elektroluminiscencija. Boja emitiranog svjetla ovisi o poluvodi?u, kao i o primjesama u njemu i varira od infracrvenog preko vidljivog do ultraljubi?astog dijela spektra. Sljede?a slika prikazuje nekoliko LED dioda. Slika 2. LED diode Otpornici za LED diode su napravljeni tako da svaka boja na otporniku predstavlja odre?enu otpornost mjerenu u omima [?]. Za 3.3M otpornike u ovom projektu su kori?teni otponici 3x (crvena, crvena, ?uta, zlatna boja) jer je ta vrijednost otpornika bila najbli?a na?oj potrebnoj vrijednosti. Sljede?a slika prikazuje nekoliko otpornika za LED diode.
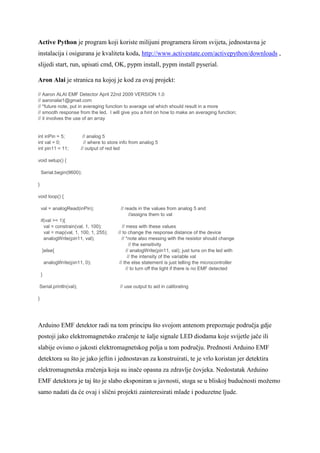
- 4. Slika 3. Otpornici za LED diode Sljede?a slika prikazuje primjer ra?unanja vrijednosti otpornosti preko boja na otporniku. Slika 4. Primjer ra?unanja otpornosti po bojama na otporniku Internetske stranice koje su kori?tene u projektu i programi koji su instalirani su sljede?i: Thing Speak, Active Python, Aron Alai. Thing Speak je stranica koja prikuplja podatke s ra?unala i mo?e upisivati neke nove podatke, community.thingspeak.com .
- 5. Active Python je program koji koriste milijuni programera ?irom svijeta, jednostavna je instalacija i osigurana je kvaliteta koda, http://www.activestate.com/activepython/downloads , slijedi start, run, upisati cmd, OK, pypm install, pypm install pyserial. Aron Alai je stranica na kojoj je kod za ovaj projekt: // Aaron ALAI EMF Detector April 22nd 2009 VERSION 1.0 // aaronalai1@gmail.com // *future note, put in averaging function to average val which should result in a more // smooth response from the led. I will give you a hint on how to make an averaging function; // it involves the use of an array int inPin = 5; // analog 5 int val = 0; // where to store info from analog 5 int pin11 = 11; // output of red led void setup() { Serial.begin(9600); } void loop() { val = analogRead(inPin); // reads in the values from analog 5 and //assigns them to val if(val >= 1){ val = constrain(val, 1, 100); // mess with these values val = map(val, 1, 100, 1, 255); // to change the response distance of the device analogWrite(pin11, val); // *note also messing with the resistor should change // the sensitivity }else{ // analogWrite(pin11, val); just tuns on the led with // the intensity of the variable val analogWrite(pin11, 0); // the else statement is just telling the microcontroller // to turn off the light if there is no EMF detected } Serial.println(val); // use output to aid in calibrating } Arduino EMF detektor radi na tom principu ?to svojom antenom prepoznaje podru?ja gdje postoji jako elektromagnetsko zra?enje te ?alje signale LED diodama koje svijetle ja?e ili slabije ovisno o jakosti elektromagnetskog polja u tom podru?ju. Prednosti Arduino EMF detektora su ?to je jako jeftin i jednostavan za konstruirati, te je vrlo koristan jer detektira elektromagnetska zra?enja koja su ina?e opasna za zdravlje ?ovjeka. Nedostatak Arduino EMF detektora je taj ?to je slabo eksponiran u javnosti, stoga se u bliskoj budu?nosti mo?emo samo nadati da ?e ovaj i sli?ni projekti zainteresirati mlade i poduzetne ljude.