![chevron Dress up a
with flowers
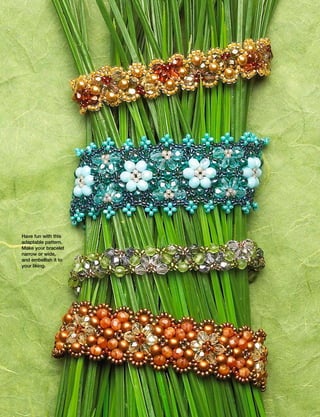
Large beads stitch up quickly to make a lovely bracelet
designed by Yvanne Ham
The traditional triangular shapes of the chevron chain
stitch get a makeover with perfectly placed fire-polished
beads that form stylized flowers. Make either a single or
double version of the chain, embellish it if desired, and
finish with a coordinating toggle clasp.
stepbystep [3] Pick up a C, a 4mm [6] Pick up a C, a 4mm
round, two Cs, and an A, round, two Cs, and a B, and Mental mantra: For
To experiment with colors and sew through the last D sew through the last D each stitch on the first
for this bracelet, go to picked up in the previous picked up in the previous side (except the first
beadandbutton.com to stitch, going in the opposite stitch (e–f).
and last stitches), you’ll
download a blank pattern. direction (b–c). [7] Pick up a D, a B, two Cs,
[4] Pick up a D, an A, two and a 4mm round, and sew
pick up five beads – a
Wide bracelet Cs, and a 4mm round, and through the last C picked up small bead, a big bead,
Side one sew through the last C in the previous stitch (f–g). two small beads, and
[1] On 2 yd. (1.8m) of Fire- picked up in the previous [8] Pick up a C, an A, two a big bead – prior to
line or conditioned Nymo stitch (c–d). Ds, and an A, and sew joining to the previous
(Basics, p. 124), attach a stop [5] Pick up a C, a color B through the last C picked up
stitch. The exact bead
bead (Basics) 6 in. (15cm) fire-polished bead, two Ds, in the previous stitch (g–h).
from the end. and a B, and sew through [9] Repeat steps 3–8 until sequence is not intui-
[2] Pick up two color C 110 the last C picked up in the the band is approximately tive, however, so
seed beads, a 4mm round previous stitch (d–e). ½ in. (1.3cm) short of the until you understand
bead, two Cs, a color A fire- the pattern, Yvanne
polished bead, two color D suggests repeating this
b d f h
110s, and an A. Sew back
to yourself as you’re
through the first C picked up, a
going in the same direction
working: small, big,
c e g
(figure 1, a–b). small, small, big, join.
figure 1
beadandbutton.com | April 2007 97](https://image.slidesharecdn.com/artesanato19-090901035554-phpapp01/85/Artesanato-19-2-320.jpg)
![b b
b d d
d f f
f h h
h
a a
a
c c
c e e
e g g
g
MatErialS
both projects
• Fireline 6 lb. test, or Nymo D conditioned
with beeswax or Thread Heaven
b b
b • beading needles, #12
a a
a • chainnose pliers (optional)
c c
c • wire cutters (optional)
figure 2
wide bracelet 8 in. (20cm)
• 4mm fire-polished beads
48 color A
56 color B
• 55–59 4mm round beads
• size 110 seed beads
k k j hjj h e e
g g e d
db b
k h g db a a
a 5g color C
n n 3g color D
n
3g color E (optional)
mm l ll i ii f f
f c c
c • 3 in. (7.6cm) 22-gauge wire (optional)
m
figure 3
narrow bracelet 8 in. (20cm)
• 4mm fire-polished beads
20 color A
f f
f 20 color B
e be b
eb c c
d d
d c 16 color F
• 29–33 4mm round beads
• size 110 seed beads
a a
a
4g color C
2g color D
3g color E (optional)
• 3 in. (7.6cm) 22-gauge wire (optional)
figure 4
desired length. End with three beads of the band (d–e). [9] Repeat steps 3–8 to the as in the blue bracelet, p. 96,
step 4, but pick up an extra [4] Pick up a C and a 4mm end of the band, ending with sew through the beadwork to
C after you pick up the first round, and sew through the step 4 (l–m). Pick up a C, and exit at point d. Pick up a C
five beads. Sew through the last C picked up in the previ- sew back through the last and four Es, and sew back
last C picked up in the previ- ous step (e–f). 4mm round (m–n). Secure the through the first E picked up
ous stitch, going in the same [5] Pick up a C, a B, two Ds, thread with a few half-hitch (d–e). Pick up a C, and sew
direction (figure 2, a–b), then and a B, and sew through the knots (Basics) between beads, through the middle two Cs
continue through the next A, C picked up in the previous and trim. Remove the stop on the next set of four embel-
two Ds, A, and C (b–c). stitch (f–g). Continue through bead, and secure the begin- lishment Cs (e–f). Repeat
the next three beads of the ning tail in the beadwork. around the bracelet. Secure
Side two band (g–h). the thread, and trim.
[1] Pick up a C, a 4mm [6] Pick up a C and a B, and Embellishment
round, two Cs, and an A, and sew through the last D picked [1] Secure 1 yd. (.9m) of Clasp
sew through the last D added up in the previous stitch (h–i). thread within the beadwork, Design a toggle clasp of your
on the first side (figure 3, a–b). [7] Pick up a D, a B, two Cs, and exit at figure 4, point a. own, or choose one of the
[2] Pick up a D, and sew and a 4mm round, and sew Pick up four Cs, and sew following toggle bars and
back through the A and the through the C picked up in through the next two Cs secure it with a bead loop.
last C added in the previous the previous stitch (i–j). Sew along the edge (a–b). Repeat
stitch (b–c). through the next three beads (b–c) around the entire brace- Peyote toggle bar
[3] Pick up a C, a 4mm on the band (j–k). let. To limit the embellishment [1] On 1 yd. (.9m) of thread,
round, two Cs, and an A, and [8] Pick up a D and an A, to this outline, as in the cop- attach a stop bead. Using Cs,
sew through the D added in and sew through the last C per bracelet (bottom, p. 96), work eight rows in flat, even-
the previous stitch (c–d). picked up in the previous secure the thread, and trim. count peyote stitch (Basics)
Continue through the next stitch (k–l). [2] To add the picot edging, to make a strip that is ten
98 Bead&Button | beadandbutton.com](https://image.slidesharecdn.com/artesanato19-090901035554-phpapp01/85/Artesanato-19-3-320.jpg)
![a b
c d Editor’s NotE:
You can substitute 60
seed beads for the
4mm round beads, as
shown here. If you do,
and you want your
bracelet to lie flat,
maintain a slightly
loose tension or the
e f g beadwork will pucker.
beads wide and has four Bead-and-wire toggle bar Clasp loop Narrow bracelet
beads along each flat edge. [1] Secure 1 ft. (30cm) of [1] Secure 1 ft. (30cm) of Follow the instructions for
Zip up (Basics) the strip to thread in the beadwork, and thread in the beadwork, and side one of the wide bracelet,
form a bar. To add an accent exit at the center of one end exit at the middle of the end but alternate between three
bead at each end of the bar, of the bracelet. To make the opposite the toggle bar. colors of fire-polished beads
continue on to step 2. Other- toggle stem, pick up five [2] Pick up enough 110s to (colors A, B, and F) for the
wise, remove the stop bead, 110s, skip the last 110, sew fit around the toggle bar, sew flower motifs. Embellish as in
secure the tails, and trim. back through the first four back through the first 110 the wide bracelet, if desired,
[2] To add accent beads to 110s, and sew into the bead- picked up, and sew into the and add a clasp.
the toggle bar, sew into the work (photo d). Retrace the beadwork (photo g). Retrace
center of the bar, and exit thread path a few times, the thread path a few times, Contact Yvanne Ham at
one end (photo a). secure the tail, and trim. secure the tail, and trim. yvanne1@comcast.net.
[3] Pick up a fire-polished [2] On 3 in. (7.6cm) of wire,
bead and an 110, skip the string two 4mm rounds,
110, and sew back through the last 110 of the toggle
the fire-polished bead and stem, and two 4mm rounds
the bar (photo b). Repeat on (photo e). Finish your bracelet with a peyote
the other end of the bar. [3] Bend one end of the wire stitch toggle bar (copper band) or
Remove the stop bead, secure around the last 4mm, and a bead-and-wire toggle bar
(green band).
the tails, and trim. wrap it around the wire
[4] Secure 1 ft. (30cm) of between the last two beads
thread in the band, and exit (photo f). Trim. Repeat on the
at the center of one end. Pick other end of the wire.
up four 110s, sew diagonally
through two center 110s on
the bar, and sew back through
the four 110s (photo c). Sew
into the beadwork, retrace
the thread path a few times,
and secure the tail.](https://image.slidesharecdn.com/artesanato19-090901035554-phpapp01/85/Artesanato-19-4-320.jpg)


More Related Content
More from Bijouxnatu (20)


Artesanato (19)
- 1. Have fun with this adaptable pattern. Make your bracelet narrow or wide, and embellish it to your liking.
- 2. chevron Dress up a with flowers Large beads stitch up quickly to make a lovely bracelet designed by Yvanne Ham The traditional triangular shapes of the chevron chain stitch get a makeover with perfectly placed fire-polished beads that form stylized flowers. Make either a single or double version of the chain, embellish it if desired, and finish with a coordinating toggle clasp. stepbystep [3] Pick up a C, a 4mm [6] Pick up a C, a 4mm round, two Cs, and an A, round, two Cs, and a B, and Mental mantra: For To experiment with colors and sew through the last D sew through the last D each stitch on the first for this bracelet, go to picked up in the previous picked up in the previous side (except the first beadandbutton.com to stitch, going in the opposite stitch (e–f). and last stitches), you’ll download a blank pattern. direction (b–c). [7] Pick up a D, a B, two Cs, [4] Pick up a D, an A, two and a 4mm round, and sew pick up five beads – a Wide bracelet Cs, and a 4mm round, and through the last C picked up small bead, a big bead, Side one sew through the last C in the previous stitch (f–g). two small beads, and [1] On 2 yd. (1.8m) of Fire- picked up in the previous [8] Pick up a C, an A, two a big bead – prior to line or conditioned Nymo stitch (c–d). Ds, and an A, and sew joining to the previous (Basics, p. 124), attach a stop [5] Pick up a C, a color B through the last C picked up stitch. The exact bead bead (Basics) 6 in. (15cm) fire-polished bead, two Ds, in the previous stitch (g–h). from the end. and a B, and sew through [9] Repeat steps 3–8 until sequence is not intui- [2] Pick up two color C 110 the last C picked up in the the band is approximately tive, however, so seed beads, a 4mm round previous stitch (d–e). ½ in. (1.3cm) short of the until you understand bead, two Cs, a color A fire- the pattern, Yvanne polished bead, two color D suggests repeating this b d f h 110s, and an A. Sew back to yourself as you’re through the first C picked up, a going in the same direction working: small, big, c e g (figure 1, a–b). small, small, big, join. figure 1 beadandbutton.com | April 2007 97
- 3. b b b d d d f f f h h h a a a c c c e e e g g g MatErialS both projects • Fireline 6 lb. test, or Nymo D conditioned with beeswax or Thread Heaven b b b • beading needles, #12 a a a • chainnose pliers (optional) c c c • wire cutters (optional) figure 2 wide bracelet 8 in. (20cm) • 4mm fire-polished beads 48 color A 56 color B • 55–59 4mm round beads • size 110 seed beads k k j hjj h e e g g e d db b k h g db a a a 5g color C n n 3g color D n 3g color E (optional) mm l ll i ii f f f c c c • 3 in. (7.6cm) 22-gauge wire (optional) m figure 3 narrow bracelet 8 in. (20cm) • 4mm fire-polished beads 20 color A f f f 20 color B e be b eb c c d d d c 16 color F • 29–33 4mm round beads • size 110 seed beads a a a 4g color C 2g color D 3g color E (optional) • 3 in. (7.6cm) 22-gauge wire (optional) figure 4 desired length. End with three beads of the band (d–e). [9] Repeat steps 3–8 to the as in the blue bracelet, p. 96, step 4, but pick up an extra [4] Pick up a C and a 4mm end of the band, ending with sew through the beadwork to C after you pick up the first round, and sew through the step 4 (l–m). Pick up a C, and exit at point d. Pick up a C five beads. Sew through the last C picked up in the previ- sew back through the last and four Es, and sew back last C picked up in the previ- ous step (e–f). 4mm round (m–n). Secure the through the first E picked up ous stitch, going in the same [5] Pick up a C, a B, two Ds, thread with a few half-hitch (d–e). Pick up a C, and sew direction (figure 2, a–b), then and a B, and sew through the knots (Basics) between beads, through the middle two Cs continue through the next A, C picked up in the previous and trim. Remove the stop on the next set of four embel- two Ds, A, and C (b–c). stitch (f–g). Continue through bead, and secure the begin- lishment Cs (e–f). Repeat the next three beads of the ning tail in the beadwork. around the bracelet. Secure Side two band (g–h). the thread, and trim. [1] Pick up a C, a 4mm [6] Pick up a C and a B, and Embellishment round, two Cs, and an A, and sew through the last D picked [1] Secure 1 yd. (.9m) of Clasp sew through the last D added up in the previous stitch (h–i). thread within the beadwork, Design a toggle clasp of your on the first side (figure 3, a–b). [7] Pick up a D, a B, two Cs, and exit at figure 4, point a. own, or choose one of the [2] Pick up a D, and sew and a 4mm round, and sew Pick up four Cs, and sew following toggle bars and back through the A and the through the C picked up in through the next two Cs secure it with a bead loop. last C added in the previous the previous stitch (i–j). Sew along the edge (a–b). Repeat stitch (b–c). through the next three beads (b–c) around the entire brace- Peyote toggle bar [3] Pick up a C, a 4mm on the band (j–k). let. To limit the embellishment [1] On 1 yd. (.9m) of thread, round, two Cs, and an A, and [8] Pick up a D and an A, to this outline, as in the cop- attach a stop bead. Using Cs, sew through the D added in and sew through the last C per bracelet (bottom, p. 96), work eight rows in flat, even- the previous stitch (c–d). picked up in the previous secure the thread, and trim. count peyote stitch (Basics) Continue through the next stitch (k–l). [2] To add the picot edging, to make a strip that is ten 98 Bead&Button | beadandbutton.com
- 4. a b c d Editor’s NotE: You can substitute 60 seed beads for the 4mm round beads, as shown here. If you do, and you want your bracelet to lie flat, maintain a slightly loose tension or the e f g beadwork will pucker. beads wide and has four Bead-and-wire toggle bar Clasp loop Narrow bracelet beads along each flat edge. [1] Secure 1 ft. (30cm) of [1] Secure 1 ft. (30cm) of Follow the instructions for Zip up (Basics) the strip to thread in the beadwork, and thread in the beadwork, and side one of the wide bracelet, form a bar. To add an accent exit at the center of one end exit at the middle of the end but alternate between three bead at each end of the bar, of the bracelet. To make the opposite the toggle bar. colors of fire-polished beads continue on to step 2. Other- toggle stem, pick up five [2] Pick up enough 110s to (colors A, B, and F) for the wise, remove the stop bead, 110s, skip the last 110, sew fit around the toggle bar, sew flower motifs. Embellish as in secure the tails, and trim. back through the first four back through the first 110 the wide bracelet, if desired, [2] To add accent beads to 110s, and sew into the bead- picked up, and sew into the and add a clasp. the toggle bar, sew into the work (photo d). Retrace the beadwork (photo g). Retrace center of the bar, and exit thread path a few times, the thread path a few times, Contact Yvanne Ham at one end (photo a). secure the tail, and trim. secure the tail, and trim. yvanne1@comcast.net. [3] Pick up a fire-polished [2] On 3 in. (7.6cm) of wire, bead and an 110, skip the string two 4mm rounds, 110, and sew back through the last 110 of the toggle the fire-polished bead and stem, and two 4mm rounds the bar (photo b). Repeat on (photo e). Finish your bracelet with a peyote the other end of the bar. [3] Bend one end of the wire stitch toggle bar (copper band) or Remove the stop bead, secure around the last 4mm, and a bead-and-wire toggle bar (green band). the tails, and trim. wrap it around the wire [4] Secure 1 ft. (30cm) of between the last two beads thread in the band, and exit (photo f). Trim. Repeat on the at the center of one end. Pick other end of the wire. up four 110s, sew diagonally through two center 110s on the bar, and sew back through the four 110s (photo c). Sew into the beadwork, retrace the thread path a few times, and secure the tail.
- 5. Create beautiful jewelry with Bead&Button magazine With every issue of Bead&Button magazine you’ll get 28+ projects, complete with step-by-step instructions, detailed photographs, and illustrations. Let Bead&Button bring endless imagination and possibilities to your jewelry making! Subscribe TODAY! Order online at www.beadandbutton.com/promo Enter code I4D2 or call 800-533-6644 Monday-Friday, 8:30 am - 5:00 pm Central Time. Outside the U.S. and Canada, call 262-796-8776. 05X1012