Basic of Navis works BIM application
- 2. Table of content 1. Objective 2. Export setting from Revit 3. Append Files to Navis 4. Clash detection 5. Move copy and rotate in Navis 6. Save Viewpoints(snaps) to Navis
- 3. Objective 1. Navisworks is coordination tool 2. It is useful to simulate, timeline, and Clash detection 3. We can use Revit also for clash detection, Navis will help us to make detection in depth. But, Main work of Navis is to view whole model whether it is architecturally and technically good or not.
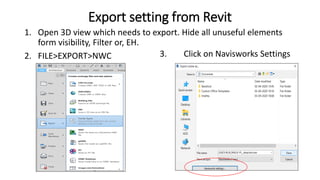
- 4. Export setting from Revit 1. Open 3D view which needs to export. Hide all unuseful elements form visibility, Filter or, EH. 2. FILE>EXPORT>NWC 3. Click on Navisworks Settings
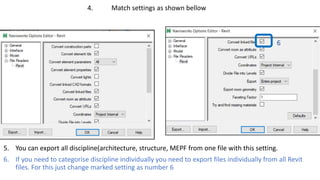
- 5. 4. Match settings as shown bellow 5. You can export all discipline(architecture, structure, MEPF from one file with this setting. 6. If you need to categorise discipline individually you need to export files individually from all Revit files. For this just change marked setting as number 6 6
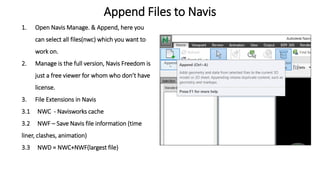
- 6. Append Files to Navis 1. Open Navis Manage. & Append, here you can select all files(nwc) which you want to work on. 2. Manage is the full version, Navis Freedom is just a free viewer for whom who don¡¯t have license. 3. File Extensions in Navis 3.1 NWC - Navisworks cache 3.2 NWF ¨C Save Navis file information (time liner, clashes, animation) 3.3 NWD = NWC+NWF(largest file) 1. 111
- 7. Clash Detection 1. In HOME tab click on Clash detection 2. Click ADD Test shown at top right corner of the dialog box 1. 111 3. Select Discipline or Elements to run clash between 4. Run Test 1. 111 3 3 4
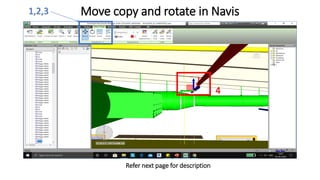
- 8. Move copy and rotate in Navis Refer next page for description 1,2,3 4
- 9. Move copy and rotate in Navis 1. Select the element which you want to move 2. Click on Item tool in menu bar. 3. There you will find options to move and rotate. 4. Use Cube shown in image to move or rotate This tool help us to check clash removing is possible or not without doing it in Revit file directly
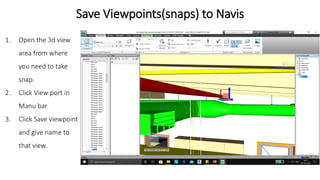
- 10. Save Viewpoints(snaps) to Navis 1. Open the 3d view area from where you need to take snap. 2. Click View port in Manu bar 3. Click Save viewpoint and give name to that view.


