Build instructions Homeslice Tower ver 070514
?Download as PPTX, PDF?
0 likes?655 views

This document provides instructions for assembling and raising a tower structure. It includes details on the various wood and metal components needed for the lower and upper platforms. It recommends building the base triangle and platform subassemblies first before connecting them. Horizontal and vertical cables should be installed and loosely tightened before raising. The raising process involves establishing roles, clearing space, attaching guide ropes, and having teams slowly pull and lower the tower into place under the direction of a lift master. After raising, bolts and turnbuckles should be re-tightened.

Build instructions Homeslice Tower ver 070514
- 1. Tower Build Manual & Raising Guidelines Camp Homeslice Version: 5 July 2014
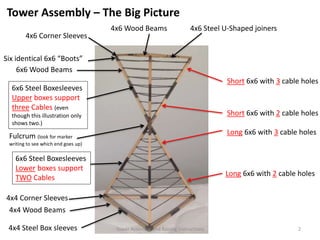
- 2. 4x4 Wood Beams 4x4 Steel Box sleeves 6x6 Steel Boxesleeves Lower boxes support TWO Cables 6x6 Wood Beams 4x6 Wood Beams 4x6 Steel U-Shaped joiners Short 6x6 with 3 cable holes Short 6x6 with 2 cable holes Long 6x6 with 3 cable holes Long 6x6 with 2 cable holes 4x4 Corner Sleeves Tower Assembly ¨C The Big Picture 4x6 Corner Sleeves 6x6 Steel Boxesleeves Upper boxes support three Cables (even though this illustration only shows two.) Six identical 6x6 ˇ°Bootsˇ± Fulcrum (look for marker writing to see which end goes up) Tower Assembly and Raising Instructions 2
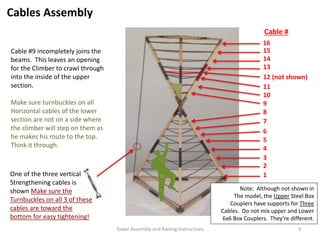
- 3. Cables Assembly Cable # 1 2 3 4 5 9 10 11 12 (not shown) 13 14 15 8 7 6 16 Note: Although not shown in The model, the Upper Steel Box Couplers have supports for Three Cables. Do not mix upper and Lower 6x6 Box Couplers. TheyˇŻre different. One of the three vertical Strengthening cables is shown Make sure the Turnbuckles on all 3 of these cables are toward the bottom for easy tightening! Cable #9 incompletely joins the beams. This leaves an opening for the Climber to crawl through into the inside of the upper section. Make sure turnbuckles on all Horizontal cables of the lower section are not on a side where the climber will step on them as he makes his route to the top. Think it through. Tower Assembly and Raising Instructions 3
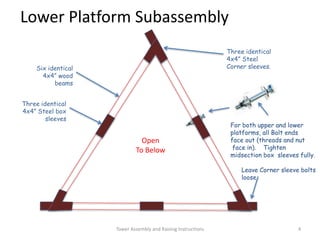
- 4. Lower Platform Subassembly Open To Below Six identical 4x4ˇ± wood beams Three identical 4x4ˇ± Steel box sleeves Three identical 4x4ˇ± Steel Corner sleeves. Tower Assembly and Raising Instructions 4 For both upper and lower platforms, all Bolt ends face out (threads and nut face in). Tighten midsection box sleeves fully. Leave Corner sleeve bolts loose
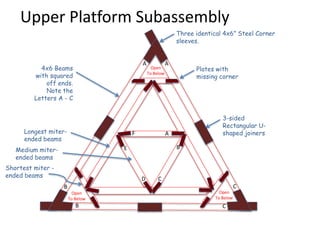
- 5. Upper Platform Subassembly Three identical 4x6ˇ± Steel Corner sleeves. A A B B C C A B C E F D 4x6 Beams with squared off ends. Note the Letters A - C Plates with missing corner 3-sided Rectangular U- shaped joiners Shortest miter - ended beams Medium miter- ended beams Longest miter- ended beams Open To Below Open To Below Open To Below
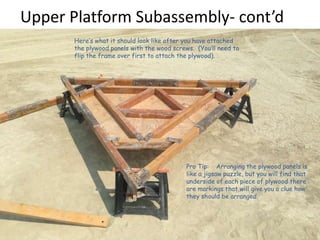
- 6. Upper Platform Subassembly- contˇŻd HereˇŻs what it should look like after you have attached the plywood panels with the wood screws. (YouˇŻll need to flip the frame over first to attach the plywood). . Pro Tip: Arranging the plywood panels is like a jigsaw puzzle, but you will find that underside of each piece of plywood there are markings that will give you a clue how they should be arranged.
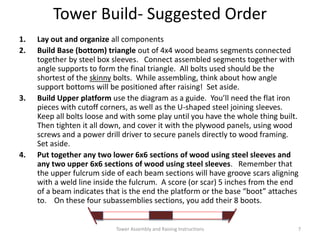
- 7. Tower Build- Suggested Order 1. Lay out and organize all components 2. Build Base (bottom) triangle out of 4x4 wood beams segments connected together by steel box sleeves. Connect assembled segments together with angle supports to form the final triangle. All bolts used should be the shortest of the skinny bolts. While assembling, think about how angle support bottoms will be positioned after raising! Set aside. 3. Build Upper platform use the diagram as a guide. YouˇŻll need the flat iron pieces with cutoff corners, as well as the U-shaped steel joining sleeves. Keep all bolts loose and with some play until you have the whole thing built. Then tighten it all down, and cover it with the plywood panels, using wood screws and a power drill driver to secure panels directly to wood framing. Set aside. 4. Put together any two lower 6x6 sections of wood using steel sleeves and any two upper 6x6 sections of wood using steel sleeves. Remember that the upper fulcrum side of each beam sections will have groove scars aligning with a weld line inside the fulcrum. A score (or scar) 5 inches from the end of a beam indicates that is the end the platform or the base ˇ°bootˇ± attaches to. On these four subassemblies sections, you add their 8 boots. Tower Assembly and Raising Instructions 7
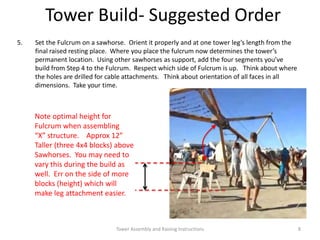
- 8. Note optimal height for Fulcrum when assembling ˇ°Xˇ± structure. Approx 12ˇ± Taller (three 4x4 blocks) above Sawhorses. You may need to vary this during the build as well. Err on the side of more blocks (height) which will make leg attachment easier. Tower Build- Suggested Order 5. Set the Fulcrum on a sawhorse. Orient it properly and at one tower legˇŻs length from the final raised resting place. Where you place the fulcrum now determines the towerˇŻs permanent location. Using other sawhorses as support, add the four segments youˇŻve build from Step 4 to the Fulcrum. Respect which side of Fulcrum is up. Think about where the holes are drilled for cable attachments. Think about orientation of all faces in all dimensions. Take your time. Tower Assembly and Raising Instructions 8
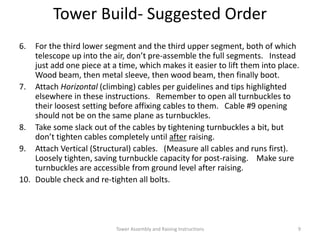
- 9. 6. For the third lower segment and the third upper segment, both of which telescope up into the air, donˇŻt pre-assemble the full segments. Instead just add one piece at a time, which makes it easier to lift them into place. Wood beam, then metal sleeve, then wood beam, then finally boot. 7. Attach Horizontal (climbing) cables per guidelines and tips highlighted elsewhere in these instructions. Remember to open all turnbuckles to their loosest setting before affixing cables to them. Cable #9 opening should not be on the same plane as turnbuckles. 8. Take some slack out of the cables by tightening turnbuckles a bit, but donˇŻt tighten cables completely until after raising. 9. Attach Vertical (Structural) cables. (Measure all cables and runs first). Loosely tighten, saving turnbuckle capacity for post-raising. Make sure turnbuckles are accessible from ground level after raising. 10. Double check and re-tighten all bolts. Tower Build- Suggested Order Tower Assembly and Raising Instructions 9
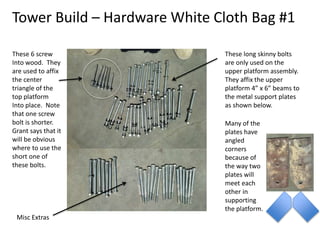
- 10. Tower Build ¨C Hardware White Cloth Bag #1 These 6 screw Into wood. They are used to affix the center triangle of the top platform Into place. Note that one screw bolt is shorter. Grant says that it will be obvious where to use the short one of these bolts. These long skinny bolts are only used on the upper platform assembly. They affix the upper platform 4ˇ± x 6ˇ± beams to the metal support plates as shown below. Many of the plates have angled corners because of the way two plates will meet each other in supporting the platform. Misc Extras
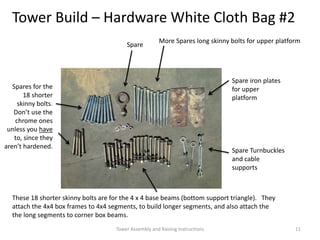
- 11. Tower Build ¨C Hardware White Cloth Bag #2 These 18 shorter skinny bolts are for the 4 x 4 base beams (bottom support triangle). They attach the 4x4 box frames to 4x4 segments, to build longer segments, and also attach the the long segments to corner box beams. Spares for the 18 shorter skinny bolts. DonˇŻt use the chrome ones unless you have to, since they arenˇŻt hardened. Spare Spare iron plates for upper platform Spare Turnbuckles and cable supports More Spares long skinny bolts for upper platform Tower Assembly and Raising Instructions 11
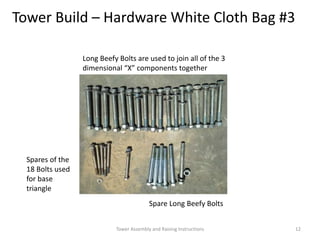
- 12. Tower Build ¨C Hardware White Cloth Bag #3 Long Beefy Bolts are used to join all of the 3 dimensional ˇ°Xˇ± components together Spare Long Beefy Bolts Spares of the 18 Bolts used for base triangle Tower Assembly and Raising Instructions 12
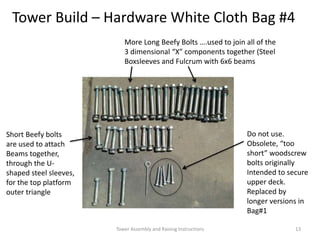
- 13. More Long Beefy Bolts ˇ.used to join all of the 3 dimensional ˇ°Xˇ± components together (Steel Boxsleeves and Fulcrum with 6x6 beams Tower Build ¨C Hardware White Cloth Bag #4 Short Beefy bolts are used to attach Beams together, through the U- shaped steel sleeves, for the top platform outer triangle Do not use. Obsolete, ˇ°too shortˇ± woodscrew bolts originally Intended to secure upper deck. Replaced by longer versions in Bag#1 Tower Assembly and Raising Instructions 13
- 14. Raising the Tower ? Establish the Homeslice Team. One Pulling Captain, one Breaking Captain and one Lift Master. All sober (at the moment) and all Experienced Tower Raising Slicers. Make sure volunteers know to watch and listen to their Captain. The LiftMaster is in charge of everything. The captains watch and listen to the LiftMaster, and relay precise orders to their crew. The Lift Master (usually Kheddarz) oversees the entire raising. ? Clear Trampoline, and any obstacles away that could be crushed by catastrophic failure, or that might trip hurried raisers/breakers scrambling to change position. Ropes should have clear, straight lines of sight. ? Make sure thick rebar has been driven on correct side of the base as a break from lower end slippage across the playa. . Try to get at least 12ˇ± deep into playa. Never hurts to rebar both sides, since tension shifts. Rebar should only touch center metal sleeve, at 2 points, at least 18ˇ± apart. ? Attach ropes. One rope pulls. Two ropes for break. (Same with Lowering, One rope pulls and two ropes break) ? ALWAYS more recruits on breaking than pulling. We always want more break than accellerator!!!! ? Get Big guys to lift it off the ground to get started, while pullers start pulling and breakers keeping rope taught only. Breakers should keep it taught, but not fight the pullers. ? Once off the ground, Big guys move to break line. Get out of the way in case of fall. ? Captains watch the Liftmaster and listen carefully at this point!! ? When point weight pivots, Liftmaster asks pullers to ease up on pulling, transitioning to keeping line from slacking, but not pull from the breakers. Meanwhile breakers who now have the tension, slowly lower tower to resting place. As this happens, Breakers closest to the tower will need to let go as the rope gets too high. They will move to the back of the breaker line. ? Cheers! As the Tower settles. ? Re-check and tighten all bolts. Tighten all Turnbuckles. ? For safety, remove all rebar that secured movement during raising. Tower Assembly and Raising Instructions 14