


Carpet Install and re-install 101
- 1. CARPET INSTALL AND RE- INSTALL 101 UNDERSTANDING THE BASICS
- 2. CARPET INSTALL AND RE-INSTALL 101 TO BEGIN WITH: ___________________ Store carpet and related materials in a climate-controlled, dry space. Protect carpet from soil, dust, moisture and other contaminants and store on a flat surface. Stacking heavy objects on top of carpet rolls or stacking more than three rolls is prohibited. Transport carpet in a manner that prevents damage and distortion. Bending or folding individual carpet rolls or cuts from rolls is not recommended. When bending or folding is unavoidable for delivery purposes, the carpet is required to be unrolled and allowed to lie flat immediately upon arrival at the installation site.
- 3. CARPET INSTALL AND RE- INSTALL 101 The carpet is to be installed when the indoor temperature is between 65-95┬║F (18-35┬║C) with a maximum relative humidity of 65%. The substrate surface temperature should not be less than 65┬░F (18┬░C) at time of installation. Keep seams to a minimum. Position seams so that, where possible: ŌĆó they run the length of the area. ŌĆó main traffic flow runs along, rather than across, the seam. ’ü¼ natural light does not strike across the seam. ŌĆó are away from areas subject to pivoting traffic. ŌĆó are not perpendicular to doorway openings. The installation is not to begin until the HVAC system is operational and the following conditions are maintained for at least 48 hours before, during and 72 hours after completion
- 4. CARPET INSTALL AND RE- INSTALL 101 _______________________________________ _Tack strip ŌĆōIt is required that tack strip be a minimum of one inch (25 mm) wide and ┬╝ inch (6 mm) thick. Architectural strip two inches in width (50mm) with three rows of pins, or two conventional strips with two rows of pins each are required for stretching areas exceeding thirty feet to provide secure attachment of the carpet and additional shear strength. To prevent possible injury to building occupants, it is required that the pins on tack strip not protrude through the carpet being installed. Additional tack strip installation specifications include: ŌĆó Securely fasten tack strip to maintain the tension _ provided by power stretching. Nailed or stapled tack strip is required to have a minimum of two fasteners per piece. ŌĆó Place tack strip with the pins angled toward the vertical abutment. ŌĆó The gully, or distance between the tack strip and vertical abutments, is required to be slightly less than the thickness of the carpet but not exceed Ōģ£ inch (9 mm). ŌĆó Avoid installing tack strip across door openings and/or sills.
- 5. CARPET INSTALL AND RE- INSTALL 101 _______________________________________ _ŌĆó Cut tack strip to follow the contour of door casings and other irregularly shaped abutments. ŌĆó Do not staple carpet to tack strip. ŌĆó On radiant-heated floors, use manufacturerŌĆÖs approved adhesive to secure tack strip do not use nails or screws to prevent damage to heating system. Using a Mechanical Stretching Device (i.e. Power Stretcher) is Mandatory. Devices used as a substitute for, or an attachment to such devices that penetrate through the carpet backing may cause injury, damage carpet or substrates, or result in inadequate stretch. Such devices are not acceptable.
- 6. CARPET INSTALL AND RE-INSTALL 101 TACK STRIP ’ü¼ THE SKELETAL SYSTEM OF THE STRETCH-IN INSTALL METHOD ’ü¼ MUST BE PLACED, ADHERED, AND SPACED PROPERLY FOR THE PRODUCT TO PERFORM WELL ’ü¼ MUST BE PLACED IN CORRECT DIRECTION, AND ŌĆ£GULLEYŌĆØ MUST BE PROPER ’ü¼ TEST ADHESION BY ATTEMPTING TO PRY STRIP LOOSE WITH YOUR FINGERS
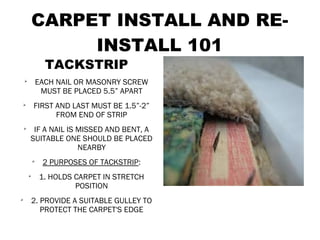
- 7. CARPET INSTALL AND RE- INSTALL 101 TACKSTRIP ’āś EACH NAIL OR MASONRY SCREW MUST BE PLACED 5.5ŌĆØ APART ’āś FIRST AND LAST MUST BE 1.5ŌĆØ-2ŌĆØ FROM END OF STRIP ’āś IF A NAIL IS MISSED AND BENT, A SUITABLE ONE SHOULD BE PLACED NEARBY ’āś 2 PURPOSES OF TACKSTRIP: ’āś 1. HOLDS CARPET IN STRETCH POSITION ’āś 2. PROVIDE A SUITABLE GULLEY TO PROTECT THE CARPET'S EDGE
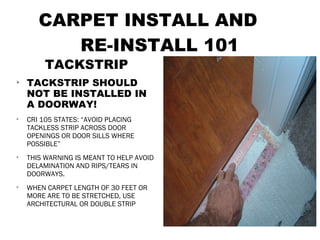
- 8. CARPET INSTALL AND RE-INSTALL 101 TACKSTRIP ’āś TACKSTRIP SHOULD NOT BE INSTALLED IN A DOORWAY! ’āś CRI 105 STATES: ŌĆ£AVOID PLACING TACKLESS STRIP ACROSS DOOR OPENINGS OR DOOR SILLS WHERE POSSIBLEŌĆØ ’āś THIS WARNING IS MEANT TO HELP AVOID DELAMINATION AND RIPS/TEARS IN DOORWAYS. ’āś WHEN CARPET LENGTH OF 30 FEET OR MORE ARE TO BE STRETCHED, USE ARCHITECTURAL OR DOUBLE STRIP
- 9. CARPET INSTALL AND RE-INSTALL 101 CAUTION: Some sheet vinyl, resilient tile and cut-back asphalt- based adhesive may contain asbestos and/or crystalline silica. Inhaling dusts from these materials creates a cancer and respiratory system hazard. Lacking documented evidence to the contrary, e.g., current testing, assume that these materials contain asbestos and treat them in the manner prescribed for removing floors containing asbestos. Recommended work practices prohibit sanding, dry scraping, bead-blasting or mechanically pulverizing resilient flooring, backing or lining felt. Do not use powered devices that create asbestos dust when removing ŌĆ£cut-backŌĆØ or asphalt- based adhesives. It is required that removal procedures comply with federal, state and local government agency regulations covering the removal and disposal of asbestos-containing materials (ACM).
- 10. CARPET INSTALL AND RE- INSTALL 101 _______________________________________ _Relaxing/Conditioning Carpet ŌĆō To minimize wrinkling and buckling and to facilitate installation, it is highly recommended that carpet be unrolled and allowed to relax in the installation area for a time period that conforms to the requirements of the manufacturer of the product being installed. (See Section 7.2 Ambient Conditions) This time period will vary up to 72 hours, but should not be less that 24 hours at a temperature between 65-95┬║F (18 -35┬║C). Protect carpet adequately from soil, dust, moisture and other contaminants. Sundry items, such as adhesives, should be conditioned as well. If these conditions are not attainable, contact flooring manufacturer for applications to warranty.
- 11. SEAMS ’āś POLYPROPYLENE SOFTENS AT 230- 240 DEGREES. ’āś POLYPROPYLENE MELTS AT 325-340 DEGREES ’āś SEAMS SHOULD BE SET SUCH THAT TRAFFIC IN THE ROOM OCCURS PERPENDICULAR TO THE SEAM, NOT ALONG THE SEAM ’āś SEAMS SHOULD BE KEPT TO A MINIMUM ’āś NATURAL LIGHT (SUNLIGHT) SHOULD NOT STRIKE ACROSS THE SEAM CAUTION: Failure to properly prepare seam edges often results in: ŌĆó edge ravel ŌĆó edge delamination ŌĆó tuft loss ŌĆó seam separation ŌĆó safety concerns CARPET INSTALL AND RE- INSTALL 101
- 12. CARPET INSTALL AND RE- INSTALL 101 ’āś WHEN MARKING ON THE BACK OF THE CARPET FOR A CUT, A LEAD CARPENTER'S PENCIL IS BEST. YOU MAY ALSO USE A CHALK LINE WITH WHITE CHALK ONLY. IF USING COLORED MARKERS (SHARPIES, ETC) OR RED OR BLUE CHALK IN A CHALK LINE, YOU WILL RISK SERIOUS STAINING IF THE AREA EVER BECOMES WET. THIS TRANSFERENCE CAN ŌĆ£WICKŌĆØ TO THE SURFACE! ’āś YOU WILL NEED FRESH BLADES OFTEN, THE ONLY THING YOU CUT WITH A DULL BLADE IS YOURSELF! YOU WILL ALSO NEED A SECURE GRIP ON THE KNIFE, AND LOTS OF PRACTICE (ON PRACTICE SCRAPS) IN ORDER TO CUT A GOOD STRAIGHT LINE FOR A PROPER SEAM. ’āś WHENEVER POSSIBLE, A TUFTED BACK CARPET SHOULD BE CUT FROM THE BACK, CAREFULLY CUTTING ONLY THROUGH THE PRIMARY AND SECONDARY BACKINGS, CAREFULLY SO AS TO AVOID BEVELING THE FACE YARNS!! EXCEPTION: LOOP PILE CARPET SHOULD BE CUT FROM THE FACE, AND SHOULD BE CUT BETWEEN THE ROWS. SOMETIMES THIS MEANS DIAGONAL CUTS ARE NECESSARY, ESPECIALLY IN THE CUT FOR A REPAIR- IT MUST BE A PARALLELLOGRAM! ’āś ALL SEAMS MUST HAVE THE CUT EDGES SEALED IN SOME MANNER BEFORE TAPE IS ACTIVATED- SEVERAL OPTIONS: HOT KNIFE, LATEX SEAM SEALER (MUST WAIT 20 MINUTES BEFORE PROCEEDING), SOLVENT SEAM SEALER (FAST DRYING BUT PRODUCES ODOR)- EXCEPTION- FUSION BONDED CARPET
- 13. CARPET INSTALL AND RE-INSTALL 101 ’āś SEAM SEALANTS MUST BE APPLIED TO THE CARPET EDGE, SEALING THE PRIMARY AND SECONDARY BACKINGS AT THE BASE OF THE FACE YARNS. THE IDEA IS BY SEALING, THE LAST ROW OF FACE YARNS WILL NOT PULL OUT OVER TIME WITH TRAFFIC AND VACUUM ROUTINES. IN FACT, YOUR LAST ROW OF YARNS WILL ACTUALLY BE STRONGER THAN THE ROW RIGHT NEXT TO IT- WHEN TESTING THROUGH THE ŌĆ£TUFT BINDŌĆØ TEST. ’āś WHEN USING A STANDARD SEAMING IRON, IF POSSIBLE THE IRON SHOULD TRAVEL WITH THE LAY OF THE NAP. ALSO, PRESSURE SHOULD NOT BE APPLIED IN A DOWNWARD, SIDEWARD, OR BACKWARD DIRECTION- ALWAYS SMOOTHLY ALONG THE TAPE AS THE IRON MELTS THE SILICONE. ’āś SEAMS MUST BE HAND SEWN IF YOU ARE WORKING WITH WOVEN CARPET! EVOLUTION OF THE TYPICAL SEAM 1. SEAM LOCATION HAS BEEN DETERMINED EITHER BY DAMAGE FOR A REPAIR, OR BY DESIGN BEFORE THE CARPET WAS ORDERED. 2. PILE LAY: DETERMINE PILE LAY WITH THE PENCIL AND PAPAER TEST, THEN ALSO CONSIDER THE PATTERN IF PRESENT, AND MATCH THE PATTERN AS WELL. 3. CUTTING: ROW CUT/ROW CUT OR ROW CUT/TRACE CUT
- 14. CARPET INSTALL AND RE-INSTALL 101 EVOLUTION OF THE TYPICAL SEAM 4. DRY FIT- TEST THE DONOR PIECE IN THE VOID, MAKE SURE THE FIT IS AS GOOD AS YOU CAN MAKE IT. NO SPACE BETWEEN BACKING OF DONOR AND EXISTING CARPET SHOULD BE THE GOAL! THIS IS MUCH EASIER IN A FRIEZE STYLE, MUCH MORE DIFFICULT IN BUILDER'S GRADE!! 5. PLACE A SEAMING BOARD (FLAT, THIN WOOD PIECE) UNDER THE AREA 6. PLACE SEAM TAPE 7. SEAL THE SEAM EDGES 8. PRE-STRETCH THE SEAM 9. INSERT IRON, OR IF DOING A TOP-DOWN SEAM, BEGIN APPLYING HEAT 10. IRON AT 3 OR UNDER, AND TRAVEL WITH THE NAP 11. LINE UP THE BACKINGS EDGE TO EDGE AFTER IRON PASSES 12. USE A ROLLER (FLAT EDGE OR STARRED)- DO NOT OVER-ROLL!! 13. DUCK BILL SHEARS TO TRIP AND PROTRUDING YARNS AND STRETCH!
- 15. CARPET INSTALL AND RE-INSTALL 101 EVOLUTION OF THE TYPICAL SEAM 4. DRY FIT- TEST THE DONOR PIECE IN THE VOID, MAKE SURE THE FIT IS AS GOOD AS YOU CAN MAKE IT. NO SPACE BETWEEN BACKING OF DONOR AND EXISTING CARPET SHOULD BE THE GOAL! THIS IS MUCH EASIER IN A FRIEZE STYLE, MUCH MORE DIFFICULT IN BUILDER'S GRADE!! 5. PLACE A SEAMING BOARD (FLAT, THIN WOOD PIECE) UNDER THE AREA 6. PLACE SEAM TAPE 7. SEAL THE SEAM EDGES 8. PRE-STRETCH THE SEAM 9. INSERT IRON, OR IF DOING A TOP-DOWN SEAM, BEGIN APPLYING HEAT 10. IRON AT 3 OR UNDER, AND TRAVEL WITH THE NAP 11. LINE UP THE BACKINGS EDGE TO EDGE AFTER IRON PASSES 12. USE A ROLLER (FLAT EDGE OR STARRED)- DO NOT OVER-ROLL!! 13. DUCK BILL SHEARS TO TRIP AND PROTRUDING YARNS AND STRETCH!
- 16. CARPET INSTALL AND RE-INSTALL 101 RE-STRETCHING ’āś UNFORTUNATELY, USUALLY A ŌĆ£RE-STRETCHŌĆØ IS REALLY THE FIRST TIME THE STRETCH HAS BEEN PERFORMED PROPERLY ’āś BUCKLING IS THE TERM PROFESSIONALS USE TO DESCRIBE THE SITUATION WHEN CARPET NEEDS TO BE STRETCHED BUCKLING CAN BE CAUSED BY: 1. IMPROPER INSTALL 2. HUMIDITY 3. DELAMINATION 4. TOO SOFT OR TOO THICK CUSHIONING 5. DOUBLE CUSHION THE POWER STRETCHER IS THE PRIMARY TOOL REQUIRED WHEN STRETCHING CARPET THE KNEE KICKER IS AN ASSIST TOOL THE POWER STRETCHER HEAD SHOULD BE SET BETWEEN 2 AND 6 INCHES FROM THE WALL, AND NO MORE THAN THE WIDTH OF THE HEAD OF THE STRETCHER SHOULD BE MOVED WHILE STRETCHING
- 17. CARPET INSTALL AND RE-INSTALL 101 HELPFUL FACTS ’āś STRETCH AWAY FROM OBSTACLES, NOT TOWARDS THEM ’āś STRETCH AWAY FROM SEAMS AND PINNED CLAMPDOWN METAL TRANSITIONS (GOLDBAR) ’āś THE STANDARD FOR STRETCH IS ŌĆ£DRUM TIGHTŌĆØ ’āś SYNTHETIC BACKED TUFTED CARPET SHOULD STRETCH 1- 1 1/2% IN BOTH LENGTH AND WIDTH OF THE ROOM THIS ILLUSTRATES HOW A KICKER CAN ASSIST A STRETCHER IN THE PROCESS
- 18. CARPET INSTALL AND RE-INSTALL 101 STRETCHING ’āś GOOGLE ŌĆ£CRI 104ŌĆØ ’āś STRETCH AWAY FROM CLOSETS, DOORWAYS, ANY OBSTACLE ’āś BACKING MUST BE IN TACT ’āś KNOWING REPAIRS VERY HELPFUL ’āś DEMONSTRATE THE STRETCH TEST FOR YOUR CUSTOMER
- 19. CARPET INSTALL AND RE-INSTALL 101 AXMINISTER CARPET CAN MOSTLY BE STRETCHED IN THE LENGTH, DUE TO IT'S CONSTRUCTION
- 20. CARPET INSTALL AND RE-INSTALL 101 BOTTOM LINE: HOW DO YOU WANT TO SIGN YOUR NAME?