ºÝºÝߣ

ºÝºÝߣShare a Scribd company logo
Chapter 4 isometric_drawing
CHAPTER 4 : ISOMETRIC DRAWING
1.

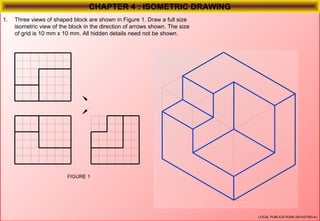
Three views of shaped block are shown in Figure 1. Draw a full size
isometric view of the block in the direction of arrows shown. The size
of grid is 10 mm x 10 mm. All hidden details need not be shown.

FIGURE 1

LOCAL PUBLICATIONS (001427383-A)
CHAPTER 4 : ISOMETRIC DRAWING
2.

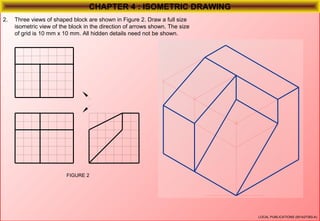
Three views of shaped block are shown in Figure 2. Draw a full size
isometric view of the block in the direction of arrows shown. The size
of grid is 10 mm x 10 mm. All hidden details need not be shown.

FIGURE 2

LOCAL PUBLICATIONS (001427383-A)
CHAPTER 4 : ISOMETRIC DRAWING
2.

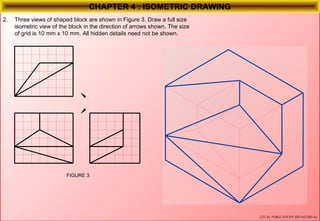
Three views of shaped block are shown in Figure 3. Draw a full size
isometric view of the block in the direction of arrows shown. The size
of grid is 10 mm x 10 mm. All hidden details need not be shown.

FIGURE 3

LOCAL PUBLICATIONS (001427383-A)
CHAPTER 4 : ISOMETRIC DRAWING
4.

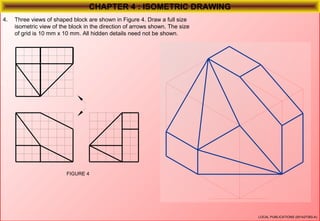
Three views of shaped block are shown in Figure 4. Draw a full size
isometric view of the block in the direction of arrows shown. The size
of grid is 10 mm x 10 mm. All hidden details need not be shown.

FIGURE 4

LOCAL PUBLICATIONS (001427383-A)
CHAPTER 4 : ISOMETRIC DRAWING
5.

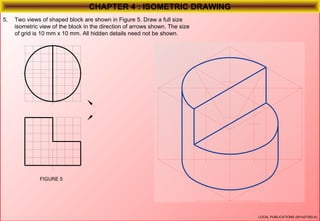
Two views of shaped block are shown in Figure 5. Draw a full size
isometric view of the block in the direction of arrows shown. The size
of grid is 10 mm x 10 mm. All hidden details need not be shown.

FIGURE 5

LOCAL PUBLICATIONS (001427383-A)
CHAPTER 4 : ISOMETRIC DRAWING
6.

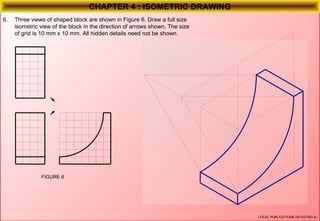
Three views of shaped block are shown in Figure 6. Draw a full size
isometric view of the block in the direction of arrows shown. The size
of grid is 10 mm x 10 mm. All hidden details need not be shown.

FIGURE 6

LOCAL PUBLICATIONS (001427383-A)
CHAPTER 4 : ISOMETRIC DRAWING
7.

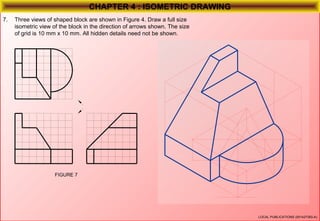
Three views of shaped block are shown in Figure 4. Draw a full size
isometric view of the block in the direction of arrows shown. The size
of grid is 10 mm x 10 mm. All hidden details need not be shown.

FIGURE 7

LOCAL PUBLICATIONS (001427383-A)
CHAPTER 4 : ISOMETRIC DRAWING
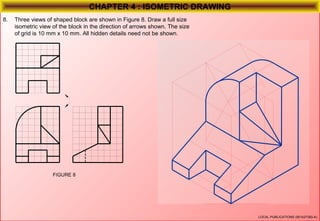
8.

Three views of shaped block are shown in Figure 8. Draw a full size
isometric view of the block in the direction of arrows shown. The size
of grid is 10 mm x 10 mm. All hidden details need not be shown.

FIGURE 8

LOCAL PUBLICATIONS (001427383-A)
CHAPTER 4 : ISOMETRIC DRAWING
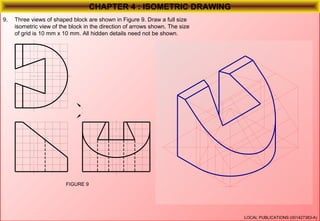
9.

Three views of shaped block are shown in Figure 9. Draw a full size
isometric view of the block in the direction of arrows shown. The size
of grid is 10 mm x 10 mm. All hidden details need not be shown.

FIGURE 9

LOCAL PUBLICATIONS (001427383-A)
CHAPTER 4 : ISOMETRIC DRAWING
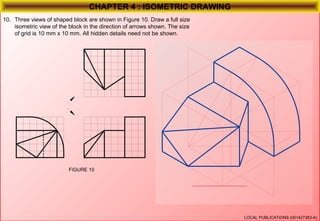
10. Three views of shaped block are shown in Figure 10. Draw a full size
isometric view of the block in the direction of arrows shown. The size
of grid is 10 mm x 10 mm. All hidden details need not be shown.

FIGURE 10

LOCAL PUBLICATIONS (001427383-A)
CHAPTER 4 : ISOMETRIC DRAWING
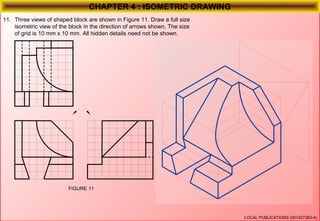
11. Three views of shaped block are shown in Figure 11. Draw a full size
isometric view of the block in the direction of arrows shown. The size
of grid is 10 mm x 10 mm. All hidden details need not be shown.

FIGURE 11

LOCAL PUBLICATIONS (001427383-A)
CHAPTER 4 : ISOMETRIC DRAWING
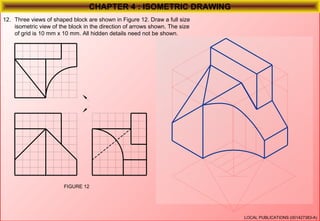
12. Three views of shaped block are shown in Figure 12. Draw a full size
isometric view of the block in the direction of arrows shown. The size
of grid is 10 mm x 10 mm. All hidden details need not be shown.

FIGURE 12

LOCAL PUBLICATIONS (001427383-A)
CHAPTER 4 : ISOMETRIC DRAWING
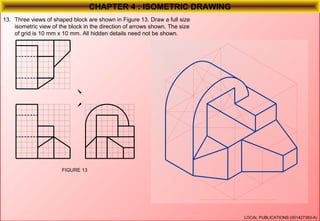
13. Three views of shaped block are shown in Figure 13. Draw a full size
isometric view of the block in the direction of arrows shown. The size
of grid is 10 mm x 10 mm. All hidden details need not be shown.

FIGURE 13

LOCAL PUBLICATIONS (001427383-A)
More Related Content

Chapter 4 isometric_drawing

  • 2. CHAPTER 4 : ISOMETRIC DRAWING 1. Three views of shaped block are shown in Figure 1. Draw a full size isometric view of the block in the direction of arrows shown. The size of grid is 10 mm x 10 mm. All hidden details need not be shown. FIGURE 1 LOCAL PUBLICATIONS (001427383-A)
  • 3. CHAPTER 4 : ISOMETRIC DRAWING 2. Three views of shaped block are shown in Figure 2. Draw a full size isometric view of the block in the direction of arrows shown. The size of grid is 10 mm x 10 mm. All hidden details need not be shown. FIGURE 2 LOCAL PUBLICATIONS (001427383-A)
  • 4. CHAPTER 4 : ISOMETRIC DRAWING 2. Three views of shaped block are shown in Figure 3. Draw a full size isometric view of the block in the direction of arrows shown. The size of grid is 10 mm x 10 mm. All hidden details need not be shown. FIGURE 3 LOCAL PUBLICATIONS (001427383-A)
  • 5. CHAPTER 4 : ISOMETRIC DRAWING 4. Three views of shaped block are shown in Figure 4. Draw a full size isometric view of the block in the direction of arrows shown. The size of grid is 10 mm x 10 mm. All hidden details need not be shown. FIGURE 4 LOCAL PUBLICATIONS (001427383-A)
  • 6. CHAPTER 4 : ISOMETRIC DRAWING 5. Two views of shaped block are shown in Figure 5. Draw a full size isometric view of the block in the direction of arrows shown. The size of grid is 10 mm x 10 mm. All hidden details need not be shown. FIGURE 5 LOCAL PUBLICATIONS (001427383-A)
  • 7. CHAPTER 4 : ISOMETRIC DRAWING 6. Three views of shaped block are shown in Figure 6. Draw a full size isometric view of the block in the direction of arrows shown. The size of grid is 10 mm x 10 mm. All hidden details need not be shown. FIGURE 6 LOCAL PUBLICATIONS (001427383-A)
  • 8. CHAPTER 4 : ISOMETRIC DRAWING 7. Three views of shaped block are shown in Figure 4. Draw a full size isometric view of the block in the direction of arrows shown. The size of grid is 10 mm x 10 mm. All hidden details need not be shown. FIGURE 7 LOCAL PUBLICATIONS (001427383-A)
  • 9. CHAPTER 4 : ISOMETRIC DRAWING 8. Three views of shaped block are shown in Figure 8. Draw a full size isometric view of the block in the direction of arrows shown. The size of grid is 10 mm x 10 mm. All hidden details need not be shown. FIGURE 8 LOCAL PUBLICATIONS (001427383-A)
  • 10. CHAPTER 4 : ISOMETRIC DRAWING 9. Three views of shaped block are shown in Figure 9. Draw a full size isometric view of the block in the direction of arrows shown. The size of grid is 10 mm x 10 mm. All hidden details need not be shown. FIGURE 9 LOCAL PUBLICATIONS (001427383-A)
  • 11. CHAPTER 4 : ISOMETRIC DRAWING 10. Three views of shaped block are shown in Figure 10. Draw a full size isometric view of the block in the direction of arrows shown. The size of grid is 10 mm x 10 mm. All hidden details need not be shown. FIGURE 10 LOCAL PUBLICATIONS (001427383-A)
  • 12. CHAPTER 4 : ISOMETRIC DRAWING 11. Three views of shaped block are shown in Figure 11. Draw a full size isometric view of the block in the direction of arrows shown. The size of grid is 10 mm x 10 mm. All hidden details need not be shown. FIGURE 11 LOCAL PUBLICATIONS (001427383-A)
  • 13. CHAPTER 4 : ISOMETRIC DRAWING 12. Three views of shaped block are shown in Figure 12. Draw a full size isometric view of the block in the direction of arrows shown. The size of grid is 10 mm x 10 mm. All hidden details need not be shown. FIGURE 12 LOCAL PUBLICATIONS (001427383-A)
  • 14. CHAPTER 4 : ISOMETRIC DRAWING 13. Three views of shaped block are shown in Figure 13. Draw a full size isometric view of the block in the direction of arrows shown. The size of grid is 10 mm x 10 mm. All hidden details need not be shown. FIGURE 13 LOCAL PUBLICATIONS (001427383-A)