Cà i Äáš·t ubuntu server cho main supermicro x9 scl trÊn raid intel
Download as DOC, PDF0 likes259 views


More Related Content
What's hot (19)
Viewers also liked (18)


Similar to Cà i Äáš·t ubuntu server cho main supermicro x9 scl trÊn raid intel (20)


More from laonap166 (20)


Cà i Äáš·t ubuntu server cho main supermicro x9 scl trÊn raid intel
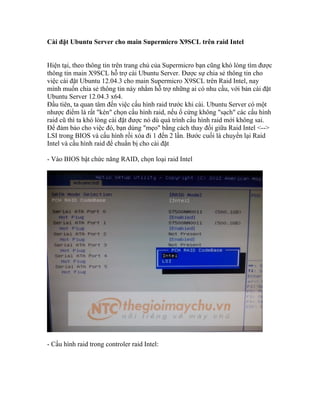
- 1. Cà i Äáš·t Ubuntu Server cho main Supermicro X9SCL trÊn raid Intel Hiáŧn tᚥi, theo thÃīng tin trÊn trang cháŧ§ cáŧ§a Supermicro bᚥn cÅĐng khÃģ lÃēng tÃŽm ÄÆ°áŧĢc thÃīng tin main X9SCL háŧ tráŧĢ cà i Ubuntu Server. ÄÆ°áŧĢc sáŧą chia sášŧ thÃīng tin cho viáŧc cà i Äáš·t Ubuntu 12.04.3 cho main Supermicro X9SCL trÊn Raid Intel, nay mÃŽnh muáŧn chia sášŧ thÃīng tin nà y nhášąm háŧ tráŧĢ nháŧŊng ai cÃģ nhu cᚧu, váŧi bášĢn cà i Äáš·t Ubuntu Server 12.04.3 x64. Äᚧu tiÊn, ta quan tÃĒm Äášŋn viáŧc cášĨu hÃŽnh raid trÆ°áŧc khi cà i. Ubuntu Server cÃģ máŧt nhÆ°áŧĢc Äiáŧm là rášĨt "kÃĐn" cháŧn cášĨu hÃŽnh raid, nášŋu áŧ cáŧĐng khÃīng "sᚥch" cÃĄc cášĨu hÃŽnh raid cÅĐ thÃŽ ta khÃģ lÃēng cà i Äáš·t ÄÆ°áŧĢc nÃģ dÃđ quÃĄ trÃŽnh cášĨu hÃŽnh raid máŧi khÃīng sai. Äáŧ ÄášĢm bášĢo cho viáŧc ÄÃģ, bᚥn dÃđng "mášđo" bášąng cÃĄch thay Äáŧi giáŧŊa Raid Intel <--> LSI trong BIOS và cášĨu hÃŽnh ráŧi xÃģa Äi 1 Äášŋn 2 lᚧn. BÆ°áŧc cuáŧi là chuyáŧn lᚥi Raid Intel và cášĨu hÃŽnh raid Äáŧ chuášĐn báŧ cho cà i Äáš·t - Và o BIOS bášt cháŧĐc nÄng RAID, cháŧn loᚥi raid Intel - CášĨu hÃŽnh raid trong controler raid Intel:
- 2. - Quay lᚥi BIOS, bášt Raid LSI và cášĨu hÃŽnh, ráŧi xoa Äi . Sau ÄÃģ chuyáŧn lᚥi Raid Intel và cášĨu hÃŽnh lᚥi. Sáŧ dÄĐ phášĢi mášĨt cÃīng thao tÃĄc Äáŧ ÄášĢm bášĢo xÃģa sᚥch config raid cÅĐ trÊn áŧ cáŧĐng. Nášŋu là HDD máŧi mua thÃŽ cÃģ tháŧ báŧ qua cÃĄc bÆ°áŧc nà y
- 3. - BášŊt Äᚧu qua trÃŽnh cà i Äáš·t
- 4. ......cÃĄc bÆ°áŧc cà i Äáš·t tiášŋp theo khÃīng khÃģ khi là m theo cÃĄc hÆ°áŧng dášŦn. ChÚng ta sáš― Äi thášģng táŧi phᚧn quan tráŧng, phᚧn nhášn raid trong Unbuntu Server
- 5. - TáŧŦ bÆ°áŧc nà y tráŧ Äi, cÃĄc bᚥn chÚ Ã― nhÃĐ. NÊn cháŧn chia phÃĒn vÃđng bášąng tay Äáŧ dáŧ kiáŧm soÃĄt hÆĄn.
- 8. - Ta tᚥo phÃĒn vÃđng "/" cho Ubuntu server trÆ°áŧc
- 11. - ChÚ Ã― bášt ON cho Bootable flag
- 12. - Tᚥo náŧt phÃĒn vÃđng cho swap, viáŧc phÃĒn chia phÃĒn vÃđng là tÃđy Ã― ngÆ°áŧi dÃđng, nhÆ°ng thÆ°áŧng là bášąng hoáš·c cao hÆĄn dung lÆ°áŧĢng RAM Äang cÃģ trÊn mÃĄy.
- 15. - CÃĄc bᚥn chÚ Ã― phᚧn khoanh Äáŧ, ÄÃģ là thÃīng tin bᚥn cᚧn Äáŧ cà i Äáš·t GRUB áŧ bÆ°áŧc sau. Cháŧn phÃĒn vÃđng "/" cho GRUB vÆĄi Äáŧnh dᚥng Ext4 váŧi phᚧn tÊn "isw_bajd...." + p1, tÆ°ÆĄng áŧĐng váŧi partition #1.
- 17. - NÊu áŧ bÆ°áŧc trÊn, bᚥn khÃīng cÃģ ÄÆ°áŧĢc thÃīng tin cáŧ§a partition "/", thÃŽ bÆ°áŧc nà y bᚥn cháŧn "NO" và back lᚥi Menu Install cháŧn Execute a Shell. Nášŋu áŧ bÆ°áŧc nà y bᚥn cháŧn "YES" thÃŽ quÃĄ trÃŽnh cà i Äáš·t vášŦn tiášŋp táŧĨc hoà n thà nh, nhÆ°ng háŧ Äiáŧu hà nh sáš― cháŧn sai GRUB boot loader, khi ÄÃģ mÃĄy kháŧi Äáŧng lÊn mà n hÃŽnh "Äen xÃŽ"
- 19. - GÃĩ láŧnh: ls /dev/mapper Äáŧ xem thÃīng tin partition "/" cᚧn cho viáŧc cà i Äáš·t GRUB boot loader. Bᚥn Äáŧ Ã― thášĨy phᚧn tÊn partition ÄÆ°áŧĢc thÊm p1 hoáš·c p2 tÆ°ÆĄng áŧĐng, lÆ°u thÃīng tin nà y và gÃĩ Exit Äáŧ thoÃĄt váŧ Menu Install
- 21. - GÃĩ tiášŋp ÄÚng phᚧn tÊn partition váŧŦa lÆ°u (tÊn phÃĒn biáŧt cášĢ cháŧŊ hoa, cháŧŊ thÆ°áŧng) và tiášŋp táŧĨc - Sau khi cà i Äáš·t xong, bᚥn nháŧ cháŧn lᚥi tháŧĐ táŧą kháŧi Äáŧng trong BIOS
- 22. ...tášn hÆ°áŧng thà nh ąįģÜášĢ!
- 23. CášĢm ÆĄn cÃĄc bᚥn ÄÃĢ theo dÃĩi !