Cin p2 p process for raw material
•
0 likes•357 views

1. The document describes the process of procuring raw materials through purchase-to-pay including creating material and vendor masters, maintaining excise details, creating purchase orders, goods receipt, excise invoice posting, and invoice verification. 2. Key steps include creating material and vendor masters, maintaining chapter IDs and excise details, creating purchase orders, goods receipt with excise invoice capture, finding the internal excise number, posting the excise invoice, and verifying the vendor invoice. 3. Accounting entries are generated during goods receipt and excise invoice posting to record the procurement and tax amounts.


Cin p2 p process for raw material
- 1. RAW MATERIAL PROCUREMENT THROUGH P2P PROCESS Applies to: SAP ECC 6.0 EHP:7 RAW MATERIAL A material or substance used in the primary production or manufacturing of a goods. Tax credit adjustment 100% tax can be paid by the same year for the raw material. Procedure Create a material master – MM01 Create a Vendor master – XK01 Maintain Chapter id & Cenvat determination – J1ID Create a PR for a material ME51N (Optional) Create a P.O. for vendor / Material ME21N Release PO (Optional) – ME29N Goods receipt Post & Capture the Excise invoice – MIGO (PART I & II) Post the Excise invoice by using internal excise number – J1IEX (Optional if you are using capturing option in MIGO you can use the transaction to post the invoice.) Invoice verification -MIRO Material Master Creation Initial Screen for Material Master Press Enter& Select the following View Basic Data1,Purchasing, General plant data/Storage1, Accounting1 & press enter. Give your Plant, Storage Location & press enter.
- 2. Fill the below details in Basic data1 Press Enter & Fill the below details in Purchasing Press Enter & Fill the below details in General plant data/Storage1
- 3. Press Enter & Fill the below details in Accounting Press Enter & Save you will get the material number. Vendor Master Creation -XK01 Initial Screen for Vendor Master Enter the above detail & press enter
- 5. Press Enter Press Enter & Save Vendor will be created.
- 6. Maintain Chapter ID & Vendor Excise Details Here, material and plant combination shall be entered and material type shall be defined as Raw Material. Excise vendor details shall be entered in the vendor master excise additional data. T code for the above process is J1ID Chapter ID: Chapter ID is the number given to a material published by the government The material involved in manufacturing. out going material, input material. The chapter ID shows how much excise duty is levied on each material. Select Chapter ID & Click the Maintain Button & Select new entries create the chapter id for the material
- 7. Then Click Material & Chapter ID combination & Click the Maintain Button & Select new entries Define material as a Raw Material Press enter & Save. Then Click Cenvat Determination & Click the Maintain Button & Select new entries Press enter & Save. Vendor Excise details: Click Vendor Excise detail & Click the Maintain Button & Select new entries Press enter & Save. Then Click excise indicator for plant & Click the Maintain Button & Select new entries Press enter & Save. Then Click Excise indicator for plant & Vendor & Click the Maintain Button & Select new entries
- 8. Creation of condition records (FV11) (this one have no path) Condition type: select BHE1 AP Excise basic Select key combination button Select plant /vendor /material radio button Enter Plant: BHEL Vendor: YOUR VENDOR Material: YOUR MATERIAL Amount: 10 (Excise rate & Tax rupees) Valid from: 01.04.CURRENT YEAR Valid to: 31.03.CURRENT YEAR Tax code: V8(This Tax Code Will be created in FTXP) Save & Select back arrow. Condition type: select BHE2 AP Excise ECESS Select key combination button Select plant /vendor /material radio button Enter Plant: BHEL Vendor: YOUR VENDOR Material: YOUR MATERIAL Amount: 2 (Excise rate & Tax rupees) Valid from: 01.04.CURRENT YEAR Valid to: 31.03.CURRENT YEAR Tax code: V8(This Tax Code Will be created in FTXP) Save & Select back arrow. Condition type: select BHE3 AP Excise HSEC Select key combination button Select plant /vendor /material radio button Enter Plant: BHEL Vendor: YOUR VENDOR Material: YOUR MATERIAL Amount: 1 (Excise rate & Tax rupees) Valid from: 01.04.CURRENT YEAR Valid to: 31.03.CURRENT YEAR Tax code: V8(This Tax Code Will be created in FTXP) Save & Select back arrow. Condition type: select BHE5 AP VAT Select key combination button Select plant /vendor /material radio button
- 9. Enter Plant: BHEL Vendor: YOUR VENDOR Material: YOUR MATERIAL Amount: 10 (Excise rate & Tax rupees) Valid from: 01.04.CURRENT YEAR Valid to: 31.03.CURRENT YEAR Tax code: V8(This Tax Code Will be created in FTXP) Save & Select back arrow. Creation of Purchase order (ME21N) In item detail click the invoice tab give your tax code & click the Tax button below screen will appear.
- 10. This Tax calculation is based on the tax calculation procedure we created and assigned to our Country. Select back arrow button & Save & your PO is created. GOODS RECEIPT Goods receipt shall be done with respect to purchase order reference. We need to enter the purchase order number. Based on the purchase order system shall fetch the data automatically. Once item OK checks over, we need to enter the excise invoice no & date. In this way, Goods receipt and Excise invoice capturing have been done for subsequent process. T code for the above process is MIGO – Goods receipt. In Excise Invoice Tab we have option like below 1)Capture & Post the Excise Invoice 2)Only Capture the Invoice If we select the option 1 means PART I(Quantity Up dation)& PART II(Accounting Documents are captured here itself) If we select the option 2 we need Post the invoice separately in TCODE- J1IEX. Here i go with the Option 2. Click the Check button you received message the document is OK & SAVE.
- 11. Accounting Entries T code for the above is Goods receipt – Display In Document info tab CLICK the FI Documents & click accounting document, you will get the below entries Finding internal excise number for the excise posting After Goods receipt done, we need to take the internal excise number generated during goods receipt process. T code for the above is Goods receipt – Display Here, by displaying material document number, we shall find out the internal excise number. This internal excise number shall be used for further posting of excise invoice. After posting MIGO in Display mode you will find the Internal Excise Number in Excise Invoice tab under Excise item under PART1 tab.
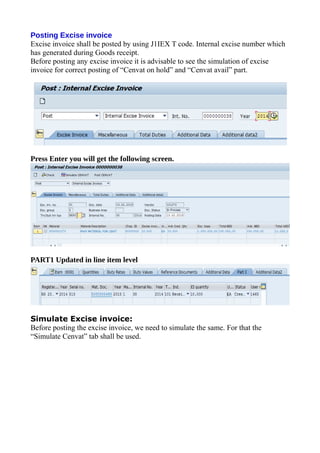
- 12. Posting Excise invoice Excise invoice shall be posted by using J1IEX T code. Internal excise number which has generated during Goods receipt. Before posting any excise invoice it is advisable to see the simulation of excise invoice for correct posting of “Cenvat on hold” and “Cenvat avail” part. Press Enter you will get the following screen. PART1 Updated in line item level Simulate Excise invoice: Before posting the excise invoice, we need to simulate the same. For that the “Simulate Cenvat” tab shall be used.
- 13. While posting the excise invoice, the respective part I and part II entries shall be Updated. The following screen shows the details. Press Enter.
- 14. Invoice verification for Raw Material(MIRO) After excise invoice has been posted, subsequently the vendor invoice shall be verified. By using T code MIRO, the vendor invoice shall be verified and posted. The following screen illustrates the details. After invoice verification done, one can pay the vendor payment. Before posting invoice need to stimulate below Screen will appear Check Check your entries & Save Post the invoice. From the menu Invoice Document Select Display button to view the Accounting Document.