際際滷

際際滷Share a Scribd company logo
Fabric Policies:
These are policies used for how the internal policies of the fabric system of the spine and
leaf interact with each other, which is under the fabric tap as shown below, with that said I will
move on and show how to create fabric policies and use it and verify.
Creating fabric policies
we will create an NTP policy and assign it to our pod. NTP is a good place to start, as having
a common and synced time source is critical for third-party authentication, such as LDAP and
logging.
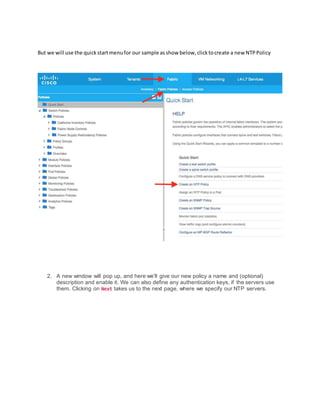
1. From the Fabric menu, select/click on Fabric Policies then the Quick Start menu,
select Create an NTP Policy
(Alternate methodistoclickon PodPolicies>>Policies>>Date andTime rightclickandclickcreate as
shownbelow)
But we will use the quickstartmenufor our sample asshow below,clicktocreate a new NTPPolicy
2. A new window will pop up, and here we'll give our new policy a name and (optional)
description and enable it. We can also define any authentication keys, if the servers use
them. Clicking on Next takes us to the next page, where we specify our NTP servers.
3. Click on the plus sign on the right-hand side, and enter the IP address or Fully Qualified
Domain Name (FQDN) of the NTP server(s):
4. We can also select a management EPG, which is useful if the NTP servers are outside of
our network. Then, click on OK
5. Click on Finish.
We can now see our custom policy under Pod Policies:
Creating Cisco ACI Fabric Policy
6. At the moment, though, the policy is not being used, Clicking on Show Usage at the
bottom of the screen shows that no nodes or policies are using the policy.
7. To use the policy, we must assign it to a pod, as we can see from the Quick Start menu:
To use it We need to go into the policy groups under Pod Policies and create a new Pod policy
and call the NTP policy into it
To create the policy, click on the Actions menu, and select Create Pod Policy Group as shown
below
8. Name the new policy PoD-Policy. From here, we can attach our NTP-POLICY to the PoD-
Policy. To attach the policy, click on the drop-down next to Date Time Policy, and
select NTP-POLICY from the list of options:
Creating Cisco ACI Fabric Policy
9. NextWe have to create a PodProfile andassignthe PodPolicytoit, the process is similar as
before: we go to Profiles (under the Pod Policies menu), select Actions, and then Create
Pod Profile:
give it a name and associate the Pod policy to it as shown below
The resultsare shownbelow
To verifyif APICisusingthe NTPPolicydothis from the APIC CLI, using the command show ntp
Note : If DNSis notfullyconfiguredonyournetworkthenuse IPaddressesforthe NTPserverandnot
an FQDN.
apic1# showntp
nodeid remote refid st t when poll reach delay offset jitter
-------- - --------------- ------------- -- ------ ------ ------- --------------- --------
1 216.239.35.4 .INIT. 16 u - 16 0 0.000 0.000 0.000
apic1#
Steps :
We created:
1. An NTPPolicy (Youcouldhave createdSNMP,BGPPolicyinsame wayfor APIC)
2. Attacheditto a Policygroup.
3. Attachedthe Policygroupto a PodProfile
4. The APICwill consume/usethe PodProfile whichwill be pusheddowntothe spine andleaves.
SummaryPicture Below
ENJOYUNTIL NEXTTIME>> AccessPolicyCreationanduse.
Creating Cisco ACI Fabric Policy

More Related Content

Creating Cisco ACI Fabric Policy

  • 1. Fabric Policies: These are policies used for how the internal policies of the fabric system of the spine and leaf interact with each other, which is under the fabric tap as shown below, with that said I will move on and show how to create fabric policies and use it and verify. Creating fabric policies we will create an NTP policy and assign it to our pod. NTP is a good place to start, as having a common and synced time source is critical for third-party authentication, such as LDAP and logging.
  • 2. 1. From the Fabric menu, select/click on Fabric Policies then the Quick Start menu, select Create an NTP Policy (Alternate methodistoclickon PodPolicies>>Policies>>Date andTime rightclickandclickcreate as shownbelow)
  • 3. But we will use the quickstartmenufor our sample asshow below,clicktocreate a new NTPPolicy 2. A new window will pop up, and here we'll give our new policy a name and (optional) description and enable it. We can also define any authentication keys, if the servers use them. Clicking on Next takes us to the next page, where we specify our NTP servers.
  • 4. 3. Click on the plus sign on the right-hand side, and enter the IP address or Fully Qualified Domain Name (FQDN) of the NTP server(s):
  • 5. 4. We can also select a management EPG, which is useful if the NTP servers are outside of our network. Then, click on OK
  • 6. 5. Click on Finish. We can now see our custom policy under Pod Policies:
  • 8. 6. At the moment, though, the policy is not being used, Clicking on Show Usage at the bottom of the screen shows that no nodes or policies are using the policy. 7. To use the policy, we must assign it to a pod, as we can see from the Quick Start menu:
  • 9. To use it We need to go into the policy groups under Pod Policies and create a new Pod policy and call the NTP policy into it To create the policy, click on the Actions menu, and select Create Pod Policy Group as shown below 8. Name the new policy PoD-Policy. From here, we can attach our NTP-POLICY to the PoD- Policy. To attach the policy, click on the drop-down next to Date Time Policy, and select NTP-POLICY from the list of options:
  • 11. 9. NextWe have to create a PodProfile andassignthe PodPolicytoit, the process is similar as before: we go to Profiles (under the Pod Policies menu), select Actions, and then Create Pod Profile: give it a name and associate the Pod policy to it as shown below The resultsare shownbelow
  • 12. To verifyif APICisusingthe NTPPolicydothis from the APIC CLI, using the command show ntp Note : If DNSis notfullyconfiguredonyournetworkthenuse IPaddressesforthe NTPserverandnot an FQDN. apic1# showntp nodeid remote refid st t when poll reach delay offset jitter -------- - --------------- ------------- -- ------ ------ ------- --------------- -------- 1 216.239.35.4 .INIT. 16 u - 16 0 0.000 0.000 0.000 apic1# Steps : We created: 1. An NTPPolicy (Youcouldhave createdSNMP,BGPPolicyinsame wayfor APIC) 2. Attacheditto a Policygroup. 3. Attachedthe Policygroupto a PodProfile 4. The APICwill consume/usethe PodProfile whichwill be pusheddowntothe spine andleaves.
  • 13. SummaryPicture Below ENJOYUNTIL NEXTTIME>> AccessPolicyCreationanduse.