Databricks Community Cloud Overview
- 1. Databricks Community Cloud By: Robert Sanders
- 2. 2Page: Databricks Community Cloud ŌĆó Free/Paid Standalone Spark Cluster ŌĆó Online Notebook ŌĆó Python ŌĆó R ŌĆó Scala ŌĆó SQL ŌĆó Tutorials and Guides ŌĆó Shareable Notebooks
- 3. 3Page: Why is it useful? ŌĆó Learning about Spark ŌĆó Testing different versions of Spark ŌĆó Rapid Prototyping ŌĆó Data Analysis ŌĆó Saved Code ŌĆó OthersŌĆ”
- 8. 8Page: Create a Cluster - Steps 1. From the Active Clusters page, click the ŌĆ£+ Create ClusterŌĆØ button 2. Fill in the cluster name 3. Select the version of Apache Spark 4. Click ŌĆ£Create ClusterŌĆØ 5. Wait for the Cluster to start up and be in a ŌĆ£RunningŌĆØ state
- 11. 11Page: Active Clusters ŌĆō Spark Cluster UI - Master
- 13. 13Page: Create a Notebook - Steps 1. Right click within a Workspace and click Create -> Notebook 2. Fill in the Name 3. Select the programming language 4. Select the running cluster youŌĆÖve created that you want to attach to the Notebook 5. Click the ŌĆ£CreateŌĆØ button
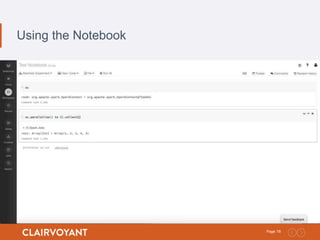
- 15. 15Page: Notebook
- 17. 17Page: Using the Notebook ŌĆō Code Snippets > sc > sc.parallelize(1 to 5).collect()
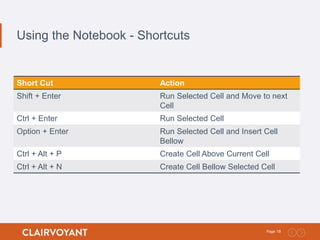
- 18. 18Page: Using the Notebook - Shortcuts Short Cut Action Shift + Enter Run Selected Cell and Move to next Cell Ctrl + Enter Run Selected Cell Option + Enter Run Selected Cell and Insert Cell Bellow Ctrl + Alt + P Create Cell Above Current Cell Ctrl + Alt + N Create Cell Bellow Selected Cell
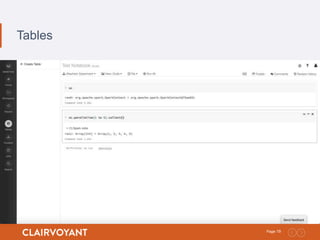
- 19. 19Page: Tables
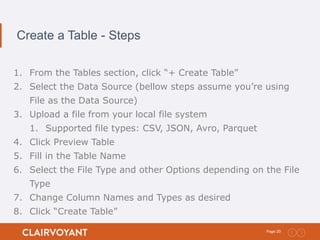
- 20. 20Page: Create a Table - Steps 1. From the Tables section, click ŌĆ£+ Create TableŌĆØ 2. Select the Data Source (bellow steps assume youŌĆÖre using File as the Data Source) 3. Upload a file from your local file system 1. Supported file types: CSV, JSON, Avro, Parquet 4. Click Preview Table 5. Fill in the Table Name 6. Select the File Type and other Options depending on the File Type 7. Change Column Names and Types as desired 8. Click ŌĆ£Create TableŌĆØ
- 21. 21Page: Create a Table ŌĆō Upload File
- 22. 22Page: Create a Table ŌĆō Configure Table
- 23. 23Page: Create a Table ŌĆō Review Table
- 24. 24Page: Notebook ŌĆō Access Table
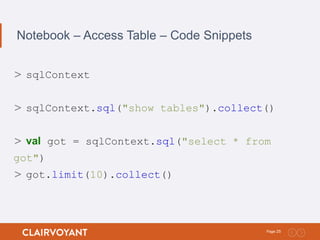
- 25. 25Page: Notebook ŌĆō Access Table ŌĆō Code Snippets > sqlContext > sqlContext.sql("show tables").collect() > val got = sqlContext.sql("select * from got") > got.limit(10).collect()
- 27. 27Page: Notebook ŌĆō Data Cleaning for Charting
- 28. 28Page: Notebook ŌĆō Plot Options
- 30. 30Page: Notebook ŌĆō Display and Charting ŌĆō Code Snippets > filter(got) > val got = sqlContext.sql("select * from got") > got.limit(10).collect() > import org.apache.spark.sql.functions._ > val allegiancesCleanupUDF = udf[String, String] (_.toLowerCase().replace("house ", "")) > val isDeathUDF = udf{ deathYear: Integer => if(deathYear != null) 1 else 0} > val gotCleaned = got.filter("Allegiances != "None"").withColumn("Allegiances", allegiancesCleanupUDF($"Allegiances")).withColumn("isDeath", isDeathUDF($"Death Year")) > display(gotCleaned)
- 31. 31Page: Publish Notebook - Steps 1. While in a Notebook, click ŌĆ£PublishŌĆØ on the top right 2. Click ŌĆ£PublishŌĆØ on the pop up 3. Copy the link and send it out









![30Page:
Notebook ŌĆō Display and Charting ŌĆō Code Snippets
> filter(got)
> val got = sqlContext.sql("select * from got")
> got.limit(10).collect()
> import org.apache.spark.sql.functions._
> val allegiancesCleanupUDF = udf[String, String]
(_.toLowerCase().replace("house ", ""))
> val isDeathUDF = udf{ deathYear: Integer => if(deathYear != null) 1 else 0}
> val gotCleaned = got.filter("Allegiances !=
"None"").withColumn("Allegiances",
allegiancesCleanupUDF($"Allegiances")).withColumn("isDeath",
isDeathUDF($"Death Year"))
> display(gotCleaned)](https://image.slidesharecdn.com/databricks-community-cloud-161009203811/85/Databricks-Community-Cloud-Overview-30-320.jpg)

