Edexcel Canvas stretching
ŌĆóDownload as PPT, PDFŌĆó
1 likeŌĆó253 views

The document provides instructions for building a wooden picture frame and stretching canvas over it. It states that you will need two long wooden pieces of equal length, three short wooden pieces of equal length, and six small triangular corner pieces made of plywood or MDF. It then gives directions to assemble the frame by connecting the corner pieces to the long and short wooden pieces with screws and connecting the triangular middle brace pieces. Finally, it provides instructions for stapling the stretched canvas tightly to the back of the frame, working from the middle outwards and leaving the corners for last.


Edexcel Canvas stretching
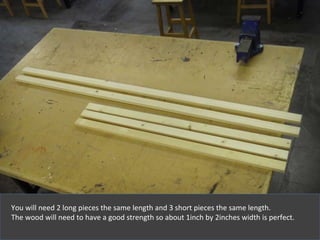
- 1. You will need 2 long pieces the same length and 3 short pieces the same length . The wood will need to have a good strength so about 1inch by 2inches width is perfect.
- 2. You will also need 6 small triangles that are going to cover a good part of the corner. These can be made from plywood or mdf.
- 3. Use a table to line up the wood and make sure it is 90 degrees. Put the longer piece on the outside and the shorter piece on the inside.
- 4. Add the corner piece, but leave about a 1cm gap between it and the edge of the wood. Put 2 screws through into each length of wood so that each corner is attached by 4 screws.
- 5. Connect all the corners ŌĆō remember to put 4 screws into each and to use the table to make sure the corners are 90 degrees angle (square).
- 6. Connect the middle brace with triangles .
- 7. Lay the canvass out on the table and put the frame face down on top.
- 8. How you staple the canvas to the stretcher is really important.
- 9. Working from the middle with one person each side stretch the canvass as tight as you can. Fold it over and staple on the back. This is probably the most complex task.
- 10. Working from the middle with one person each side stretch the canvass as tight as you can. Fold it over and staple on the back. This is probably the most complex task.
- 11. Leave the corners until last.
- 12. Fold the canvas in on itself so the least is showing.
- 13. Job done! Its now ready to prime with 2 coats of primer. This should be equal parts of PVA, water and white emulsion. Remember to do the edges!