ºÝºÝߣ

ºÝºÝߣShare a Scribd company logo
Microsoft Excel 2010- Illustrated

           Unit C:
   Formatting a Worksheet
Objectives
    •     Format values
    •     Change font and font size
    •     Change font styles and alignment
    •     Adjust column width
    •     Insert and delete rows and columns


Microsoft Office 2010-Illustrated
Objectives
    •     Apply colors, patterns, and borders
    •     Apply conditional formatting
    •     Rename and move a worksheet
    •     Check spelling


Microsoft Office 2010-Illustrated
Formatting Values
    • The format of a cell determines how
      the labels and values look
            • Bold, italic, dollar signs, commas, etc.
    • Formatting does not change the data
      only its appearance
    • Select a cell or a range, then apply
      formatting


Microsoft Office 2010-Illustrated
Formatting Values
                        Format Cells dialog box


Microsoft Office 2010-Illustrated
Changing Font and Font Sizes

   • A font is the name for a collection of
     characters with a similar, specific
     design
   • Font size is the physical size of text
            • Measured in points
                   • 1 point = 1/72 of an inch
   • The default font in Excel is 11-point
     Calibri

Microsoft Office 2010-Illustrated
Changing Font and Font Sizes

                Font list


 Font list
  arrow

 Font size
 list arrow


Click a font
to apply it


Microsoft Office 2010-Illustrated
Changing Font and Font Sizes

          Worksheet with formatted title and labels
                               Font and size of active cell or range


Microsoft Office 2010-Illustrated
Changing Font Styles and
Alignment

   • Attributes are styling formats such as
     bold, italics, and underlining
   • Alignment determines the position of
     data in a cell
            • Left, right, or center


Microsoft Office 2010-Illustrated
Changing Font Styles and
Alignment

   • The Format Painter allows you to
     copy all formatting attributes of
     selected cells and apply them to
     other cells
            • Use to copy multiple format settings or
              individual ones


Microsoft Office 2010-Illustrated
Changing Font Styles and
    Alignment
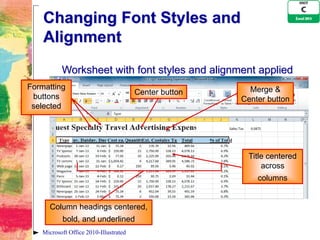
          Worksheet with font styles and alignment applied
Formatting                                               Merge &
                                       Center button
 buttons                                               Center button
 selected


                                                         Title centered
                                                             across
                                                           columns


     Column headings centered,
          bold, and underlined
   Microsoft Office 2010-Illustrated
Changing Font Styles and
Alignment

 Common font and alignment buttons


Microsoft Office 2010-Illustrated
Adjusting Column Width

    • Adjust column widths to
      accommodate data
            • Default column width is 8.43 characters
              wide (a little less than one inch)
            • One or more columns can be adjusted
              using the Ribbon, the shortcut menu,
              or the mouse


Microsoft Office 2010-Illustrated
Adjusting Column Width


 Common column formatting commands


Microsoft Office 2010-Illustrated
Adjusting Column Width

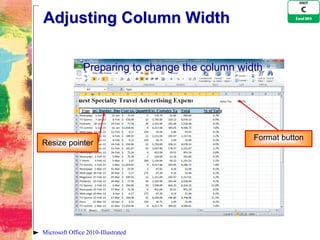
                Preparing to change the column width


                                                  Format button
Resize pointer


Microsoft Office 2010-Illustrated
Inserting and Deleting Rows
 and Columns
    • When you insert a new row, the
      contents of the worksheet shift down
      from the newly inserted row
    • When you insert a new column, the
      contents of the worksheet shift to the
      right of the new column


Microsoft Office 2010-Illustrated
Inserting and Deleting Rows
 and Columns

    • Excel inserts rows above the cell
      pointer and columns to the left
    • Insert multiple rows or columns by
      selecting the same number of row or
      column headings to be inserted


Microsoft Office 2010-Illustrated
Inserting and Deleting Rows
and Columns

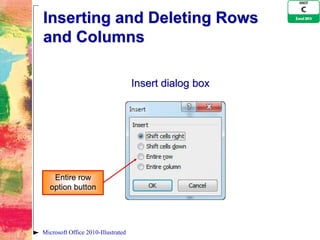
                                    Insert dialog box


   Entire row
  option button


Microsoft Office 2010-Illustrated
Inserting and Deleting Rows
and Columns

    • When you delete a row, the contents
      of the worksheet shift up
    • When you delete a column, the
      contents of the worksheet shift to the
      left
    • Delete multiple rows or columns by
      selecting all of the row or column
      headings to be deleted

Microsoft Office 2010-Illustrated
Applying Colors, Patterns,
 and Borders

    • You can add enhancements such as
      colors, patterns, and borders by
      using:
            • Border and Fill Color buttons in the
              Font group on the Home tab of the
              Ribbon and on the Mini toolbar, or
            • Fill tab and Border tab in the Format
              Cells dialog box


Microsoft Office 2010-Illustrated
Applying Colors, Patterns,
  and Borders
    • Cell styles are pre-designed
      combinations of formatting attributes
            • Use the Cell Styles button in the Styles
              group on the Home tab


Microsoft Office 2010-Illustrated
Applying Colors, Patterns,
and Borders

  LivePreview of fill color          Cell styles
                                        button


                                    Font Color
                                     list arrow

                                    Fill Color
                                    list arrow
         Cell A1
        previewed

Microsoft Office 2010-Illustrated
Applying Conditional
Formatting

    • Excel can format cells based on
      specific results
            • Automatic application of formatting
              attributes on cell values is called
              conditional formatting
            • Different formats are automatically
              applied if the data meets conditions you
              specify


Microsoft Office 2010-Illustrated
Applying Conditional
Formatting
    • Data bars are a type of conditional
      formatting that visually illustrate
      differences among values


Microsoft Office 2010-Illustrated
Applying Conditional
Formatting
                  Previewing a data bars in a range


Data bars


Microsoft Office 2010-Illustrated
Applying Conditional
 Formatting

                   Between dialog box    Format when
                                        conditions met


       Input boxes


Microsoft Office 2010-Illustrated
Applying Conditional
Formatting

               Worksheet with conditional formatting


Microsoft Office 2010-Illustrated
Renaming and Moving a
Worksheet

    • By default, an Excel workbook
      initially contains three worksheets,
      named Sheet1, Sheet2, and Sheet3
    • To move to another sheet, click its
      sheet tab


Microsoft Office 2010-Illustrated
Naming and Moving a Sheet

    • To make it easier to identify the
      sheets, you can rename each sheet
      and add color to the tabs
    • You can change the order of sheets
      by dragging the sheet tabs


Microsoft Office 2010-Illustrated
Naming and Moving a Sheet


                            Moving the Budget sheet


     Sheet
   relocation                        Sheet1
     pointer                        renamed


Microsoft Office 2010-Illustrated
Checking Spelling

 • Spelling checker scans the
   worksheet and flags possible
   mistakes and suggests corrections
          • To check other worksheets in a
            workbook, display the worksheet and
            run the spelling checker again
          • Add words that are spelled correctly but
            are not recognized by the spelling
            checker

Microsoft Office 2010-Illustrated
Checking Spelling

                        Spelling English (U.S.) dialog box
Misspelled
  word


Replacement
   word
suggestions

Microsoft Office 2010-Illustrated
Summary
    •     Format values
    •     Change font and font size
    •     Change font styles and alignment
    •     Adjust column width
    •     Insert and delete rows and columns


Microsoft Office 2010-Illustrated
Summary
    •     Apply colors, patterns, and borders
    •     Apply conditional formatting
    •     Rename and move a worksheet
    •     Check spelling


Microsoft Office 2010-Illustrated

More Related Content

Excel 2010 Unit C PPT

  • 1. Microsoft Excel 2010- Illustrated Unit C: Formatting a Worksheet
  • 2. Objectives • Format values • Change font and font size • Change font styles and alignment • Adjust column width • Insert and delete rows and columns Microsoft Office 2010-Illustrated
  • 3. Objectives • Apply colors, patterns, and borders • Apply conditional formatting • Rename and move a worksheet • Check spelling Microsoft Office 2010-Illustrated
  • 4. Formatting Values • The format of a cell determines how the labels and values look • Bold, italic, dollar signs, commas, etc. • Formatting does not change the data only its appearance • Select a cell or a range, then apply formatting Microsoft Office 2010-Illustrated
  • 5. Formatting Values Format Cells dialog box Microsoft Office 2010-Illustrated
  • 6. Changing Font and Font Sizes • A font is the name for a collection of characters with a similar, specific design • Font size is the physical size of text • Measured in points • 1 point = 1/72 of an inch • The default font in Excel is 11-point Calibri Microsoft Office 2010-Illustrated
  • 7. Changing Font and Font Sizes Font list Font list arrow Font size list arrow Click a font to apply it Microsoft Office 2010-Illustrated
  • 8. Changing Font and Font Sizes Worksheet with formatted title and labels Font and size of active cell or range Microsoft Office 2010-Illustrated
  • 9. Changing Font Styles and Alignment • Attributes are styling formats such as bold, italics, and underlining • Alignment determines the position of data in a cell • Left, right, or center Microsoft Office 2010-Illustrated
  • 10. Changing Font Styles and Alignment • The Format Painter allows you to copy all formatting attributes of selected cells and apply them to other cells • Use to copy multiple format settings or individual ones Microsoft Office 2010-Illustrated
  • 11. Changing Font Styles and Alignment Worksheet with font styles and alignment applied Formatting Merge & Center button buttons Center button selected Title centered across columns Column headings centered, bold, and underlined Microsoft Office 2010-Illustrated
  • 12. Changing Font Styles and Alignment Common font and alignment buttons Microsoft Office 2010-Illustrated
  • 13. Adjusting Column Width • Adjust column widths to accommodate data • Default column width is 8.43 characters wide (a little less than one inch) • One or more columns can be adjusted using the Ribbon, the shortcut menu, or the mouse Microsoft Office 2010-Illustrated
  • 14. Adjusting Column Width Common column formatting commands Microsoft Office 2010-Illustrated
  • 15. Adjusting Column Width Preparing to change the column width Format button Resize pointer Microsoft Office 2010-Illustrated
  • 16. Inserting and Deleting Rows and Columns • When you insert a new row, the contents of the worksheet shift down from the newly inserted row • When you insert a new column, the contents of the worksheet shift to the right of the new column Microsoft Office 2010-Illustrated
  • 17. Inserting and Deleting Rows and Columns • Excel inserts rows above the cell pointer and columns to the left • Insert multiple rows or columns by selecting the same number of row or column headings to be inserted Microsoft Office 2010-Illustrated
  • 18. Inserting and Deleting Rows and Columns Insert dialog box Entire row option button Microsoft Office 2010-Illustrated
  • 19. Inserting and Deleting Rows and Columns • When you delete a row, the contents of the worksheet shift up • When you delete a column, the contents of the worksheet shift to the left • Delete multiple rows or columns by selecting all of the row or column headings to be deleted Microsoft Office 2010-Illustrated
  • 20. Applying Colors, Patterns, and Borders • You can add enhancements such as colors, patterns, and borders by using: • Border and Fill Color buttons in the Font group on the Home tab of the Ribbon and on the Mini toolbar, or • Fill tab and Border tab in the Format Cells dialog box Microsoft Office 2010-Illustrated
  • 21. Applying Colors, Patterns, and Borders • Cell styles are pre-designed combinations of formatting attributes • Use the Cell Styles button in the Styles group on the Home tab Microsoft Office 2010-Illustrated
  • 22. Applying Colors, Patterns, and Borders LivePreview of fill color Cell styles button Font Color list arrow Fill Color list arrow Cell A1 previewed Microsoft Office 2010-Illustrated
  • 23. Applying Conditional Formatting • Excel can format cells based on specific results • Automatic application of formatting attributes on cell values is called conditional formatting • Different formats are automatically applied if the data meets conditions you specify Microsoft Office 2010-Illustrated
  • 24. Applying Conditional Formatting • Data bars are a type of conditional formatting that visually illustrate differences among values Microsoft Office 2010-Illustrated
  • 25. Applying Conditional Formatting Previewing a data bars in a range Data bars Microsoft Office 2010-Illustrated
  • 26. Applying Conditional Formatting Between dialog box Format when conditions met Input boxes Microsoft Office 2010-Illustrated
  • 27. Applying Conditional Formatting Worksheet with conditional formatting Microsoft Office 2010-Illustrated
  • 28. Renaming and Moving a Worksheet • By default, an Excel workbook initially contains three worksheets, named Sheet1, Sheet2, and Sheet3 • To move to another sheet, click its sheet tab Microsoft Office 2010-Illustrated
  • 29. Naming and Moving a Sheet • To make it easier to identify the sheets, you can rename each sheet and add color to the tabs • You can change the order of sheets by dragging the sheet tabs Microsoft Office 2010-Illustrated
  • 30. Naming and Moving a Sheet Moving the Budget sheet Sheet relocation Sheet1 pointer renamed Microsoft Office 2010-Illustrated
  • 31. Checking Spelling • Spelling checker scans the worksheet and flags possible mistakes and suggests corrections • To check other worksheets in a workbook, display the worksheet and run the spelling checker again • Add words that are spelled correctly but are not recognized by the spelling checker Microsoft Office 2010-Illustrated
  • 32. Checking Spelling Spelling English (U.S.) dialog box Misspelled word Replacement word suggestions Microsoft Office 2010-Illustrated
  • 33. Summary • Format values • Change font and font size • Change font styles and alignment • Adjust column width • Insert and delete rows and columns Microsoft Office 2010-Illustrated
  • 34. Summary • Apply colors, patterns, and borders • Apply conditional formatting • Rename and move a worksheet • Check spelling Microsoft Office 2010-Illustrated