Folding An Origami Poems Book 2
Download as ppt, pdf1 like1,346 views
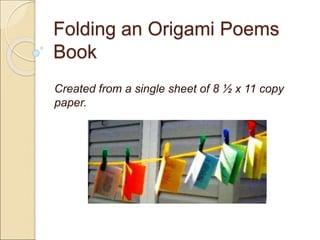
An origami book can be created from a single sheet of paper by making a series of folds. The folds create pages that contain poems. Once completed, the small origami book measures 4 by 2.5 inches. To finish the book, a single cut is made across the top fold of the title page.
1 of 18
Downloaded 35 times
Ad
Recommended
Citations UCEM (Texte 23.III.3.1)Pierrot Caron
?
Le document aborde le concept de salut selon le cours en miracles, en affirmant qu'il n'y a aucun compromis possible ©ż cet ©”gard. Il met l'accent sur la n©”cessit©” d'une compr©”hension pure du salut. Le texte souligne l'importance de l'int©”grit©” dans les choix personnels li©”s ©ż ce th©©me.blairresume1
blairresume1Blair Atkinson
?
This document contains contact and background information for Blair Atkinson, a music producer and A&R professional from Atlanta, GA. It includes his education history, noting he has a high school diploma from Jonesboro High School and studied Business Administration at Georgia Gwinnett College. It lists his experience working in A&R and production roles at Universal Music Group, Warner Music, and RCA Records. Additionally, it provides references and outlines his skills in areas such as talent scouting, music licensing, and audio engineering.ź▀źĄźżźļźóź╗ź├ź╚3Ęų╝õźŽź├źŁź¾ź░?
ź▀źĄźżźļźóź╗ź├ź╚3Ęų╝õźŽź├źŁź¾ź░?Takashi Jona
?
2016─Ļ5į┬14╚šż╦ĖŻī∙?▓®ČÓż╬ź┌źčź▄żŪķ_┤▀żĄżņżļźżź┘ź¾ź╚ĪĖUnity Fukuoka 11 ?ūįū„źóź╗ź├ź╚ż╚źĘź¦®`ź└ż“╠Ēż©żŲ?Ī╣ż╬ųąż╬ĪĖźóź╗ź├ź╚Ż│Ęųź»ź├źŁź¾ź░Ī╣żŪ╩╣ż”ź┴źÕ®`ź╚źĻźóźļżŪż╣ĪŻ
https://atnd.org/events/77231Saginaw county cof c 5 2-13
Saginaw county cof c 5 2-13Betty Marvin McNerney
?
The Michigan Chamber of Commerce advocates increasing state and local investment in roads and public transportation by at least $1.6 billion per year to address the deteriorating transportation infrastructure. Transportation is critical to Michigan's economy, yet funding has not kept up and conditions are worsening, costing the state billions annually. Investing more now would create jobs, boost economic growth, and improve safety, while delaying further damages the transportation system and economy.Investment Portfolio
Investment PortfolioEleanor Murgatroyd
?
The document discusses proposed changes to the investment portfolio of the Lace and Hosiery Workers Provident Charity. The current portfolio is deemed inappropriate and high-risk by the Trustees due to a lack of diversification and concentration in similar industries. The Trustees express concerns about the level of risk, lack of security, and the portfolio being out of date. To address these issues, the document proposes lowering risk through diversification across different asset classes and industries. This includes adding bonds and a small number of investment trusts while limiting high-risk shares. The goal is to create a portfolio that produces growth and income but is safer and more suitable for the charity.║▌║▌▀ŻshareCarola26
?
Que es ║▌║▌▀Żshare, cuales son sus funciones, como podemos crear una cuenta y como se pueden subir archivos paso a paso.Curso de-cromoterapia-curacion-con-coloresEducagratis
?
El documento discute el uso terap©”utico de los colores en el tratamiento de enfermedades, mencionando c©«mo distintos colores pueden influir en aspectos fisiol©«gicos como la circulaci©«n y el dolor. Tambi©”n se presenta una oferta de cursos gratuitos en diversas ©óreas relacionadas con la salud, medicina y bienestar personal, disponibles en educagratis. Adem©ós, se listan varios cursos espec©¬ficos como homeopat©¬a, primeros auxilios y cromoterapia.Curso de origamiEducagratis
?
El sitio web educagratis.org ofrece una variedad de cursos y clases online gratuitos en diversas tem©óticas, que incluyen juegos y recreaci©«n. Los usuarios pueden acceder a m©▓ltiples cursos relacionados con juegos espec©¬ficos como bridge, poker, ajedrez, y otros pasatiempos. Adem©ós, se proporcionan enlaces directos a cada categor©¬a de cursos disponibles.JASCYNTHIA E.McKENZIE 2016
JASCYNTHIA E.McKENZIE 2016Jem McKenzie
?
Jascyntia McKenzie has over 15 years of experience providing executive level administrative support. She has a proven track record of managing schedules, travel arrangements, meetings, reports and special projects for senior level executives in various industries. She is highly skilled in Microsoft Office, scheduling, expense reporting, and coordinating complex activities and meetings. Her objective is to obtain a position that utilizes her dependability, flexibility, problem-solving skills and ability to maintain confidentiality.╩╝╝ŲóŌ
╩╝╝ŲóŌYujiSuzue
?
ĪĖ╦’ūėż╬▒°Ę©ĪĪ╩╝╝ŲŲ¬Ī╣ż╬ūŅųš╗žżŪż╣ĪŻż│żņż▐żŪ╬Õ╩┬ż╚Ų▀╝Ųż╚╣ŅĄ└ż“Ž░ż├żŲżŁż┐ż½ż╚╦╝żżż▐ż╣ż¼Īóżõż├żčżĻ╝Ų╦Ńż“Š║š∙ŽÓ╩ųżĶżĻżżż├żčżżż╣żļż│ż╚ż¼┤¾╩┬ż╚żżż”ż’ż▒żŪż╣ĪŻąęż╗ż╬ż┐żßż╦żŽĪó┼¼┴”ż“Ž¦żĘż▐ż╩żżż╚żżż▒ż╩żżż¾żŪż╣ż═Ī½UnityAssetTouchAndTryinGreeCreatorsMeetup4th20160517
UnityAssetTouchAndTryinGreeCreatorsMeetup4th20160517Takashi Jona
?
2016/05/17(╗)ż╦ķ_┤▀żĄżņżļ "GREE Creators' Meetup Ą┌4╗ž
HOLLYWOODż╬ųŲū„¼Fł÷ż½żķ覿ųĪĖźėźĖźÕźóźļźŪź┘źĒź├źūźßź¾ź╚Ī╣" żŪĪóĄ▒╚šż╬ź╗ź├źĘźńź¾─┌╚▌ż╦ź▐ź├ź┴ż╣żļźóź╗ź├ź╚ż“¤o┴ŽżŪż¬įćżĘżżż┐ż└ż▒żļżĶż”ż╦żĘż▐żĘż┐ĪŻ
żĮż╬īØŽ¾ż╬źóź╗ź├ź╚ż╬ę╗ėEżŪż╣ĪŻMakeGameWithParticle
MakeGameWithParticleTakashi Jona
?
2016─Ļ6į┬25╚šż╦Ä┌Ą║żŪ▒ß│¦░õżĄż¾ų„┤▀żŪ┐¬┤▀ż╣żļźč®`źŲźŻź»źļ├ŃŪ┐╗߯©╚ļ├┼▒ÓŻ®ż╬ū╩┴ŽżŪż╣ĪŻingenieria de metodos trabajo 1Universidad Nacional de Trujillo
?
El documento presenta las respuestas de un estudiante de ingenier©¬a industrial a nueve preguntas sobre ingenier©¬a de m©”todos. Explica el objetivo principal de la ingenier©¬a de m©”todos, lista los ocho pasos para aplicarla, y describe d©«nde se realizaron originalmente los estudios de tiempos y qui©”n los llev©« a cabo. Tambi©”n resume los principios de Frederick W. Taylor sobre administraci©«n cient©¬fica y las organizaciones que promueven las ideas de Taylor y Gilbreth.Editorial bruno-catalogo-plan lector-2016-secundariaRosa Maria Flores Gutierrez
?
Este documento presenta el Plan Lector de Editorial Bru?o para el nivel de Educaci©«n Secundaria. El plan propone desarrollar el h©óbito de la lectura y las capacidades comunicativas en los estudiantes para que sean competentes en el mundo de la comunicaci©«n y se formen integralmente. Incluye estrategias metodol©«gicas antes, durante y despu©”s de la lectura, as©¬ como una gu©¬a de libros recomendados para cada a?o de secundaria con enfoques en valores.FLAMENCO Y COPLAJuanGa6
?
El documento resume el origen y desarrollo del flamenco en Espa?a. Surge a finales del siglo XVIII de la mezcla de gitanos, musulmanes y andaluces en el sur de Espa?a. Refleja la vida y oficios de estas comunidades a trav©”s del cante, baile y toque musical. Ha evolucionado con el tiempo influenciado por factores sociales, pol©¬ticos y econ©«micos como la industrializaci©«n y la emigraci©«n. Hoy en d©¬a es considerado patrimonio cultural inmaterial de la humanidad.Origami
Origaminkocasoy
?
The document outlines an exhibition proposal for the British Museum titled "Once upon a time, UnFold: A Tale of Origami" that would use origami master Akira Yoshizawa as a reference point to tell the story of origami's history through 4 sections divided into a narrative story. Key elements of the exhibition include its graphic identity derived from origami angles, color palette, custom origami typeface, and layout/design of invitation cards, tickets, posters for bus/underground stations, and web banners to promote the exhibition.Ocean Care Origami
Ocean Care OrigamiDanuse Murty
?
The document explains the history and significance of origami, highlighting its role as a holistic teaching medium that fosters creativity and environmental awareness among children. It provides instructions for making various origami models, including animals, hats, and boxes, using simple materials like paper. Additionally, it encourages children to create origami gifts for special occasions using the skills they develop from these activities.Speech 1A Demonstration- Oragami
Speech 1A Demonstration- OragamiAndi (Andreea) Burton
?
1) The document provides instructions for making a 5-point origami star using either a dollar bill or half sheet of paper.
2) It explains that 5 pieces of paper are needed and the steps to fold each individual point piece which involves 7 steps of precise folding.
3) Finally, it outlines the assembly process to bring all 5 point pieces together to form the completed 5-point origami star.PAPER FOLDING.pptx
PAPER FOLDING.pptxSankari62
?
This document discusses the art of origami, or paper folding. It defines origami as the art of folding objects out of paper to create two-dimensional and three-dimensional shapes. The document then describes different types of paper folds such as parallel folds, combination folds, asymmetric folds. It notes that November 11th is origami day and discusses how origami can help teach mathematics and geometry concepts to students.Nat
NatMatt Stephens
?
This storyboard outlines the steps to make an origami whale from a square piece of paper in 13 scenes. It shows folding the paper in half diagonally and creasing then unfolding. Further steps include folding sides to the center and flipping the paper to complete the whale shape by making cuts for the nose and tail and adding diagonal folds for fins. The final scene allows for customization.Origami blow up box
Origami blow up boxfshutterman
?
To make an origami blow-up box, start with a square of origami paper and fold it in half to make a diamond shape, then fold it the opposite way. Open it up and push in on both sides to form a triangle, then fold the flaps on each side so they meet in the middle. Fold in the four points so they meet the center line, then pinch one point to create an opening and push the flap above it inside to prevent it from coming out, repeating for the other three points. Blow into one end to inflate the box.TOOLS AND MATERIALS USED IN MAKING ORIGAMI.pptx
TOOLS AND MATERIALS USED IN MAKING ORIGAMI.pptxLords Angel's Montessori Inc. (LAMS)
?
Tools used in origami include paper, knives, and scissors. Different types of paper can be used, including colored paper from magazines. The document outlines common origami folding techniques like valley folds where the paper folds up from the center and mountain folds where it folds down. Diagrams show different symbols to indicate things like hidden edges, crease lines, and whether a fold should be valley or mountain style.Origami frog
Origami frogBarbara Sakamoto
?
The document provides instructions to fold an origami frog out of a single square sheet of paper in 22 steps. It begins with making initial folds to create a rectangle and triangles, then involves folding the triangles into legs and a body and refolding parts of the rectangle to form the frog's shape. Finally, optional eyes can be drawn on the folded frog.Folding Hope: How to Create a Paper Crane
Folding Hope: How to Create a Paper CraneCarrie Brummer
?
This document provides a step-by-step origami tutorial for creating a paper crane, detailing the folding techniques and orientation of the paper throughout the process. It includes instructions on how to manipulate the paper to achieve the desired shapes and features of the crane. Additionally, it encourages sharing the final creations on social media to spread joy and inspiration.Internet Quiz - Prelims || Aditya Shiva Sharma, Druva and Haaziq || Midnight ...
Internet Quiz - Prelims || Aditya Shiva Sharma, Druva and Haaziq || Midnight ...BITS Goa Quiz Club
?
Midnight QuizĘ┬ųŲ░õ│¦▒½│¦č¦Ę襟├└╣·╝ė└¹ĖŻ─ßčŪų▌┴ó┤¾č¦╚°┐╦└Ł├┼═ąĘųąŻ▒ŽęĄųżĘČ▒Š,░õ│¦▒½│¦╬─ŲŠ
Ę┬ųŲ░õ│¦▒½│¦č¦Ę襟├└╣·╝ė└¹ĖŻ─ßčŪų▌┴ó┤¾č¦╚°┐╦└Ł├┼═ąĘųąŻ▒ŽęĄųżĘČ▒Š,░õ│¦▒½│¦╬─ŲŠtaqyed
?
╝°ė┌┤╦Ż¼░ņ└ĒCSUS┤¾č¦▒ŽęĄųż╝ė└¹ĖŻ─ßčŪų▌┴ó┤¾č¦╚°┐╦└Ł├┼═ąĘųąŻ▒ŽęĄųż╩ķĪŠq▐▒1954292140Ī┐┴¶č¦ę╗šŠ╩Į░ņ└Ēč¦└·╬─ŲŠų▒═©│ĄŻ©╝ė└¹ĖŻ─ßčŪų▌┴ó┤¾č¦╚°┐╦└Ł├┼═ąĘųąŻ▒ŽęĄųżCSUS│╔╝©ĄźįŁ░µ╝ė└¹ĖŻ─ßčŪų▌┴ó┤¾č¦╚°┐╦└Ł├┼═ąĘųąŻč¦╬╗ųż╝┘╬─ŲŠŻ®╬┤─▄š²│Ż▒ŽęĄŻ┐ĪŠq▐▒1954292140Ī┐░ņ└Ē╝ė└¹ĖŻ─ßčŪų▌┴ó┤¾č¦╚°┐╦└Ł├┼═ąĘųąŻ▒ŽęĄųż│╔╝©Ąź/┴¶ą┼č¦└·╚Žųż/č¦└·╬─ŲŠ/╩╣╣▌╚Žųż/┴¶č¦╗ž╣·╚╦į▒ųż├„/┬╝╚Ī═©ų¬╩ķ/Offer/į┌Č┴ųż├„/│╔╝©Ąź/═°╔Ž┤µĄĄė└Š├┐╔▓ķŻĪ
╚ń╣¹─·┤”ė┌ęįŽ┬╝ĖųųŪķ┐÷Ż║
Ī¾į┌ąŻŲ┌╝õŻ¼ę“Ė„ųųįŁę“╬┤─▄╦│└¹▒ŽęĄĪŁĪŁ─├▓╗ĄĮ╣┘ĘĮ▒ŽęĄųż
Ī¾├µČįĖĖ─ĖĄ─č╣┴”Ż¼ŽŻ═¹ŠĪ┐ņ─├ĄĮŻ╗
Ī¾▓╗ŪÕ│■╚Žųż┴„│╠ęį╝░▓─┴ŽĖ├╚ń║╬ū╝▒ĖŻ╗
Ī¾╗ž╣·╩▒╝õ║▄│żŻ¼═³╝Ū░ņ└ĒŻ╗
Ī¾╗ž╣·┬Ē╔ŽŠ═꬚ę╣żū„Ż¼░ņĖ°ė├╚╦Ąź╬╗┐┤Ż╗
Ī¾Ų¾╩┬ꥥź╬╗▒žąļę¬Ū¾░ņ└ĒĄ─
Ī¾ąĶę¬▒©┐╝╣½╬±į▒Īó╣║┬“├Ō╦░│ĄĪó┬õū¬╗¦┐┌
Ī¾╔ĻŪļ┴¶č¦╔·┤┤ęĄ╗∙Į
ĪŠ░ņ└Ē╝ė└¹ĖŻ─ßčŪų▌┴ó┤¾č¦╚°┐╦└Ł├┼═ąĘųąŻ│╔╝©ĄźBuy California State University, Sacramento TranscriptsĪ┐
╣║┬“╚š║½│╔╝©ĄźĪóėó╣·┤¾č¦│╔╝©ĄźĪó├└╣·┤¾č¦│╔╝©ĄźĪó░─ų▐┤¾č¦│╔╝©ĄźĪó╝ė─├┤¾┤¾č¦│╔╝©ĄźŻ©q╬ó1954292140Ż®ą┬╝ėŲ┬┤¾č¦│╔╝©ĄźĪóą┬╬„└╝┤¾č¦│╔╝©ĄźĪó░«Č¹└╝│╔╝©ĄźĪó╬„░Óč└│╔╝©ĄźĪóĄ┬╣·│╔╝©ĄźĪŻ│╔╝©ĄźĄ─ęŌęÕų„ę¬╠ÕŽųį┌ųż├„覎░─▄┴”ĪóŲ└╣└č¦╩§▒│Š░Īóš╣╩Šū█║Ž╦žų╩Īó╠ßĖ▀┬╝╚Ī┬╩Ż¼ęį╝░╩Ūū„╬¬┴¶ą┼╚Žųż╔ĻŪļ▓─┴ŽĄ─ę╗▓┐ĘųĪŻ
╝ė└¹ĖŻ─ßčŪų▌┴ó┤¾č¦╚°┐╦└Ł├┼═ąĘųąŻ│╔╝©Ąź─▄╣╗╠ÕŽų─·Ą─Ą─覎░─▄┴”Ż¼░³└©╝ė└¹ĖŻ─ßčŪų▌┴ó┤¾č¦╚°┐╦└Ł├┼═ąĘųąŻ┐╬│╠│╔╝©Īóū©ęĄ─▄┴”Īó蹊┐─▄┴”ĪŻŻ©q╬ó1954292140Ż®Š▀╠Õ└┤╦ĄŻ¼│╔╝©▒©ĖµĄź═©│Ż░³║¼č¦╔·Ą─覎░╝╝─▄ėļŽ░╣▀ĪóĖ„┐Ų│╔╝©ęį╝░└Ž╩”Ų└ė’Ą╚▓┐ĘųŻ¼ę“┤╦Ż¼│╔╝©Ąź▓╗Į÷╩Ūč¦╔·č¦╩§─▄┴”Ą─ųż├„Ż¼ę▓╩ŪŲ└╣└č¦╔·╩Ūʱ╩╩║Ž─│Ė÷Į╠ė²ŽŅ─┐Ą─ųžę¬ę└Š▌ŻĪburstone analysis.pptx..........................................................
burstone analysis.pptx..........................................................UjjawalKrishnan
?
hjgghgbcvSeason 12 _ EP03 - The Coked up Quiz .pdf
Season 12 _ EP03 - The Coked up Quiz .pdfQuiz Club, Indian Institute of Technology, Patna
?
Weekly set conducted as part of season 12.More Related Content
Viewers also liked (9)
Curso de origamiEducagratis
?
El sitio web educagratis.org ofrece una variedad de cursos y clases online gratuitos en diversas tem©óticas, que incluyen juegos y recreaci©«n. Los usuarios pueden acceder a m©▓ltiples cursos relacionados con juegos espec©¬ficos como bridge, poker, ajedrez, y otros pasatiempos. Adem©ós, se proporcionan enlaces directos a cada categor©¬a de cursos disponibles.JASCYNTHIA E.McKENZIE 2016
JASCYNTHIA E.McKENZIE 2016Jem McKenzie
?
Jascyntia McKenzie has over 15 years of experience providing executive level administrative support. She has a proven track record of managing schedules, travel arrangements, meetings, reports and special projects for senior level executives in various industries. She is highly skilled in Microsoft Office, scheduling, expense reporting, and coordinating complex activities and meetings. Her objective is to obtain a position that utilizes her dependability, flexibility, problem-solving skills and ability to maintain confidentiality.╩╝╝ŲóŌ
╩╝╝ŲóŌYujiSuzue
?
ĪĖ╦’ūėż╬▒°Ę©ĪĪ╩╝╝ŲŲ¬Ī╣ż╬ūŅųš╗žżŪż╣ĪŻż│żņż▐żŪ╬Õ╩┬ż╚Ų▀╝Ųż╚╣ŅĄ└ż“Ž░ż├żŲżŁż┐ż½ż╚╦╝żżż▐ż╣ż¼Īóżõż├żčżĻ╝Ų╦Ńż“Š║š∙ŽÓ╩ųżĶżĻżżż├żčżżż╣żļż│ż╚ż¼┤¾╩┬ż╚żżż”ż’ż▒żŪż╣ĪŻąęż╗ż╬ż┐żßż╦żŽĪó┼¼┴”ż“Ž¦żĘż▐ż╩żżż╚żżż▒ż╩żżż¾żŪż╣ż═Ī½UnityAssetTouchAndTryinGreeCreatorsMeetup4th20160517
UnityAssetTouchAndTryinGreeCreatorsMeetup4th20160517Takashi Jona
?
2016/05/17(╗)ż╦ķ_┤▀żĄżņżļ "GREE Creators' Meetup Ą┌4╗ž
HOLLYWOODż╬ųŲū„¼Fł÷ż½żķ覿ųĪĖźėźĖźÕźóźļźŪź┘źĒź├źūźßź¾ź╚Ī╣" żŪĪóĄ▒╚šż╬ź╗ź├źĘźńź¾─┌╚▌ż╦ź▐ź├ź┴ż╣żļźóź╗ź├ź╚ż“¤o┴ŽżŪż¬įćżĘżżż┐ż└ż▒żļżĶż”ż╦żĘż▐żĘż┐ĪŻ
żĮż╬īØŽ¾ż╬źóź╗ź├ź╚ż╬ę╗ėEżŪż╣ĪŻMakeGameWithParticle
MakeGameWithParticleTakashi Jona
?
2016─Ļ6į┬25╚šż╦Ä┌Ą║żŪ▒ß│¦░õżĄż¾ų„┤▀żŪ┐¬┤▀ż╣żļźč®`źŲźŻź»źļ├ŃŪ┐╗߯©╚ļ├┼▒ÓŻ®ż╬ū╩┴ŽżŪż╣ĪŻingenieria de metodos trabajo 1Universidad Nacional de Trujillo
?
El documento presenta las respuestas de un estudiante de ingenier©¬a industrial a nueve preguntas sobre ingenier©¬a de m©”todos. Explica el objetivo principal de la ingenier©¬a de m©”todos, lista los ocho pasos para aplicarla, y describe d©«nde se realizaron originalmente los estudios de tiempos y qui©”n los llev©« a cabo. Tambi©”n resume los principios de Frederick W. Taylor sobre administraci©«n cient©¬fica y las organizaciones que promueven las ideas de Taylor y Gilbreth.Editorial bruno-catalogo-plan lector-2016-secundariaRosa Maria Flores Gutierrez
?
Este documento presenta el Plan Lector de Editorial Bru?o para el nivel de Educaci©«n Secundaria. El plan propone desarrollar el h©óbito de la lectura y las capacidades comunicativas en los estudiantes para que sean competentes en el mundo de la comunicaci©«n y se formen integralmente. Incluye estrategias metodol©«gicas antes, durante y despu©”s de la lectura, as©¬ como una gu©¬a de libros recomendados para cada a?o de secundaria con enfoques en valores.FLAMENCO Y COPLAJuanGa6
?
El documento resume el origen y desarrollo del flamenco en Espa?a. Surge a finales del siglo XVIII de la mezcla de gitanos, musulmanes y andaluces en el sur de Espa?a. Refleja la vida y oficios de estas comunidades a trav©”s del cante, baile y toque musical. Ha evolucionado con el tiempo influenciado por factores sociales, pol©¬ticos y econ©«micos como la industrializaci©«n y la emigraci©«n. Hoy en d©¬a es considerado patrimonio cultural inmaterial de la humanidad.Origami
Origaminkocasoy
?
The document outlines an exhibition proposal for the British Museum titled "Once upon a time, UnFold: A Tale of Origami" that would use origami master Akira Yoshizawa as a reference point to tell the story of origami's history through 4 sections divided into a narrative story. Key elements of the exhibition include its graphic identity derived from origami angles, color palette, custom origami typeface, and layout/design of invitation cards, tickets, posters for bus/underground stations, and web banners to promote the exhibition.Similar to Folding An Origami Poems Book 2 (9)
Ocean Care Origami
Ocean Care OrigamiDanuse Murty
?
The document explains the history and significance of origami, highlighting its role as a holistic teaching medium that fosters creativity and environmental awareness among children. It provides instructions for making various origami models, including animals, hats, and boxes, using simple materials like paper. Additionally, it encourages children to create origami gifts for special occasions using the skills they develop from these activities.Speech 1A Demonstration- Oragami
Speech 1A Demonstration- OragamiAndi (Andreea) Burton
?
1) The document provides instructions for making a 5-point origami star using either a dollar bill or half sheet of paper.
2) It explains that 5 pieces of paper are needed and the steps to fold each individual point piece which involves 7 steps of precise folding.
3) Finally, it outlines the assembly process to bring all 5 point pieces together to form the completed 5-point origami star.PAPER FOLDING.pptx
PAPER FOLDING.pptxSankari62
?
This document discusses the art of origami, or paper folding. It defines origami as the art of folding objects out of paper to create two-dimensional and three-dimensional shapes. The document then describes different types of paper folds such as parallel folds, combination folds, asymmetric folds. It notes that November 11th is origami day and discusses how origami can help teach mathematics and geometry concepts to students.Nat
NatMatt Stephens
?
This storyboard outlines the steps to make an origami whale from a square piece of paper in 13 scenes. It shows folding the paper in half diagonally and creasing then unfolding. Further steps include folding sides to the center and flipping the paper to complete the whale shape by making cuts for the nose and tail and adding diagonal folds for fins. The final scene allows for customization.Origami blow up box
Origami blow up boxfshutterman
?
To make an origami blow-up box, start with a square of origami paper and fold it in half to make a diamond shape, then fold it the opposite way. Open it up and push in on both sides to form a triangle, then fold the flaps on each side so they meet in the middle. Fold in the four points so they meet the center line, then pinch one point to create an opening and push the flap above it inside to prevent it from coming out, repeating for the other three points. Blow into one end to inflate the box.TOOLS AND MATERIALS USED IN MAKING ORIGAMI.pptx
TOOLS AND MATERIALS USED IN MAKING ORIGAMI.pptxLords Angel's Montessori Inc. (LAMS)
?
Tools used in origami include paper, knives, and scissors. Different types of paper can be used, including colored paper from magazines. The document outlines common origami folding techniques like valley folds where the paper folds up from the center and mountain folds where it folds down. Diagrams show different symbols to indicate things like hidden edges, crease lines, and whether a fold should be valley or mountain style.Origami frog
Origami frogBarbara Sakamoto
?
The document provides instructions to fold an origami frog out of a single square sheet of paper in 22 steps. It begins with making initial folds to create a rectangle and triangles, then involves folding the triangles into legs and a body and refolding parts of the rectangle to form the frog's shape. Finally, optional eyes can be drawn on the folded frog.Folding Hope: How to Create a Paper Crane
Folding Hope: How to Create a Paper CraneCarrie Brummer
?
This document provides a step-by-step origami tutorial for creating a paper crane, detailing the folding techniques and orientation of the paper throughout the process. It includes instructions on how to manipulate the paper to achieve the desired shapes and features of the crane. Additionally, it encourages sharing the final creations on social media to spread joy and inspiration.Ad
Recently uploaded (20)
Internet Quiz - Prelims || Aditya Shiva Sharma, Druva and Haaziq || Midnight ...
Internet Quiz - Prelims || Aditya Shiva Sharma, Druva and Haaziq || Midnight ...BITS Goa Quiz Club
?
Midnight QuizĘ┬ųŲ░õ│¦▒½│¦č¦Ę襟├└╣·╝ė└¹ĖŻ─ßčŪų▌┴ó┤¾č¦╚°┐╦└Ł├┼═ąĘųąŻ▒ŽęĄųżĘČ▒Š,░õ│¦▒½│¦╬─ŲŠ
Ę┬ųŲ░õ│¦▒½│¦č¦Ę襟├└╣·╝ė└¹ĖŻ─ßčŪų▌┴ó┤¾č¦╚°┐╦└Ł├┼═ąĘųąŻ▒ŽęĄųżĘČ▒Š,░õ│¦▒½│¦╬─ŲŠtaqyed
?
╝°ė┌┤╦Ż¼░ņ└ĒCSUS┤¾č¦▒ŽęĄųż╝ė└¹ĖŻ─ßčŪų▌┴ó┤¾č¦╚°┐╦└Ł├┼═ąĘųąŻ▒ŽęĄųż╩ķĪŠq▐▒1954292140Ī┐┴¶č¦ę╗šŠ╩Į░ņ└Ēč¦└·╬─ŲŠų▒═©│ĄŻ©╝ė└¹ĖŻ─ßčŪų▌┴ó┤¾č¦╚°┐╦└Ł├┼═ąĘųąŻ▒ŽęĄųżCSUS│╔╝©ĄźįŁ░µ╝ė└¹ĖŻ─ßčŪų▌┴ó┤¾č¦╚°┐╦└Ł├┼═ąĘųąŻč¦╬╗ųż╝┘╬─ŲŠŻ®╬┤─▄š²│Ż▒ŽęĄŻ┐ĪŠq▐▒1954292140Ī┐░ņ└Ē╝ė└¹ĖŻ─ßčŪų▌┴ó┤¾č¦╚°┐╦└Ł├┼═ąĘųąŻ▒ŽęĄųż│╔╝©Ąź/┴¶ą┼č¦└·╚Žųż/č¦└·╬─ŲŠ/╩╣╣▌╚Žųż/┴¶č¦╗ž╣·╚╦į▒ųż├„/┬╝╚Ī═©ų¬╩ķ/Offer/į┌Č┴ųż├„/│╔╝©Ąź/═°╔Ž┤µĄĄė└Š├┐╔▓ķŻĪ
╚ń╣¹─·┤”ė┌ęįŽ┬╝ĖųųŪķ┐÷Ż║
Ī¾į┌ąŻŲ┌╝õŻ¼ę“Ė„ųųįŁę“╬┤─▄╦│└¹▒ŽęĄĪŁĪŁ─├▓╗ĄĮ╣┘ĘĮ▒ŽęĄųż
Ī¾├µČįĖĖ─ĖĄ─č╣┴”Ż¼ŽŻ═¹ŠĪ┐ņ─├ĄĮŻ╗
Ī¾▓╗ŪÕ│■╚Žųż┴„│╠ęį╝░▓─┴ŽĖ├╚ń║╬ū╝▒ĖŻ╗
Ī¾╗ž╣·╩▒╝õ║▄│żŻ¼═³╝Ū░ņ└ĒŻ╗
Ī¾╗ž╣·┬Ē╔ŽŠ═꬚ę╣żū„Ż¼░ņĖ°ė├╚╦Ąź╬╗┐┤Ż╗
Ī¾Ų¾╩┬ꥥź╬╗▒žąļę¬Ū¾░ņ└ĒĄ─
Ī¾ąĶę¬▒©┐╝╣½╬±į▒Īó╣║┬“├Ō╦░│ĄĪó┬õū¬╗¦┐┌
Ī¾╔ĻŪļ┴¶č¦╔·┤┤ęĄ╗∙Į
ĪŠ░ņ└Ē╝ė└¹ĖŻ─ßčŪų▌┴ó┤¾č¦╚°┐╦└Ł├┼═ąĘųąŻ│╔╝©ĄźBuy California State University, Sacramento TranscriptsĪ┐
╣║┬“╚š║½│╔╝©ĄźĪóėó╣·┤¾č¦│╔╝©ĄźĪó├└╣·┤¾č¦│╔╝©ĄźĪó░─ų▐┤¾č¦│╔╝©ĄźĪó╝ė─├┤¾┤¾č¦│╔╝©ĄźŻ©q╬ó1954292140Ż®ą┬╝ėŲ┬┤¾č¦│╔╝©ĄźĪóą┬╬„└╝┤¾č¦│╔╝©ĄźĪó░«Č¹└╝│╔╝©ĄźĪó╬„░Óč└│╔╝©ĄźĪóĄ┬╣·│╔╝©ĄźĪŻ│╔╝©ĄźĄ─ęŌęÕų„ę¬╠ÕŽųį┌ųż├„覎░─▄┴”ĪóŲ└╣└č¦╩§▒│Š░Īóš╣╩Šū█║Ž╦žų╩Īó╠ßĖ▀┬╝╚Ī┬╩Ż¼ęį╝░╩Ūū„╬¬┴¶ą┼╚Žųż╔ĻŪļ▓─┴ŽĄ─ę╗▓┐ĘųĪŻ
╝ė└¹ĖŻ─ßčŪų▌┴ó┤¾č¦╚°┐╦└Ł├┼═ąĘųąŻ│╔╝©Ąź─▄╣╗╠ÕŽų─·Ą─Ą─覎░─▄┴”Ż¼░³└©╝ė└¹ĖŻ─ßčŪų▌┴ó┤¾č¦╚°┐╦└Ł├┼═ąĘųąŻ┐╬│╠│╔╝©Īóū©ęĄ─▄┴”Īó蹊┐─▄┴”ĪŻŻ©q╬ó1954292140Ż®Š▀╠Õ└┤╦ĄŻ¼│╔╝©▒©ĖµĄź═©│Ż░³║¼č¦╔·Ą─覎░╝╝─▄ėļŽ░╣▀ĪóĖ„┐Ų│╔╝©ęį╝░└Ž╩”Ų└ė’Ą╚▓┐ĘųŻ¼ę“┤╦Ż¼│╔╝©Ąź▓╗Į÷╩Ūč¦╔·č¦╩§─▄┴”Ą─ųż├„Ż¼ę▓╩ŪŲ└╣└č¦╔·╩Ūʱ╩╩║Ž─│Ė÷Į╠ė²ŽŅ─┐Ą─ųžę¬ę└Š▌ŻĪburstone analysis.pptx..........................................................
burstone analysis.pptx..........................................................UjjawalKrishnan
?
hjgghgbcvSeason 12 _ EP03 - The Coked up Quiz .pdf
Season 12 _ EP03 - The Coked up Quiz .pdfQuiz Club, Indian Institute of Technology, Patna
?
Weekly set conducted as part of season 12.The Bet - Concept Teaser v06 Storyboards
The Bet - Concept Teaser v06 StoryboardsJim Mortensen
?
"THE BET" : God & the Devil wagering on which one of them is better at convincing a family to stick with them despite ruining their lives on a daily basis.Ganimatoonics Finals || QM: Agastya and Nikhil || Quark'25 || BITS Pilani, KK...
Ganimatoonics Finals || QM: Agastya and Nikhil || Quark'25 || BITS Pilani, KK...BITS Goa Quiz Club
?
Quark'25Season 12 _ EP 01 _ Lieutenant Quiz.pptx
Season 12 _ EP 01 _ Lieutenant Quiz.pptxQuiz Club, Indian Institute of Technology, Patna
?
Weekly quiz conducted as part of season 12The Bet - Concept Teaser v06 Storyboards
The Bet - Concept Teaser v06 StoryboardsJim Mortensen
?
"THE BET" : God & the Devil wagering on which one of them is better at convincing a family to stick with them despite ruining their lives on a daily basis.Rice Genomics & Whole Genome Sequencing.pptx
Rice Genomics & Whole Genome Sequencing.pptxLikhithHR
?
This presentation delves into the fascinating journey of rice genomics and whole genome sequencing, charting the evolution from early marker development to cutting-edge genome editing and pan-genomics. Rice (Oryza sativa) is not only a staple crop feeding over half the global population but also a model organism for cereal genomics due to its relatively small genome, rich genetic diversity, and high synteny with other grasses like wheat and maize. The presentation outlines why rice was the first crop plant to be fully sequenced and traces the contributions of international consortia such as IRGSP, Syngenta, and Monsanto, along with IndiaĪ»s role in sequencing chromosome 11 through the Indian Initiative for Rice Genome Sequencing (IIRGS). Detailed insights are provided into map-based sequencing methods, clone-by-clone strategies, and hierarchical shotgun sequencing, including how BAC and PAC libraries enabled high-quality genome assemblies. The sequencing of Nipponbare (japonica) laid the foundation for comprehensive rice genome annotation, revealing over 37,000 coding genes, extensive gene duplications, and a high density of transposable elements. The presentation explores the impact of rice genomic data on the development of molecular markers (SSRs, SNPs, InDels, ILPs), comparative genomics, structural and functional annotation, and custom-made markers for precision breeding. Advances post-genome era, including the 3K Rice Genome Project and updates in the Rice Genome Annotation Project (RGAP), are discussed along with emerging tools like pan-genomics, synteny maps, and RNA-seq-based expression profiling. Special attention is given to the sequencing and functional relevance of rice mitochondrial and chloroplast genomes, which play roles in energy metabolism, cytoplasmic male sterility, and hybrid breeding. Recent breakthroughs such as the activation of BBM1 and WOX9A genes for clonal seed development highlight the potential of synthetic apomixis. The talk concludes with reflections on the transformative impact of rice genome sequencing on crop improvement, enabling breeders to enhance yield, stress resilience, and nutritional quality through genomics-assisted selection and genome editing. This presentation serves as a comprehensive guide for students, researchers, and breeders navigating the landscape of rice genomics in the era of precision agricultureRalf Schumacher_ The Shadow and the Spotlight in Formula One.docx
Ralf Schumacher_ The Shadow and the Spotlight in Formula One.docxvoice ofarticle
?
When the conversation turns to the most iconic names in the high-octane world of Formula One, itĪ»s impossible to ignore the Schumacher legacy. While Michael SchumacherĪ»s record-breaking career often takes center stage, his younger brother, Ralf Schumacher, has crafted a compelling and impressive racing story of his own Ī¬ one that deserves to be told in full. Often introduced in the shadow of his elder sibling, Ralf refused to remain just "Michael's younger brother" for long. Instead, he emerged as a fierce competitor with raw talent, relentless determination, and a deep passion for racing that was evident from a very young age.
Growing up in the motorsport-rich environment of Germany, Ralf Schumacher began his racing journey on the local karting circuits, where he quickly displayed a natural flair for speed and control. It was here that he honed the skills that would one day propel him onto the world stage. Unlike many young drivers who fizzle out before reaching the top, Ralf steadily climbed the ranks, moving from national championships to the international arena with precision and maturity far beyond his years. His early years were marked by countless hours of training, setbacks that tested his resolve, and victories that fueled his ambition.
ūŅą┬░µ├└╣·╠ņŲš┤¾č¦▒ŽęĄųżŻ©░š▒│Š▒Ķ▒¶▒▒ŽęĄųż╩ķŻ®įŁ░µČ©ųŲ
ūŅą┬░µ├└╣·╠ņŲš┤¾č¦▒ŽęĄųżŻ©░š▒│Š▒Ķ▒¶▒▒ŽęĄųż╩ķŻ®įŁ░µČ©ųŲTaqyea
?
╝°ė┌┤╦Ż¼Č©ųŲ╠ņŲš┤¾č¦č¦╬╗ųż╩ķ╠ß╔²┬─└·ĪŠq▐▒1954292140Ī┐įŁ░µĖ▀Ę┬╠ņŲš┤¾č¦▒ŽęĄųż(Temple▒ŽęĄųż╩ķ)┐╔Ž╚┐┤│╔ŲĘč∙▒ŠĪŠq▐▒1954292140Ī┐░’─·ĮŌŠ÷į┌├└╣·╠ņŲš┤¾č¦╬┤▒ŽęĄ─č╠ŌŻ¼├└╣·▒ŽęĄųż╣║┬“Ż¼├└╣·╬─ŲŠ╣║┬“Ż¼ĪŠq╬ó1954292140Ī┐├└╣·╬─ŲŠ╣║┬“Ż¼├└╣·╬─ŲŠČ©ųŲŻ¼├└╣·╬─ŲŠ▓╣░ņĪŻū©ęĄį┌Ž▀Č©ųŲ├└╣·┤¾č¦╬─ŲŠŻ¼Č©ū÷├└╣·▒Š┐Ų╬─ŲŠŻ¼ĪŠq╬ó1954292140Ī┐Ė┤ųŲ├└╣·Temple University completion letterĪŻį┌Ž▀┐ņ╦┘▓╣░ņ├└╣·▒Š┐Ų▒ŽęĄųżĪó╦Č╩┐╬─ŲŠųż╩ķŻ¼╣║┬“├└╣·č¦╬╗ųżĪó╠ņŲš┤¾č¦OfferŻ¼├└╣·┤¾č¦╬─ŲŠį┌Ž▀╣║┬“ĪŻ
╚ń╣¹─·┤”ė┌ęįŽ┬╝ĖųųŪķ┐÷Ż║
Ī¾į┌ąŻŲ┌╝õŻ¼ę“Ė„ųųįŁę“╬┤─▄╦│└¹▒ŽęĄĪŁĪŁ─├▓╗ĄĮ╣┘ĘĮ▒ŽęĄųż
Ī¾├µČįĖĖ─ĖĄ─č╣┴”Ż¼ŽŻ═¹ŠĪ┐ņ─├ĄĮŻ╗
Ī¾▓╗ŪÕ│■╚Žųż┴„│╠ęį╝░▓─┴ŽĖ├╚ń║╬ū╝▒ĖŻ╗
Ī¾╗ž╣·╩▒╝õ║▄│żŻ¼═³╝Ū░ņ└ĒŻ╗
Ī¾╗ž╣·┬Ē╔ŽŠ═꬚ę╣żū„Ż¼░ņĖ°ė├╚╦Ąź╬╗┐┤Ż╗
Ī¾Ų¾╩┬ꥥź╬╗▒žąļę¬Ū¾░ņ└ĒĄ─
Ī¾ąĶę¬▒©┐╝╣½╬±į▒Īó╣║┬“├Ō╦░│ĄĪó┬õū¬╗¦┐┌
Ī¾╔ĻŪļ┴¶č¦╔·┤┤ęĄ╗∙Į
ĪŠĖ┤┐╠ę╗╠ū╠ņŲš┤¾č¦▒ŽęĄųż│╔╝©Ąźą┼ĘŌĄ╚▓─┴ŽūŅŪ┐╣ź┬į,Buy Temple University TranscriptsĪ┐
╣║┬“╚š║½│╔╝©ĄźĪóėó╣·┤¾č¦│╔╝©ĄźĪó├└╣·┤¾č¦│╔╝©ĄźĪó░─ų▐┤¾č¦│╔╝©ĄźĪó╝ė─├┤¾┤¾č¦│╔╝©ĄźŻ©q╬ó1954292140Ż®ą┬╝ėŲ┬┤¾č¦│╔╝©ĄźĪóą┬╬„└╝┤¾č¦│╔╝©ĄźĪó░«Č¹└╝│╔╝©ĄźĪó╬„░Óč└│╔╝©ĄźĪóĄ┬╣·│╔╝©ĄźĪŻ│╔╝©ĄźĄ─ęŌęÕų„ę¬╠ÕŽųį┌ųż├„覎░─▄┴”ĪóŲ└╣└č¦╩§▒│Š░Īóš╣╩Šū█║Ž╦žų╩Īó╠ßĖ▀┬╝╚Ī┬╩Ż¼ęį╝░╩Ūū„╬¬┴¶ą┼╚Žųż╔ĻŪļ▓─┴ŽĄ─ę╗▓┐ĘųĪŻ
╠ņŲš┤¾č¦│╔╝©Ąź─▄╣╗╠ÕŽų─·Ą─Ą─覎░─▄┴”Ż¼░³└©╠ņŲš┤¾č¦┐╬│╠│╔╝©Īóū©ęĄ─▄┴”Īó蹊┐─▄┴”ĪŻŻ©q╬ó1954292140Ż®Š▀╠Õ└┤╦ĄŻ¼│╔╝©▒©ĖµĄź═©│Ż░³║¼č¦╔·Ą─覎░╝╝─▄ėļŽ░╣▀ĪóĖ„┐Ų│╔╝©ęį╝░└Ž╩”Ų└ė’Ą╚▓┐ĘųŻ¼ę“┤╦Ż¼│╔╝©Ąź▓╗Į÷╩Ūč¦╔·č¦╩§─▄┴”Ą─ųż├„Ż¼ę▓╩ŪŲ└╣└č¦╔·╩Ūʱ╩╩║Ž─│Ė÷Į╠ė²ŽŅ─┐Ą─ųžę¬ę└Š▌ŻĪūŅą┬░µ├└╣·┐░╚°╦╣┤¾č¦▒ŽęĄųżŻ©░Ł▒½▒ŽęĄųż╩ķŻ®įŁ░µČ©ųŲ
ūŅą┬░µ├└╣·┐░╚°╦╣┤¾č¦▒ŽęĄųżŻ©░Ł▒½▒ŽęĄųż╩ķŻ®įŁ░µČ©ųŲtaqyea
?
ę╗▒╚ę╗╗╣įŁ┐░╚°╦╣┤¾č¦▒ŽęĄųż/KU▒ŽęĄųż╩ķ2025įŁ░µĪŠq▐▒1954292140Ī┐╬ę├Ūū©ęĄ░ņ└Ē░─ų▐┤¾č¦▒ŽęĄųż│╔╝©ĄźŻ¼├└╣·┤¾č¦▒ŽęĄųż│╔╝©Ąź,ėó╣·┤¾č¦▒ŽęĄųż│╔╝©ĄźŻ¼╝ė─├┤¾┤¾č¦▒ŽęĄųż│╔╝©ĄźŻ¼ą┬╝ėŲ┬┤¾č¦▒ŽęĄųż│╔╝©ĄźŻ¼ą┬╬„└╝┤¾č¦▒ŽęĄųż│╔╝©ĄźŻ¼║½╣·┤¾č¦▒ŽęĄųż│╔╝©ĄźŻ¼╚š▒Š┤¾č¦▒ŽęĄųż│╔╝©ĄźĪŻ
ĪŠĖ┤┐╠ę╗╠ū┐░╚°╦╣┤¾č¦▒ŽęĄųż│╔╝©Ąźą┼ĘŌĄ╚▓─┴ŽūŅŪ┐╣ź┬į,Buy The University of Kansas TranscriptsĪ┐
╣║┬“╚š║½│╔╝©ĄźĪóėó╣·┤¾č¦│╔╝©ĄźĪó├└╣·┤¾č¦│╔╝©ĄźĪó░─ų▐┤¾č¦│╔╝©ĄźĪó╝ė─├┤¾┤¾č¦│╔╝©ĄźŻ©q╬ó1954292140Ż®ą┬╝ėŲ┬┤¾č¦│╔╝©ĄźĪóą┬╬„└╝┤¾č¦│╔╝©ĄźĪó░«Č¹└╝│╔╝©ĄźĪó╬„░Óč└│╔╝©ĄźĪóĄ┬╣·│╔╝©ĄźĪŻ│╔╝©ĄźĄ─ęŌęÕų„ę¬╠ÕŽųį┌ųż├„覎░─▄┴”ĪóŲ└╣└č¦╩§▒│Š░Īóš╣╩Šū█║Ž╦žų╩Īó╠ßĖ▀┬╝╚Ī┬╩Ż¼ęį╝░╩Ūū„╬¬┴¶ą┼╚Žųż╔ĻŪļ▓─┴ŽĄ─ę╗▓┐ĘųĪŻ
┐░╚°╦╣┤¾č¦│╔╝©Ąź─▄╣╗╠ÕŽų─·Ą─Ą─覎░─▄┴”Ż¼░³└©┐░╚°╦╣┤¾č¦┐╬│╠│╔╝©Īóū©ęĄ─▄┴”Īó蹊┐─▄┴”ĪŻŻ©q╬ó1954292140Ż®Š▀╠Õ└┤╦ĄŻ¼│╔╝©▒©ĖµĄź═©│Ż░³║¼č¦╔·Ą─覎░╝╝─▄ėļŽ░╣▀ĪóĖ„┐Ų│╔╝©ęį╝░└Ž╩”Ų└ė’Ą╚▓┐ĘųŻ¼ę“┤╦Ż¼│╔╝©Ąź▓╗Į÷╩Ūč¦╔·č¦╩§─▄┴”Ą─ųż├„Ż¼ę▓╩ŪŲ└╣└č¦╔·╩Ūʱ╩╩║Ž─│Ė÷Į╠ė²ŽŅ─┐Ą─ųžę¬ę└Š▌ŻĪ
╬ę├Ū│ą┼Ą▓╔ė├Ą─╩Ū覹ŻįŁ░µųĮš┼Ż©įŁ░µųĮų╩ĪóĄū╔½Īó╬Ų┬ĘŻ®╬ę├Ū╣ż│¦ėĄėą╚½╠ūĮ°┐┌įŁū░╔Ķ▒ĖŻ¼╠ž╩Ō╣żęšČ╝╩Ū▓╔ė├▓╗═¼╗·Ų„ųŲū„Ż¼Ę┬šµČ╚╗∙▒Š┐╔ęį┤’ĄĮ100%Ż¼╦∙ėą│╔ŲĘęį╝░╣żęšą¦╣¹Č╝┐╔╠ßŪ░Ė°┐═╗¦š╣╩ŠŻ¼▓╗┬·ęŌ┐╔ęįĖ∙Š▌┐═╗¦ę¬Ū¾Į°ąąĄ„š¹Ż¼ų▒ĄĮ┬·ęŌ╬¬ų╣ŻĪ
ĪŠų„ė¬ŽŅ─┐Ī┐
ę╗Īó╣żū„╬┤╚ĘČ©Ż¼╗ž╣·ąĶŽ╚Ė°ĖĖ─ĖĪóŪūŲ▌┼¾ėč┐┤Ž┬╬─ŲŠĄ─Ūķ┐÷Ż¼░ņ└Ē▒ŽęĄųż|░ņ└Ē╬─ŲŠ: ┬“┤¾č¦▒ŽęĄųż|┬“┤¾č¦╬─ŲŠĪŠq▐▒1954292140Ī┐┐░╚°╦╣┤¾č¦č¦╬╗ųż├„╩ķ╚ń║╬░ņ└Ē╔ĻŪļŻ┐
Č■Īó╗ž╣·Į°╦ĮŲ¾Īó═ŌŲ¾Īóūį╝║ū÷╔·ęŌĄ─Ūķ┐÷Ż¼šŌą®Ąź╬╗╩Ū▓╗▓ķč»▒ŽęĄųżšµ╬▒Ą─Ż¼Č°Ūę╣·─┌├╗ėąŪ■Ą└╚ź▓ķč»╣·═Ō╬─ŲŠĄ─šµ╝┘Ż¼ę▓▓╗ąĶę¬╠ß╣®šµ╩ĄĮ╠ė²▓┐╚ŽųżĪŻ╝°ė┌┤╦Ż¼░ņ└Ē├└╣·│╔╝©Ąź┐░╚°╦╣┤¾č¦▒ŽęĄųżĪŠq▐▒1954292140Ī┐╣·═Ō┤¾č¦▒ŽęĄųż, ╬─ŲŠ░ņ└Ē, ╣·═Ō╬─ŲŠ░ņ└Ē, ┴¶ą┼═°╚Žųż
╚².▓─┴Žū╔č»░ņ└ĒĪó╚Žųżū╔č»░ņ└ĒŪļ╝ėč¦└·╣╦╬╩ĪŠ╬óą┼:1954292140Ī┐┐░╚°╦╣┤¾č¦▒ŽęĄųż╣║┬“ųĖ┤¾č¦╬─ŲŠ╣║┬“Ż¼▒ŽęĄųż░ņ└Ē║═╬─ŲŠ░ņ└ĒĪŻč¦į║╬─ŲŠČ©ųŲŻ¼č¦ąŻįŁ░µ╬─ŲŠ▓╣░ņŻ¼╔©├Ķ╝■╬─ŲŠČ©ū÷Ż¼100%╬─ŲŠĖ┤┐╠ĪŻInternet Quiz - Finals || Aditya Shiva Sharma, Druva and Haaziq || Midnight Q...
Internet Quiz - Finals || Aditya Shiva Sharma, Druva and Haaziq || Midnight Q...BITS Goa Quiz Club
?
Midnight QuizDine in Jordan Flyer New in June of 2025 Packed With Favorites
Dine in Jordan Flyer New in June of 2025 Packed With FavoritesForklift Trucks in Minnesota
?
Jordan, Minnesota may be a small town, but when it comes to finding something good to eat or sip, it punches well above its weight. Whether you're looking for a hot meal, a cup of coffee, or something sweet to carry you through the day, this town serves up options with more heart than flashĪ¬and thatĪ»s exactly the charm. From the moment you roll into town, the mix of smells, sights, and sounds starts to work on you. You might catch a whiff of wood smoke or the comforting clatter of dishes behind a storefront window. Around here, the food doesnĪ»t just fill your stomach; it fills a little space in your memory too.
YouĪ»ve got sit-down spots where the pace is unhurried and the regulars know their favorite booth. And there are quick, grab-and-go joints that deliver solid comfort food without needing a white tablecloth to prove anything. A couple of places serve up pub fare with the kind of local attitude that makes it clear youĪ»re not just in any old townĪ¬youĪ»re in Jordan. YouĪ»ll hear laughter at the bar and maybe a story or two youĪ»re not sure you believe. ThatĪ»s part of the meal, too.
Then there are places where the coffeeĪ»s strong, the Wi-FiĪ»s decent, and the people behind the counter are just as likely to know your name as they are to know your usual order. Some of the cozier corners offer a quiet spot to settle in with a slice of something warm, a good book, or just your own thoughts. Others lean into the social side, with people gathering to swap town news or catch up with old friends who swear theyĪ»re just stopping in for a minute but end up staying an hour.
Family-owned is the default around here, not the exception. The folks running the kitchen often live down the street. TheyĪ»re not just cooking for customersĪ¬theyĪ»re cooking for neighbors, classmates, and cousins. That kind of closeness shows up in the details, from the portions that lean generous to the handwritten signs that tell you whatĪ»s fresh or whatĪ»s running low. ItĪ»s the kind of dining scene where Ī░whatĪ»s good todayĪ▒ is a real question with a real answer.
Dessert isnĪ»t forgotten either. Whether itĪ»s classic scoops, baked goods, or a creative take on an old favorite, thereĪ»s always something sweet nearby. And if youĪ»re walking with kidsĪ¬or just feeling like one yourselfĪ¬thereĪ»s a good chance youĪ»ll end up with something sticky on your fingers and a grin you didnĪ»t see coming.
JordanĪ»s food scene isnĪ»t about impressing food critics. ItĪ»s about feeding the people who live here, the ones passing through, and the ones who maybe didnĪ»t even realize how hungry they were until they smelled what was coming from the next block. ItĪ»s the kind of place where food ties into memory, and every plate feels like a story you didnĪ»t know you were waiting to hear.Sydney Sweeney_ A Deep Dive into the ActressĪ»s Journey and Impact.docx
Sydney Sweeney_ A Deep Dive into the ActressĪ»s Journey and Impact.docxvoice ofarticle
?
Born September 12, 1997, in Spokane, Washington, Sydney Sweeney emerged from a rural upbringing to become one of today's most dynamic and beloved figures in Hollywood. Raised by a lawyer mother and hospitality professional father near Spokane and north Idaho, Sydney SweeneyĪ»s early years were marked by athletic pursuitsĪ¬soccer, skiing, wakeboarding, and martial artsĪ¬and an early love for the arts. A childhood wakeboarding accident left her with a scar near her eye, a badge of resilience that foreshadowed a career built on grit.
Retail Store Scavenger Hunt feat. MAD MONK
Retail Store Scavenger Hunt feat. MAD MONKjahudson
?
Retail store scavenger hunt for Mad Monk by Joel Hudson. Strategy & Survival in Aliens Another Glorious Day in the Corps!
Strategy & Survival in Aliens Another Glorious Day in the Corps!BoardGamesNMore
?
Dive into the high-stakes world of Aliens: Another Glorious Day in the Corps! This PPT explores key strategies, survival tips, and co-op mechanics that make this game a must-play for sci-fi and board game enthusiasts. Perfect for fans of tactical teamwork!Ad
Folding An Origami Poems Book 2
- 1. Folding an Origami Poems Book Created from a single sheet of 8 ? x 11 copy paper.
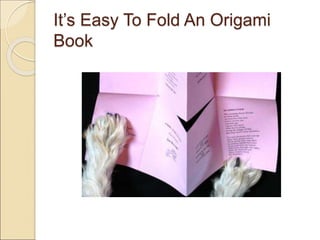
- 2. ItĪ»s Easy To Fold An Origami Book
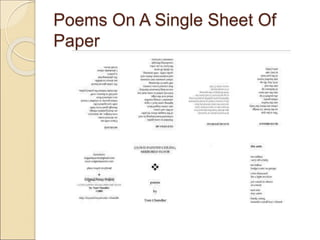
- 3. Poems On A Single Sheet Of Paper
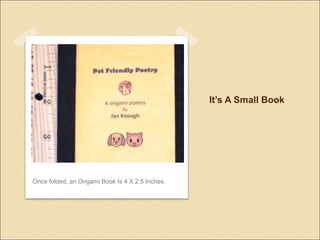
- 4. ItĪ»s A Small Book Once folded, an Origami Book Is 4 X 2.5 Inches.
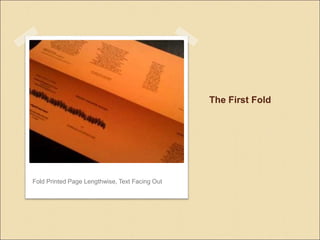
- 5. The First Fold Fold Printed Page Lengthwise, Text Facing Out
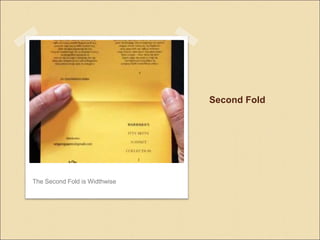
- 6. Second Fold The Second Fold is Widthwise
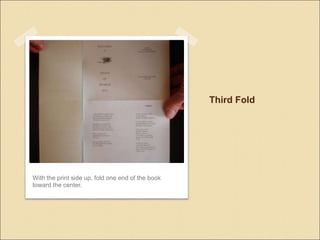
- 7. Third Fold With the print side up, fold one end of the book toward the center.
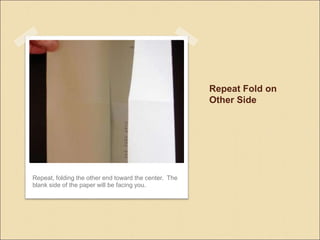
- 8. Repeat Fold on Other Side Repeat, folding the other end toward the center. The blank side of the paper will be facing you.
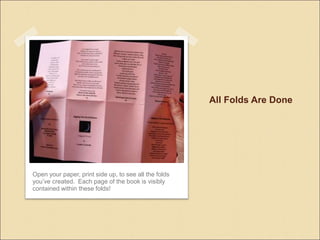
- 9. All Folds Are Done Open your paper, print side up, to see all the folds youĪ»ve created. Each page of the book is visibly contained within these folds!
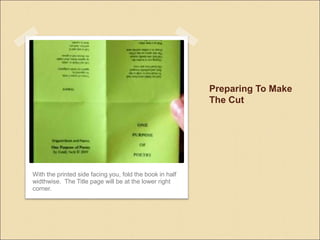
- 10. Preparing To Make The Cut With the printed side facing you, fold the book in half widthwise. The Title page will be at the lower right corner.
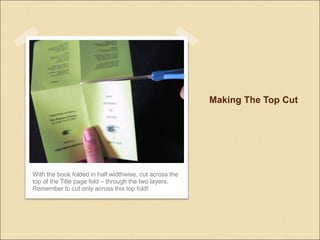
- 11. Making The Top Cut With the book folded in half widthwise, cut across the top of the Title page fold ©C through the two layers. Remember to cut only across this top fold!
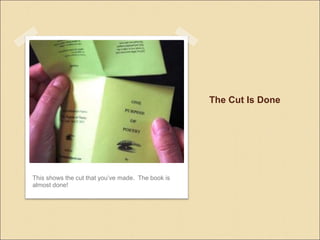
- 12. The Cut Is Done This shows the cut that youĪ»ve made. The book is almost done!
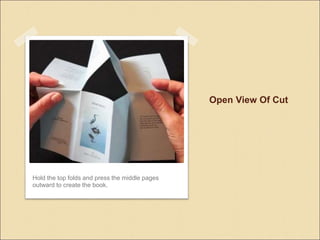
- 13. Open View Of Cut Hold the top folds and press the middle pages outward to create the book.
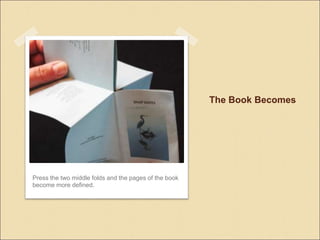
- 14. The Book Becomes Press the two middle folds and the pages of the book become more defined.
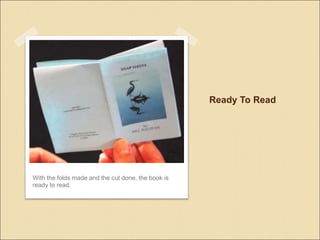
- 15. Ready To Read With the folds made and the cut done, the book is ready to read.
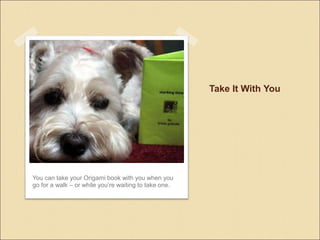
- 16. Take It With You You can take your Origami book with you when you go for a walk ©C or while youĪ»re waiting to take one.
- 17. Recycle With A Friend When you are finished reading your book, please recycle with a friend.