GUI for MySQL
?Download as PPT, PDF?
0 likes?252 views

This document describes a GUI software called MySQL Enhanced that allows users to perform operations on databases and tables without knowledge of SQL. It summarizes the components and functionality of the software, including displaying and filtering table data, inserting new data, and creating new tables. The software aims to enable learning for students and could be expanded in the future to include additional SQL features and support for multiple databases.


GUI for MySQL
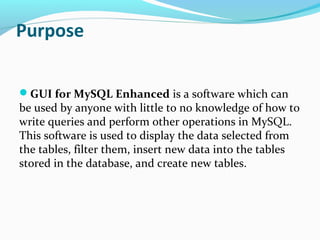
- 2. Purpose ?GUI for MySQL Enhanced is a software which can be used by anyone with little to no knowledge of how to write queries and perform other operations in MySQL. This software is used to display the data selected from the tables, filter them, insert new data into the tables stored in the database, and create new tables.
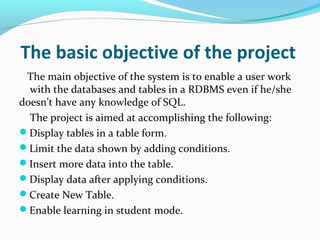
- 3. The basic objective of the project The main objective of the system is to enable a user work with the databases and tables in a RDBMS even if he/she doesnˇŻt have any knowledge of SQL. The project is aimed at accomplishing the following: ?Display tables in a table form. ?Limit the data shown by adding conditions. ?Insert more data into the table. ?Display data after applying conditions. ?Create New Table. ?Enable learning in student mode.
- 4. COMPONENTS OF THE APPLICATIONComponents of Authorization Frame: ?Username: User has to enter his username in this textfield. ?Password: User has to enter his password in this textfield. ?Database Password: User has to enter the database password for connectivity with the database in this textfield. ?Student Mode: If activated, a frame is launched with the main window in which a log of all the queries being executed is maintained. ?Done Button: Connect with the database and launch the application(main window).
- 5. Components of Main Frame: ?Refresh: Fetches all the available tables from the database. ?Table list(combo box): Contains the list of tables fetched from database. ?Add more data: To add more values to the table.
- 6. Display Columns: ?Show the list of all the columns of the selected table. Add Condition: ?This launches another frame, in which user enter the WHERE condition. List1(Column Names): ?This list contains columns of the selected table.
- 7. Display data without condition Button: ?This shows the content of table, with the columns selected by user from the above combo box. Display data with condition Button: ?This displays the data after ˇ°Add Conditionˇ± button is used (WHERE condition is in use.)
- 8. Delete Table: ?To delete the table on which the query operations are being performed. Save Table: ?To save the table form in .xls format. Save Table to Database: ?To upload the visible table form directly to the database. Open Table: ?To open the .xls format file into the table form. Edit Table: ? To edit the table properties, like adding or deleting columns and inserting new data into the table.
- 9. Components of ˇ°Add Conditionˇ± Frame: ?This frame is launched when ˇ°Add Conditionˇ± Button is pressed. Display Columns: ?Show all the columns of selected table. Combo box(ˇ°Comparison Operatorˇ±) ?This contains all the comparison operator like =, !=, >, <, <=, >=. Text Field(ˇ°Compare With Numberˇ±): ?A number is inserted here if comparison is to be made with an ˇ°integerˇ±.
- 10. Text Field(ˇ°Compare with Stringˇ±) ?A string is inserted here if comparison is to be made with a ˇ°stringˇ±. Go Button: ?Launch the query with WHERE condition, ready to be displayed by pressing ˇ°Display data with conditionˇ± button.
- 11. AND Button: ?A new frame is launched, in which new query is framed and is combined with the previous one with AND operator. OR Button: ?A new frame is launched, in which new query is framed and combined with the previous one with AND operator. ˇ®Compare with a column from different tableˇŻ Button: ?Pressing this launches a new frame where user selects the table and the column to compare.
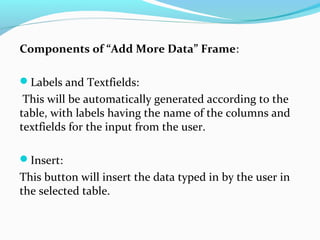
- 12. Components of ˇ°Add More Dataˇ± Frame: ?Labels and Textfields: This will be automatically generated according to the table, with labels having the name of the columns and textfields for the input from the user. ?Insert: This button will insert the data typed in by the user in the selected table.
- 13. Components of ˇ°Table Name for New Tableˇ± Frame: Text Field(ˇ°Table Nameˇ±): ?Insert a table name for the new table. Add Columns: ?Opens ˇ°Add Columnˇ± frame.
- 14. Components of ˇ°Add Columnsˇ± Frame: Text Field(ˇ°Column Nameˇ±): ?Name of the new column. Combo Box(ˇ°Type of Variable : INT or VARCHARˇ±) ?Select the type of column. Text Field(ˇ°Sizeˇ±): ?Enter the size of the column.
- 15. Checkboxes(Not Null, Unique, Primary Key) ?This is used to define whether the new column is Not Null, Unique, Primary Key. Add More Columns: ?Add more columns by launching ˇ°Add Columnsˇ± Frame again. Done: ?Create the new table with the columns made.
- 16. Conclusion ?This java based application is easy to use and flexible, and really helps people understanding the basics of a structural query language ?. This application doesnˇŻt offer variety of functionalities to perform on database as of now, but enough to give user without no programming background ability to work on database.
- 17. Future ?In future this project can be extended to cover other functionalities like selecting different databases, integration with other SQL languages, and implementing other features of SQL like joints and triggers.