Guide to BleedsˇŞUsing Print Design for Marketing
?
0 likes?717 views

Every marketer and designer should understand whether or not their file should be printed with bleeds, how to set up the file, and how to save it for your printer. This guide will walk you through the process.

Guide to BleedsˇŞUsing Print Design for Marketing
- 1. A Guide to Bleeds To Bleed or not to Bleed? That is the Question.
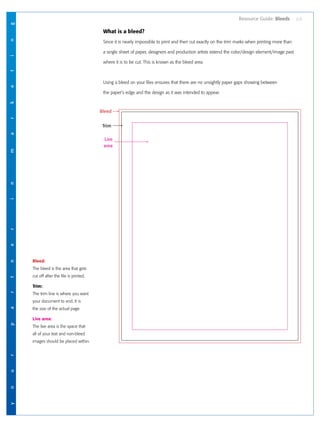
- 2. y o u r p a r t n e r i n m a r k e t i n g What is a bleed? Since it is nearly impossible to print and then cut exactly on the trim marks when printing more than a single sheet of paper, designers and production artists extend the color/design element/image past where it is to be cut. This is known as the bleed area. Using a bleed on your files ensures that there are no unsightly paper gaps showing between the paperˇŻs edge and the design as it was intended to appear. Bleed Trim Live area Bleed: The bleed is the area that gets cut off after the file is printed. Trim: The trim line is where you want your document to end. It is the size of the actual page. Live area: The live area is the space that all of your text and non-bleed images should be placed within. Resource Guide: Bleeds 2/5
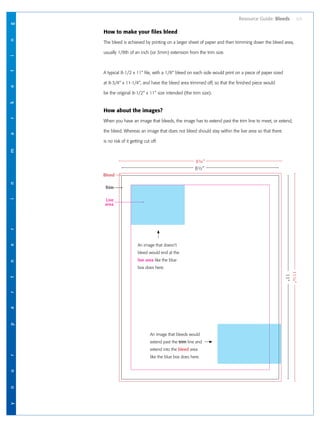
- 3. y o u r p a r t n e r i n m a r k e t i n g Resource Guide: Bleeds 3/5 How to make your files bleed The bleed is achieved by printing on a larger sheet of paper and then trimming down the bleed area, usually 1/8th of an inch (or 3mm) extension from the trim size. A typical 8-1/2 x 11" file, with a 1/8" bleed on each side would print on a piece of paper sized at 8-3/4" x 11-1/4", and have the bleed area trimmed off, so that the finished piece would be the original 8-1/2" x 11" size intended (the trim size). How about the images? When you have an image that bleeds, the image has to extend past the trim line to meet, or extend, the bleed. Whereas an image that does not bleed should stay within the live area so that there is no risk of it getting cut off. Bleed Trim Live area An image that doesnˇŻt bleed would end at the live area like the blue box does here. 8?" An image that bleeds would extend past the trim line and extend into the bleed area like the blue box does here. 11" 8?" 11?"
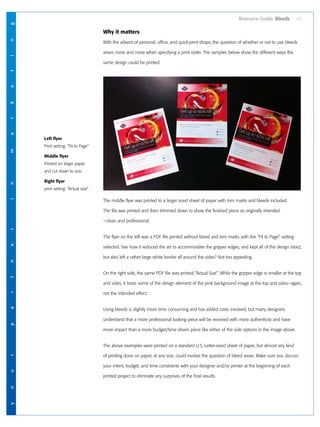
- 4. y o u r p a r t n e r i n m a r k e t i n g Why it matters With the advent of personal, office, and quick-print shops, the question of whether or not to use bleeds arises more and more when specifying a print order. The samples below show the different ways the same design could be printed. The middle flyer was printed to a larger sized sheet of paper with trim marks and bleeds included. The file was printed and then trimmed down to show the finished piece as originally intended ˇŞclean and professional. The flyer on the left was a PDF file printed without bleed and trim marks with the ˇ°Fit to Pageˇ± setting selected. See how it reduced the art to accommodate the gripper edges, and kept all of the design intact, but also left a rather large white border all around the sides? Not too appealing. On the right side, the same PDF file was printed ˇ°Actual Sizeˇ±. While the gripper edge is smaller at the top and sides, it loses some of the design element of the pink background image at the top and sidesˇŞagain, not the intended effect. Using bleeds is slightly more time consuming and has added costs involved, but many designers understand that a more professional looking piece will be received with more authenticity and have more impact than a more budget/time driven piece like either of the side options in the image above. The above examples were printed on a standard U.S. Letter-sized sheet of paper, but almost any kind of printing done on paper, at any size, could involve the question of bleed areas. Make sure you discuss your intent, budget, and time constraints with your designer and/or printer at the beginning of each printed project to eliminate any surprises of the final results. Left flyer Print setting: ˇ°Fit to Pageˇ± Middle flyer Printed on larger paper and cut down to size. Right flyer print setting: ˇ°Actual sizeˇ± Resource Guide: Bleeds 4/5
- 5. About JP Enterprises Headquartered in Pittsburgh, Pennsylvania, with a branch office in Santa Monica, California, JP Enterprises is a full-service graphic design and technology agency offering a full suite of marketing communication solutions. We specialize in: ? Print and catalog design ? SEO and social media marketing ? Digital marketing and email campaigns ? Web and app design and development Check out our website: www.jpenterprises.com Give us a call: 800-372-1263 P I T T S B U R G H 108 Commerce Blvd. Suite D Lawrence, PA 15055 pgh@jpenterprises.com L O S A N G E L E S 400 Continental Blvd. 6th Floor, Suite 101 El Segundo, CA 90245 la@jpenterprises.com Be social