What is a "microcontroller"?
This slideshow is an introduction to the concept of a micro, an overview of several types and finally, a focused intro to Arduino and how to program one.
This document provides an introduction to a class on microcontrollers with Arduino. It discusses controlling Arduino from a computer and vice versa using serial communication. It introduces servomotors and how to control their position with pulse width modulation signals from Arduino. Examples are provided for moving a servo across its full range, controlling a servo from serial input, and addressing timing issues with serial servo control. The document also covers using RGB LEDs with Arduino by controlling the pulse width modulation on three pins to mix colors. Further topics discussed include reading serial strings and potential future projects involving servos, serial communications, and piezo elements.
The Arduino platform allows users to create interactive electronic objects by providing an open-source hardware and software environment. It consists of a microcontroller board and IDE that allows users to write code to control sensors, LEDs, motors and more. The Arduino is inexpensive, easy to use, and has a large community that shares tutorials and projects online. It is well suited for interactive art, design prototypes, and physical computing projects.
Arduino Lecture 4 - Interactive Media CS4062 Semester 2 2009Eoin Brazil
油
CS4062 Masters in Interactive Media - Fourth Arduino Lecture - March 18th 2009 - University of Limerick. This lecture presents a short review and introduction to programming concepts relevant to Arduino. This was aimed at a digital media / music technology masters student audience.
The document provides an overview of how an interactive device works using Arduino. It describes that an interactive device senses its environment using sensors, processes this information using software on the microcontroller, and then interacts with the world using actuators. It then gives examples of blinking an LED using Arduino code to illustrate how this process works at a basic level.
This document provides an introduction to using Arduino boards. It discusses getting started with the Arduino IDE, programming basics like digital I/O and timing functions. Examples are provided to blink an LED, read a digital sensor, read an analog sensor with a potentiometer, and fade an LED using pulse width modulation. Terminology around bits, bytes and serial communication is also explained. The document aims to teach Arduino fundamentals and provide practice examples for learning.
This document provides an introduction to using Arduino, an open-source physical computing platform. It describes Arduino as a microcontroller board and IDE that allows users to write software to control sensors and actuators. The document outlines the basic Arduino hardware components, software interface, and guides setting up the IDE. It recommends verifying the setup by running a sample "Blink" sketch to toggle an onboard LED.
This document provides an overview of microcontrollers and the Arduino platform. It discusses what a microcontroller is and some common types. It then introduces Arduino as an open-source prototyping platform using easy hardware and software. Several Arduino boards are described and the ATmega328p microcontroller chip is specified. The document outlines how to download the Arduino software and write programs. It provides examples of basic Arduino projects like blinking LEDs, reading sensors, and creating sounds.
The Arduino document provides information on learning Arduino through examples, foundations of concepts, hacking guides, and additional links. It includes sections on examples programs, core concepts, extending Arduino hardware and software, and links to other documentation resources. A variety of examples are given to demonstrate uses of Arduino's input/output pins, analog/digital functions, communication, libraries, and interfacing with other hardware.
Arduino Workshop Day 1 際際滷s
Basics of Arduino - Introduction, Basics of Circuits, Signals & Electronics, LED Interfacing, Switch, Buzzer, LCD & Bluetooth Communication.
The document provides an overview of an Arduino workshop. It outlines exercises that attendees will complete, including blinking an LED, reading a button input, and fading an RGB LED using pulse width modulation. It also discusses what Arduino is used for, such as interactive art, robots, and commercial products. Examples of where Arduino is used include schools, art installations, and 3D printers.
The document provides an introduction to programming with Arduino. It explains that Arduino is an open-source hardware and software platform used to build interactive electronic projects. It consists of a microcontroller board that can be programmed and used to read and control sensors, LEDs, motors and more. The document outlines the basic steps to get started which include downloading the Arduino IDE, installing drivers, selecting the board type, and uploading a test "Blink" program to make an LED turn on and off. It also provides explanations of some core electronic components like resistors, LEDs, sensors and describes how to set up a simple temperature sensing project and store the sensor readings in a database.
This document outlines an Arduino workshop. It includes an overview of the agenda which involves introductions, checking equipment, experimentation time, and creating personal projects. It then details introducing participants and encouraging collaboration. A list of included parts in the kits is provided. Instructions are given for installing the Arduino software and development environment. Examples are shown for breadboard layouts and code for simple projects like blinking an LED and reading input from a button. Additional experiments suggested include using sensors, LCD displays, motors, and programming an RGB LED with a joystick. Sources for parts, tutorials, and inspiration are listed to encourage continued learning.
This document provides an overview and introduction to the Arduino software and programming environment through a series of tutorials. It begins by explaining how to download and install the Arduino software and interface. It then demonstrates a basic "Blink" code to turn an LED on and off as an introduction to Arduino programming. The document outlines the various sections of code, such as void setup() and void loop(), and basic syntax like semicolons. It also explains how to upload code to the Arduino board and view the output.
Arduino Lecture 2 - Interactive Media CS4062 Semester 2 2009Eoin Brazil
油
CS4062 Masters in Interactive Media - Second Arduino Lecture - March 6th 2009 - University of Limerick. This lecture presents an introduction to communications and the Arduino with examples. This was aimed at a digital media / music technology masters student audience.
Two Grade 9 girls were given Arduino kits to play around with for 4 weeks (9 lessons). The girls were told to explore, create, inquire, think critically and develop a simple introductory guide for other students. This is one girl's guide.
The document discusses Arduino, an open-source electronics prototyping platform. It describes Arduino Uno, including its processor, memory, input/output pins, and operating voltage. It provides steps for getting started with Arduino, including downloading the IDE, connecting the board, selecting options in the IDE, and uploading a basic blink program. The document also covers some key Arduino concepts like variables, conditional statements, loops, and functions.
This document provides information about the ARDX Arduino experimentation kit from Oomlout, including:
- The overall goal of the kit is to get comfortable using electronic components through simple circuits and learning why each circuit works.
- Oomlout is a design company focused on producing "delightfully fun open source products."
- All of Oomlout's projects are open source under a Creative Commons license, allowing free downloading, reproduction, modification, and distribution of the materials with credit given to Oomlout.
- The document provides an overview of assembling the kit pieces, installing the software, basic programming and electronics primers, and an index of the circuits included in the
This document introduces Arduino by defining what it is, the parts of an Arduino board, and how to program it. An Arduino is a microcontroller board that can be used to develop interactive objects by taking various inputs (e.g. sensors) and controlling physical outputs (e.g. lights, motors). It explains the basic components of an Arduino board and how Arduino code is uploaded and run. A simple example is provided to blink an LED using Arduino code and by changing the delay times, the blinking speed can be adjusted. Keywords like Arduino board, sketch, and LED are also defined.
Class materials for teaching the basic use of Arduino with LED, button, debouncing concept and Serial output. These materials were originally used in Startathon 2016.
The code is available here. https://github.com/SustainableLivingLab/intro-to-arduino
The document provides an introduction to Arduino and physical computing using microcontrollers. It describes that Arduino boards use ATmega microcontrollers and can be programmed to sense the physical world using sensors, process data, and control physical devices using actuators. The document outlines the basic components of a microcontroller, how the Arduino programming environment works, and the basic structure and functions used in Arduino programs.
This document provides an overview of a lab on using Arduino. The schedule includes lectures on Arduino, installing drivers, and using an ultrasonic sensor. It defines Arduino as a hardware and software platform and describes the Arduino UNO board. It explains how to install the Arduino IDE and write programs with a setup and loop structure. Lab 1 demonstrates controlling an LED, and Lab 2 uses an ultrasonic sensor to measure distance. Lab 3 builds a minimum system using just an AVR chip.
This document provides information about different types of sensors, including infrared (IR), temperature, and sound sensors. It discusses the basic working principles of IR sensors, including how they detect objects based on reflected IR light. The document also describes temperature sensors that output a voltage proportional to temperature. Finally, it explains how sound sensors use a microphone and 555 timer integrated circuit to measure sound pressure variations and generate pulses. Key components discussed include the LM358 comparator, LM35 temperature sensor, and operating modes of the 555 timer IC like monostable, bistable, and astable.
The document summarizes the basics of Arduino programming. It discusses that Arduino programs have three main parts: structure, values (variables and constants), and functions. It describes the setup() and loop() functions that enclose blocks of code. Setup() initializes variables and runs once, while loop() continuously runs the main program code. It also discusses defining variables, data types, and writing custom functions. Finally, it provides an example of blinking an LED using the Arduino by wiring an LED, resistor and running a program to turn the LED on and off.
1. Arduino is an open-source hardware and software platform used for building electronics projects. It contains a microcontroller and can be programmed using C code.
2. Arduino boards have digital and analog input/output pins that can sense the environment by receiving signals from sensors and control devices like motors. Common boards include the Uno, Due, and LilyPad.
3. The basic structure of an Arduino program includes a setup() function for initialization and a loop() function containing the main code. Functions like digitalWrite(), analogRead(), and Serial.print() are used to control pins, read sensors, and display output.
I have prepared this presentation when I was studying at Western Region Campus. I along with some of my friends conducted training for junior students on Arduino. Its day-1 presentation.
The document provides an overview of Arduino, including what it is, common Arduino boards, digital and analog input/output, and example projects. Arduino is an open-source electronics prototyping platform that can be used to create interactive objects. It uses a simple hardware and software environment to program and develop prototypes. The Arduino Uno is one of the most commonly used boards, which contains an Atmega328 microcontroller, digital and analog pins, and can be programmed via USB. The document describes how to connect various components like LEDs, buttons, sensors and motors to an Arduino board.
The document describes an Arduino-based home automation system that can sense various parameters like temperature, distance, light, and detect burglars. It transmits the sensor data to an Arduino board which processes the data and checks it against the program code to control devices like fans accordingly. The system also allows users to set alerts. It then provides details about Arduino programming, including the languages, code structure, and functions used. It gives an example of a circuit and code to light LEDs and explains various Arduino functions like pinMode(), digitalWrite(), analogRead() etc.
The document provides an overview of the Arduino platform, including what it is, what it is used for, and how to get started using it. Key points:
- Arduino is an open-source hardware and software platform for building interactive electronic projects through a simple programming language.
- It is used for physical computing projects, interactive installations, and rapid prototyping. Projects can include sensors and actuators.
- Getting started requires an Arduino board, USB cable, power supply, and downloading the IDE (integrated development environment) to write and upload code. Basic electrical safety knowledge is also important.
1. The document provides step-by-step instructions for setting up the Arduino IDE software and connecting an Arduino board to a computer. It explains how to select the board type and serial port, and upload a program to make an LED blink.
2. Key steps include downloading the Arduino IDE, selecting the board type in Tools, choosing the serial port, and uploading a basic blink program to test that the board is connected properly.
3. The document also provides an overview of programming concepts for Arduino like using variables, constants, and the setup and loop functions.
The document discusses the Arduino board, which was created in 2005 in Italy as an open source hardware platform. It can be programmed using C/C++ and other languages to read analog/digital signals and control outputs. The Arduino Uno was released in 2011 and contains an ATmega328p microcontroller, 14 digital I/O pins (6 provide PWM), 6 analog inputs, and operates at 16MHz. Example projects shown include an LED cube, fan control, and more. The Arduino IDE is used for coding the board using setup() and loop() functions. Digital and analog I/O, serial communication, and other concepts are explained.
This lab aims to program an Arduino Uno board to blink an LED connected to pin 13. The document outlines the necessary materials, provides background on the Arduino board and IDE, and gives step-by-step instructions to write a simple program using the setup() and loop() functions that uses digitalWrite() and delay() to toggle the pin on and off, blinking the LED.
ATTiny Light Sculpture Project - Part I (Setup)Brian Huang
油
This document provides instructions for building an ATTiny light sculpture using a small and inexpensive ATTiny85 microcontroller chip. It explains that the ATTiny85 has fewer pins than the Arduino Uno but is sufficient for most basic projects. It outlines how to program the ATTiny85 chip using the Arduino IDE by selecting the correct board and programmer settings. Example blinking LED code is provided and explained. Challenges are given to modify the code to change the blink rate and create heartbeat and Morse code patterns.
The document provides an overview of Arduino, including what it is, common Arduino boards, digital and analog input/output, and example projects. Arduino is an open-source electronics prototyping platform that allows users to create interactive objects and environments. It uses flexible, easy-to-use hardware and software. Common tasks demonstrated include blinking LEDs, reading buttons, and controlling motors. The document serves as an introduction to getting started with the Arduino platform.
The document provides an overview of topics related to interfacing sensors and actuators with Arduino microcontrollers. It discusses basic I/O components, sensor interfacing including ultrasonic, IR, temperature and motion sensors. It also covers actuators, motor control, LCD displays and programming concepts for Arduino like digital and analog I/O, PWM and interrupts. References for further reading on Arduino programming are also provided.
This document provides an overview of Arduino programming and the Arduino platform. It discusses what Arduino is, what types of projects can be built with Arduino, and covers the basics of getting started, digital and analog inputs/outputs, Neopixels, and putting projects together. It also includes an agenda and summaries of the Arduino UNO board and common sensors that can be used.
This document provides an introduction to microcontrollers and electronics basics using Arduino and RedBoard microcontrollers. It covers topics such as Arduino and RedBoard overview, downloading the Arduino IDE, connecting boards to computers, installing drivers, selecting boards and serial devices in the IDE interface, and an overview of the key areas of the Arduino GUI. It also introduces basic electronics concepts like circuits, Ohm's Law, analog and digital signals. Several example circuits are presented to blink an LED, read input from a potentiometer to control blink rate, use a light sensor to control an LED, and read temperature from a sensor.
This document provides instructions for setting up Arduino and programming a LilyPad development board. It discusses fixing driver issues, selecting the correct board type and COM port in the Arduino IDE, and provides code examples for blinking an LED, reading a button input, and displaying sensor values over serial communication. It also gives an overview of LilyPad e-textile boards and how to calculate battery life for circuits using multiple components in parallel.
This document provides an overview of physical prototyping with an Arduino board. It discusses what an Arduino board is, downloading and installing the Arduino IDE, code structure including the setup function and main loop, how to connect an Arduino to a computer, breadboard layout, common Arduino functions like pinMode and digitalWrite, programming concepts like variables and for loops, and gives an example homework of recreating the Knight Rider car's light effect.
Arduino is an open-source electronics platform that can be used to build interactive objects that can sense and control the physical world. It consists of a microcontroller board and IDE software to write code. The Arduino programming language is based on C/C++ and wiring, and the boards can be assembled by hand or purchased preassembled. Arduino allows users to create interactive projects by taking inputs from sensors and controlling outputs like lights, motors, and other devices.
The document provides an introduction to Arduino boards. It describes that Arduinos contain a microcontroller and can be programmed to interact with electronic components. The specific board being discussed, the Arduino Uno R3, contains an ATmega328 chip, has ports for digital and analog input/output, and can be expanded with shields. The document also outlines how to install the Arduino IDE software and provides an example code to fade an LED on and off.
This document provides an introduction to the Arduino electronics prototyping platform. It explains that Arduino is an open-source platform used to build interactive electronic projects through hardware and software. The document covers basic concepts such as inputs and outputs, digital and analog signals, circuits, and programming Arduino with a simple blink example. It also demonstrates attaching basic components like LEDs, buttons, and potentiometers to control outputs and read inputs.
This document provides an introduction to the Arduino, an open-source electronics prototyping platform. It explains that Arduino uses a microchip that can be programmed to sense inputs from sensors and control outputs to other devices. It also covers basic electronics concepts like digital and analog inputs/outputs, and shows how to set up a simple circuit with an LED and use code to blink the LED.
This document provides an overview of common electronic components, including conductors, switches, resistors, diodes, light emitting diodes (LEDs), transformers, transistors, and capacitors. It describes their basic functions and characteristics, such as how resistors impede current flow, diodes only allow current to flow in one direction, and capacitors can store and release voltage. The document also introduces basic circuit concepts like series and parallel connections and their effects on voltage and current.
The document discusses nesting <div> elements and counting the total number of <div> elements. It provides an example of nested <div> elements with increasing levels of indentation, with the final example containing 7 total <div> elements: an outer "allcontent" div containing inner "top", "bottom", "left", "right", "section1", and "section2" divs.
This document discusses images and typography in HTML and CSS. It covers adding images to HTML, image formats like JPG, PNG and GIF, using CSS to add background images, embedding fonts using the @font-face rule, resetting default browser styles, and styling links using pseudo-classes like :link, :visited, :hover and :active.
The document provides an introduction to HTML and CSS. It defines HTML as the structure and CSS as the design of webpages. It then covers HTML syntax and tags, how to connect HTML and CSS using link tags, and paths to images and stylesheets when files are organized in folders. The relationship between HTML, CSS, and the browser is that HTML provides structure, CSS provides design rules, and the browser displays the combined result.
2. Our methods so far:
This circuit is a one-liner
Not many possibilities for interaction
Circuits hard-wired for specific purposes
Making changes requires you to re-wire, snip, de-solder, etc...
3. What is a microcontroller ?
A small, inexpensive computer. Less sophisticated than your mac...
think calculator
Good for taking INPUT data, processing it, OUTPUTTING something.
Route several different inputs to outputs, one input to many outputs,
etc...
Many electronic devices with any smarts whatsoever have some
microcontroller.
Higher level vs. Lower lever (Arduino is mid)
Wiring Gainer BX 24 PIC micro
4. Where does the
microcontroller fit in?
As an input...
Count button clicks
Sense pressure
Multiple switches
How long switch is held down
10. Arduino
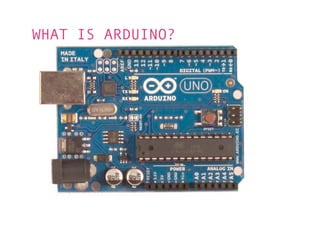
-A single board microcontroller and a software
suite for programming it.
-Programming language is based on WIRING
(similar to C++)
-IDE is based on PROCESSING, so it looks
friendly.
-An Italian production (IVREA Institute)
-USB to Serial interface. I/O pins. Accepts
shields and components easily. Inexpensive &
open-source
-Loaded with Atmel AVR microcontroller chips.
Preinstalled bootloader makes it easy to
program right out of the box!
-Clones exist.
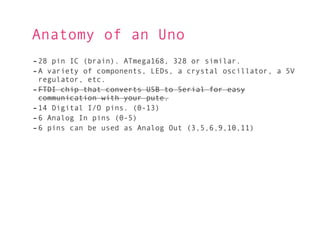
11. Anatomy of an Uno
- 28 pin IC (brain). ATmega168, 328 or similar.
- A variety of components, LEDs, a crystal oscillator, a 5V
regulator, etc.
- FTDI chip that converts USB to Serial for easy
communication with your pute.
- 14 Digital I/O pins. (0-13)
- 6 Analog In pins (0-5)
- 6 pins can be used as Analog Out (3,5,6,9,10,11)
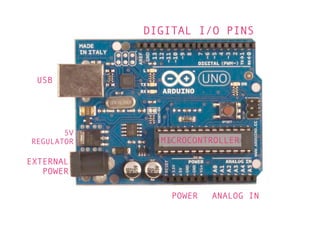
12. DIGITAL I/O PINS
USB
5V
REGULATOR MICROCONTROLLER
EXTERNAL
POWER
POWER ANALOG IN
14. Each DIGITAL OUT pin acts like a mini 5V power supply.
Dont forget about Ground!
+ 9V
470
instead of...
16. Now we need to give the board instructions on what to do...
17. What is Code?
A set of instructions (an algorithm)
that tells the board exactly what to do,
for how long and in what order. A
procedure, a program.
Knitting a scarf:
Row 1: (RS) *K2, P2* across
Rows 2, 3 & 4: Repeat Row 1
Row 5: (RS0 *K2, P2, C8F* Repeat to last 4 sts, K2, P2
Row 6: Repeat Row 1
Repeat rows 1-6 for desired length, ending with row 4
Bind off in K2, P2 pattern
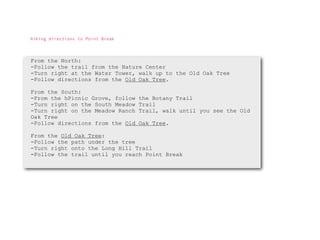
18. Hiking directions to Point Break
From the North:
-Follow the trail from the Nature Center
-Turn right at the Water Tower, walk up to the Old Oak Tree
-Follow directions from the Old Oak Tree.
From the South:
-From the hPicnic Grove, follow the Botany Trail
-Turn right on the South Meadow Trail
-Turn right on the Meadow Ranch Trail, walk until you see the Old
Oak Tree
-Follow directions from the Old Oak Tree.
From the Old Oak Tree:
-Follow the path under the tree
-Turn right onto the Long Hill Trail
-Follow the trail until you reach Point Break
19. A code snippet from PROCESSING
Produces This:
* Arduino is based off ofsimilar. Dont
IDE. So they look very
Processings
mix the two up though.
20. Anatomy of an
Arduino Program
Buttons for common tasks
Comments
Variables
Setup & Loop
Functions
Message Area
Console
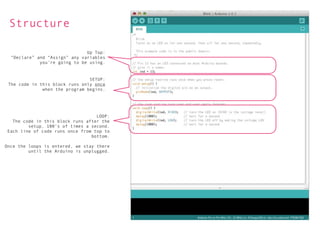
21. Structure
Up Top:
Declare and Assign any variables
youre going to be using.
SETUP:
The code in this block runs only once
when the program begins.
LOOP:
The code in this block runs after the
setup, 100s of times a second.
Each line of code runs once from top to
bottom.
Once the loops is entered, we stay there
until the Arduino is unplugged.
22. Breakdown
Make a few notes to myself, so when I
return to this later, I can remember more
easily...
Give the #13 a nickname so I can use it
multiple times. If I change 13 to 10 now,
I only have to change it once, here!
Make sure Arduino knows pin 13 (nicknamed
led) is going to serve as OUTPUT.
Specify some instructions for how long to
turn the LED on/off. This part will
repeat over and over again.
If you remove the last delay(1000); what
happens?
Can you make the LED blink SOS?
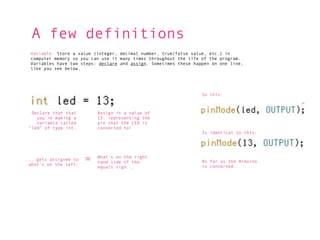
23. A few definitions
Variable: Store a value (integer, decimal number, true/false value, etc.) in
computer memory so you can use it many times throughout the life of the program.
Variables have two steps: declare and assign. Sometimes these happen on one line,
like you see below.
So this:
Declare that that Assign it a value of
youre making a 13, representing the
variable called pin that the LED is
led of type int. connected to!
Is identical to this:
... gets assigned to
whats on the left.
= Whats on the right
hand side of the As far as the Arduino
equals sign... is concerned.
24. A few definitions
Function: Code modules that can be called in your program. A function is actually
a nickname given to other lines of code, written and stored elsewhere. Arduino has
a large selection of existing functions. Each one does something specific like send
5v to pin X or delay for one second. Functions can be customized sometimes, with
parameters
You can write your own
functions too! These are
just the ones that come
digitalWrite takes with Arduino.
the name of the
two parameters,
function begin
which pin? and what
called. Note the ()
state?
Its like saying
set led (13) to
HIGH.
Meaning...
Send 5V to pin 13
25. For more, visit the Arduino website:
arduino.cc
and check out their tutorials:
http://arduino.cc/en/Tutorial/Foundations
#20: 1. There are many ways to write one given algorithm\n2. An algorithm requires certain assumptions\n3. An algorithm includes decision making\n4. A complex algorithm should be broken down into modular pieces.\n
#24: The computer needs to know what type of data you&#x2019;re going to be storing, so it knows how much memory to set aside. ints take up less room than floats. \n
#25: If you forget, check the reference on the website.\n