How to Create an AWS VPC from Beginning to End and deploy a Windows Instance into the VPC to Test
•Download as DOCX, PDF•
0 likes•85 views

This document provides steps to create an AWS VPC, deploy a Windows instance into the VPC, and test connectivity. Key steps include: 1. Creating a VPC with an IPv4 CIDR block and subnet within the block in a selected availability zone. 2. Configuring a routing table with a default route to an Internet Gateway attached to the VPC, and associating the subnet. 3. Launching a Windows instance into the VPC subnet and assigning an Elastic IP for external access. 4. Testing connectivity by accessing the instance via RDP using the Elastic IP and security group rules.


How to Create an AWS VPC from Beginning to End and deploy a Windows Instance into the VPC to Test
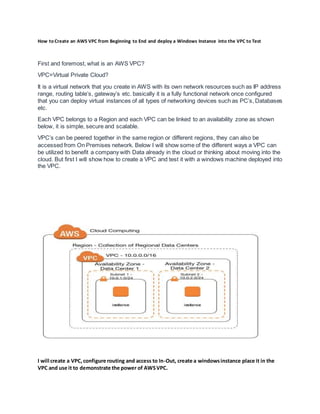
- 1. How to Create an AWS VPC from Beginning to End and deploy a Windows Instance into the VPC to Test First and foremost, what is an AWS VPC? VPC=Virtual Private Cloud? It is a virtual network that you create in AWS with its own network resources such as IP address range, routing table’s, gateway’s etc. basically it is a fully functional network once configured that you can deploy virtual instances of all types of networking devices such as PC’s, Databases etc. Each VPC belongs to a Region and each VPC can be linked to an availability zone as shown below, it is simple, secure and scalable. VPC’s can be peered together in the same region or different regions, they can also be accessed from On Premises network. Below I will show some of the different ways a VPC can be utilized to benefit a company with Data already in the cloud or thinking about moving into the cloud. But first I will show how to create a VPC and test it with a windows machine deployed into the VPC. I will create a VPC,configure routing and access to In-Out, create a windowsinstance place it in the VPC and use it to demonstrate the power of AWSVPC.
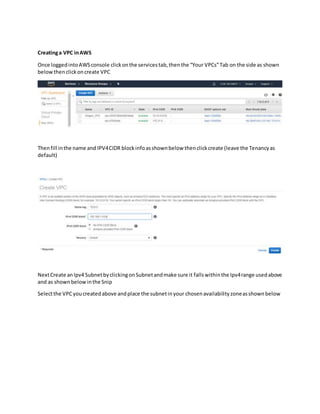
- 2. Creatinga VPC inAWS Once loggedintoAWSconsole clickonthe servicestab,thenthe “Your VPCs”Tab on the side as shown belowthenclickoncreate VPC Thenfill inthe name and IPV4CIDR blockinfoasshownbelow thenclickcreate (leave the Tenancyas default) NextCreate anIpv4 SubnetbyclickingonSubnetandmake sure it fallswithinthe Ipv4range usedabove and as shownbelowinthe Snip Selectthe VPCyoucreatedabove andplace the subnetinyour chosenavailabilityzoneasshownbelow
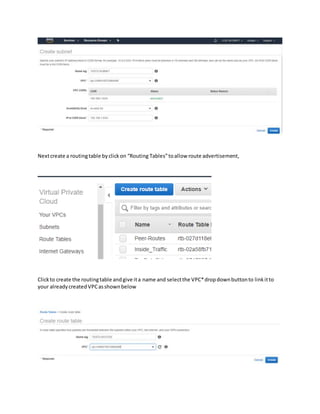
- 3. Nextcreate a routingtable byclickon “Routing Tables”toallow route advertisement, Clickto create the routingtable andgive ita name and selectthe VPC*dropdownbuttonto linkitto your alreadycreatedVPCasshownbelow
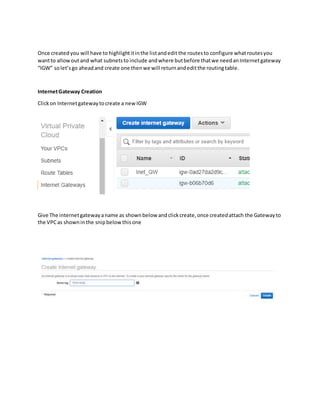
- 4. Once createdyou will have to highlightitinthe listandedit the routesto configure whatroutesyou wantto allowoutand what subnetsto include andwhere butbefore thatwe needanInternetgateway “IGW” solet’sgo aheadand create one thenwe will returnandeditthe routingtable. InternetGateway Creation Clickon Internetgatewaytocreate a new IGW Give The internetgatewayaname as shownbelow andclickcreate,once createdattach the Gatewayto the VPCas showninthe snipbelowthisone
- 5. Clickyournewlycreatedinternetgatewaythenclickonthe actiontab to attach itto your VPC AS shownbelow,make sure toselectthe correctVPCtoattach it to. Once attachedthe STATE will change to“attached”as shownbelow Nowlet’sgoback to the complete the routingtable routes Clickon Route Tablesandhighlightyoualreadycreatedroute table asshownbelow,thenclickonEdit Routes
- 6. Andthenadd a defaultroute of 0.0.0.0/0 pointingtothe internetgatewaycreatedearlierasshownin the snipbelow,thiswill allowthe VPCtobe able tosendtrafficto the internetnextwe have tocreate a SecurityGroupthat decidesexactlywhatINBOUND/OUTBOUNDTrafficisallowed. NextclickonSubnetAssociationandata minimumallow the subnetthatthe Instanceswillbe usingin the routingtable as shownbelow Security Groupcreation Clickon Securitygroupthencreate tocreate a new one as shownbelow
- 7. Fill inthe groupname,descriptionandselectthe correctVPCtolinkitto as shownbelow Nextclickintothe Securitygroupto edititand define the InboundandOutboundtrafficrulesasshown below Note: The Inboundrulesisbasedonwhat resourcesyoumighthave inyournetworkandwouldlike othersto accesssuch as a webserver,FTPserver,database serveretcso that will be companyspecific Note: The Outboundrulescan be more relaxed;itwill all dependonthe type of company. For thisdemoI will allowfor: InboundTrafficforHttps (443), SSH (22) OutboundTrafficIwill allowall. Clickto EditInbound Rulesasshownbelow
- 8. Addwhat isallowedbyclickingon“AddRule”asshownbelow NextclickonOutboundRulesandmake sure there isa rule allowingoutbound 0.0.0.0/0traffic,if not create one as shownbelow At thispointthe VPCisa functioningvirtual Cloudnetworkingwithoutside accessallowedandinside access forport 443 and22 ComingNext Part II Device Instance Creation Nextlet’screate awindows/Linux/Unixinstance andplace itinourVPC Clickon Servicesandthen searchforEC2 thenclick “Launch Instance”to create an instance asshown below
- 9. Once the instance islaunchedchoose the machine type youwanttocreate,I chose Windows Clicknextafterchoosingtoconfigure the instance detailssuchasthe “network”(pointtothe VPCyou created) andsubnet(pointtothe subnetbeingusedbythe VPC) asshownbelow Leave everythingelse atthe defaultsexceptscroll all the waytothe bottomand give itan IPaddressin the range as the subnet(use IPaddressstartingfrom.5 upwardssince AWSuses.2-.4 internallyand.1 will be usedforyourgateway) You can add a secondnetworkcard if yoursetupneedsit. Clicknexttocreate a SecurityGroupto allow access(RDP,port 3389) to the WindowsInstance asshown belowyoucan leave the source as0.0.0.0/0 for now until we getintosome more advanced configurationlikeusingtransitVPC,VPN toaccessfromthe OnPremisesnetworkthenwe canlockit downto a set of IP addressesthat are allowedaccessfromRDP
- 10. Clicknexttofinishandcreate a keyPair that will be usedwhenaccessthe PCinstance. Thenlaunchthe instance and waituntil itsaysinitializedandrunning. WhileswaitinggoaheadandrequestanElasticIP address thatwill be usedwhenaccessingthe Windows instance fromoutside.ClickElasticIPthenAllocatenew addressfromamazonPool asshownbelow
- 11. Nextclickinto the newallocatedaddressandgive itaname thenclickonaction andassociate address
- 12. To the WindowsInstance youcreatedas shownbelow TestingTime Make sure SecurityGrouphas RDP port 3389 allowedforinboundtraffic.
- 13. To ConnectGo to the instance,selectitandclickon Connect Whenthe windowfor“Connectto Your Instance”opensasshownbelow
- 14. Clickon “GetPassword”as shownabove andthenclickon choose file toretrieve the .pemfileyou createdearlier Thenclickon “DecryptPassword” Thencopy the passwordto a clipboard to use to logintothe system
- 15. Thenclickto download“Remote DesktopFile” Clickon DownloadedRemote DesktopFileinputpasswordandaccessthe WindowsInstance as shownbelow doa pingtestto google dns8.8.8.8 and alsothe gateway192.168.1.1 and alsowhateverothertestyouwantto perform at thispointyouare inControl.
- 16. Until NextTime Enjoy Learning and Movingbeyondthe Cloud and neverStop. Technologyhas touched the cloudswe wait to see what isabove the clouds. If you findany missedstepsin thisDocument bring it to my attention.