How to: Digital Watercolor with SketchUp
- 1. hand drawn digital watercolor with sketchup by Jim Leggitt how to:
- 2. Jim’s new “Digital Watercolor” method take the hybrid process one step further and adds filtering with Photoshop to give the image a soft watercolor- like appearance. This studioINSITE project is for a children’s hospital healing garden.
- 3. Step 1- Base SketchUp model The base SketchUp model was constructed by importing and autoCAD site plan and populating the model with the different elements and topography.
- 4. Step 2- Background site photo The digital photo was taken at the location - used to create a realistic background context
- 5. Step 3- Selected view and exported jpeg -Eye level view is populated with 3D people in the foreground and several in the distance. Carefully compose the scene and adjust the sun angle to highlight the shaded areas. -Export a 4000 pixel wide jpeg of the view with the edges turned off (an important first step in the digital watercolor process).
- 6. Step 4- Exported edges -Turn off all faces, sky, and shadows in the SketchUp model. Export just the edges of the model at 4000 pixels wide and save a jpeg (I added a colored background and frame to the jpeg in this image to improve seeing the linework against the white background).
- 7. Step 5 - Composite SketchUp View -In Photoshop, bring the two jpeg’s together and give the linework layer a 50% transparency -Lighten the entire image and print it on 11”x17” coated bond paper. -Why lighten the jpeg? - you’ll be adding back color with markers and pencils.
- 8. Step 6 - Hand Illustration and Coloring -Apply Chartpak AD markers to the print. And trace over much of the computer linework with a hard graphite pencil. -The overall image looks entirely different than the computer generated version once the hand drawn elements were applied to the print!
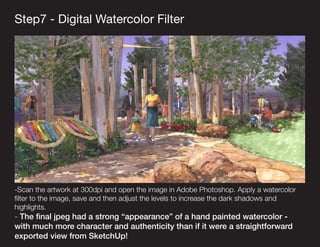
- 9. Step7 - Digital Watercolor Filter -Scan the artwork at 300dpi and open the image in Adobe Photoshop. Apply a watercolor filter to the image, save and then adjust the levels to increase the dark shadows and highlights. - The final jpeg had a strong “appearance” of a hand painted watercolor - with much more character and authenticity than if it were a straightforward exported view from SketchUp!
- 10. to see Jim’s blog post of this presentation click here: http://jimleggitt.typepad.com/jim-leggitt-drawing- shortcuts/2013/12/hand-drawn-digital-watercolor-with- a-sketchup-model.html studio-insite.com


