狠狠撸

狠狠撸Share a Scribd company logo
How to Install a Personal
Condor on Your Windows
         Laptop
           Guy Tel-Zur
Ben-Gurion University of the Negev
Download Condor


? Condor home page:
  – http://www.cs.wisc.edu/condor
? Download link:
  – http://www.cs.wisc.edu/condor/downloads-
    v2/download.pl
? For Windows I recommend the msi installer
Start the Installer


In these slides: Version 7.4.2. Released on April 6, 2010 is demonstrated
Accept the license
We want a local, personal,
      installation
I want my jobs to start immediately
Leave the domain blank
You can leave these blank as well
Condor automatically detects
   your Java installation
Don’t worry too much about this, we will
  see how to correct/edit things later
Here, we install only the good
old “Classic” features, no VM
…and no Hadoop support
Cont’


Click on Install
Click on Install
(needs administrator’s privileges)
Wait until this step will finish
How to install a personal condor
You will have to restart
     your system


             restart
The Condor service should be started
                If needed restart the service here
Check the Tasks Manager
for the Condor daemons
Edit/Correct the condor_config file:
     the host is set to localhost
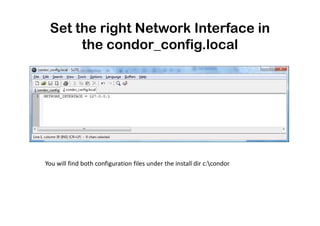
Set the right Network Interface in
      the condor_config.local


You will find both configuration files under the install dir c:condor
condor_status


Good! So now we have a Personal Condor running on my laptop ?
Let’s write a short C program and check
  Condor: my own cpu_burn version:
  #include <math.h>
  #include <stdio.h>

  int main() {

      int iMAX = 60000;
      int i,j;
      float fNORM, fMAX;
      float x,y;

      fMAX = iMAX; // convert to float
      fNORM = fMAX * fMAX;
      for (j=0;j<iMAX;j++)
         for (i=0;i<iMAX;i++) {
             y = i; // convert to float
             x = y*y/fNORM;
         }

      return 0;
  }
Just copy & paste the code to
your favorite IDE and compile
In a text editor create your
                   submit file:
universe = vanilla
                                  You should have in the
executable = cpu_burn.exe         same folder the
Error =                           executable and the
err.$(Cluster).$(Process)         submit file
Output =
out.$(Cluster).$(Process)
Log = log.$(Cluster).$(Process)

Queue 5
Submit 5 jobs
Watch the Task Manager
        The heat is on
Check with condor_q the
 progress of your jobs
All jobs were processed
Condor daemons while
 executing cpu_burn
Check the logfile that was
                created
000 (088.001.000) 04/26 10:23:10 Job submitted from host:
<127.0.0.1:50486>
...
001 (088.001.000) 04/26 10:23:19 Job executing on host: <127.0.0.1:50487>
...
005 (088.001.000) 04/26 10:24:20 Job terminated.
        (1) Normal termination (return value 0)
                Usr 0 00:00:27, Sys 0 00:00:00 - Run Remote Usage
                Usr 0 00:00:00, Sys 0 00:00:00 - Run Local Usage
                Usr 0 00:00:27, Sys 0 00:00:00 - Total Remote Usage
                Usr 0 00:00:00, Sys 0 00:00:00 - Total Local Usage
        0 - Run Bytes Sent By Job
        15686 - Run Bytes Received By Job
        0 - Total Bytes Sent By Job
        15686 - Total Bytes Received By Job
...
That’s it


Send your comments/suggestions to

Guy Tel-Zur
gtelzur at bgu dot ac dot il

More Related Content

How to install a personal condor

  • 1. How to Install a Personal Condor on Your Windows Laptop Guy Tel-Zur Ben-Gurion University of the Negev
  • 2. Download Condor ? Condor home page: – http://www.cs.wisc.edu/condor ? Download link: – http://www.cs.wisc.edu/condor/downloads- v2/download.pl ? For Windows I recommend the msi installer
  • 3. Start the Installer In these slides: Version 7.4.2. Released on April 6, 2010 is demonstrated
  • 5. We want a local, personal, installation
  • 6. I want my jobs to start immediately
  • 8. You can leave these blank as well
  • 9. Condor automatically detects your Java installation
  • 10. Don’t worry too much about this, we will see how to correct/edit things later
  • 11. Here, we install only the good old “Classic” features, no VM
  • 12. …and no Hadoop support
  • 14. Click on Install (needs administrator’s privileges)
  • 15. Wait until this step will finish
  • 17. You will have to restart your system restart
  • 18. The Condor service should be started If needed restart the service here
  • 19. Check the Tasks Manager for the Condor daemons
  • 20. Edit/Correct the condor_config file: the host is set to localhost
  • 21. Set the right Network Interface in the condor_config.local You will find both configuration files under the install dir c:condor
  • 22. condor_status Good! So now we have a Personal Condor running on my laptop ?
  • 23. Let’s write a short C program and check Condor: my own cpu_burn version: #include <math.h> #include <stdio.h> int main() { int iMAX = 60000; int i,j; float fNORM, fMAX; float x,y; fMAX = iMAX; // convert to float fNORM = fMAX * fMAX; for (j=0;j<iMAX;j++) for (i=0;i<iMAX;i++) { y = i; // convert to float x = y*y/fNORM; } return 0; }
  • 24. Just copy & paste the code to your favorite IDE and compile
  • 25. In a text editor create your submit file: universe = vanilla You should have in the executable = cpu_burn.exe same folder the Error = executable and the err.$(Cluster).$(Process) submit file Output = out.$(Cluster).$(Process) Log = log.$(Cluster).$(Process) Queue 5
  • 27. Watch the Task Manager The heat is on
  • 28. Check with condor_q the progress of your jobs
  • 29. All jobs were processed
  • 30. Condor daemons while executing cpu_burn
  • 31. Check the logfile that was created 000 (088.001.000) 04/26 10:23:10 Job submitted from host: <127.0.0.1:50486> ... 001 (088.001.000) 04/26 10:23:19 Job executing on host: <127.0.0.1:50487> ... 005 (088.001.000) 04/26 10:24:20 Job terminated. (1) Normal termination (return value 0) Usr 0 00:00:27, Sys 0 00:00:00 - Run Remote Usage Usr 0 00:00:00, Sys 0 00:00:00 - Run Local Usage Usr 0 00:00:27, Sys 0 00:00:00 - Total Remote Usage Usr 0 00:00:00, Sys 0 00:00:00 - Total Local Usage 0 - Run Bytes Sent By Job 15686 - Run Bytes Received By Job 0 - Total Bytes Sent By Job 15686 - Total Bytes Received By Job ...
  • 32. That’s it Send your comments/suggestions to Guy Tel-Zur gtelzur at bgu dot ac dot il