ݺߣ

ݺߣShare a Scribd company logo
HOW TO SET UP CLASSES & WORKSHOPS

   How to create a class
   How to create a workshop
   How to process attendees
   How to complete the sale for classes and workshops

PLEASE NOTE: THE PROCEDURE FOR SETTING CLASSES AND
WORKSHOPS IS EXACTLY THE SAME.

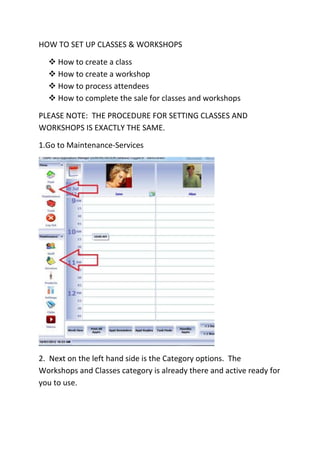
1.Go to Maintenance-Services


2. Next on the left hand side is the Category options. The
Workshops and Classes category is already there and active ready for
you to use.
3. Click on Classes and then New to create a new Class.


4. You then enter in the name of the Class and the class size. Also
please note that there is the Active box ticked. Simply unclick this to
deactivate the class. Then press Save. When you click Save, the
pricing box will appear. Enter in the amount you wish to charge for
the class. And then another box will appear for you to select which
staff member/s will be performing the class.


5. Next you can Edit the Time the course will take, breaks, GS
Applicable in the Details Section.


BOOKING IN A CLASS
1. Once you have created the Class, you can then book the class
   in for the date and time you wish to run it on.
2. Go to the date and time and select the appointment time under
   the staff members name.
3. This will bring up the Customers box, here you will see Class in
   the Surname row. Select Class.


4. You will then have a box appear to select the class you wish to
   run. It will also appear down the bottom in Selected Services.
   Click OK
5. Next the screen for selecting the service will appear. The Class
   will already be selected. Simply click save and the class will
   appear in the appointment screen.
6. When you click on the appointment, a box will appear with
   your options for the class. Select Attendees to book in the
   customers attending.
7. The next box to appear will allow you to select the attendees
   from the customer database.
How to set up classes
8. Select the customer and they will appear in the next box which
   allows you to select if the customer/s have attended, paid and
   also to check them out once they have paid. It will also show
   you the invoice number once the sale has been finalised. You
   are able to print the list of attendees off to give to you class
   instructor if you wish to do so.


9. To checkout an attendee, simply click on the Checkout button
   and the POS screen will appear. Select their payment method
   and the amount paid, then finalise the payment.

More Related Content

How to set up classes

  • 1. HOW TO SET UP CLASSES & WORKSHOPS  How to create a class  How to create a workshop  How to process attendees  How to complete the sale for classes and workshops PLEASE NOTE: THE PROCEDURE FOR SETTING CLASSES AND WORKSHOPS IS EXACTLY THE SAME. 1.Go to Maintenance-Services 2. Next on the left hand side is the Category options. The Workshops and Classes category is already there and active ready for you to use.
  • 2. 3. Click on Classes and then New to create a new Class. 4. You then enter in the name of the Class and the class size. Also please note that there is the Active box ticked. Simply unclick this to deactivate the class. Then press Save. When you click Save, the pricing box will appear. Enter in the amount you wish to charge for
  • 3. the class. And then another box will appear for you to select which staff member/s will be performing the class. 5. Next you can Edit the Time the course will take, breaks, GS Applicable in the Details Section. BOOKING IN A CLASS
  • 4. 1. Once you have created the Class, you can then book the class in for the date and time you wish to run it on. 2. Go to the date and time and select the appointment time under the staff members name. 3. This will bring up the Customers box, here you will see Class in the Surname row. Select Class. 4. You will then have a box appear to select the class you wish to run. It will also appear down the bottom in Selected Services. Click OK
  • 5. 5. Next the screen for selecting the service will appear. The Class will already be selected. Simply click save and the class will appear in the appointment screen.
  • 6. 6. When you click on the appointment, a box will appear with your options for the class. Select Attendees to book in the customers attending.
  • 7. 7. The next box to appear will allow you to select the attendees from the customer database.
  • 9. 8. Select the customer and they will appear in the next box which allows you to select if the customer/s have attended, paid and also to check them out once they have paid. It will also show you the invoice number once the sale has been finalised. You are able to print the list of attendees off to give to you class instructor if you wish to do so. 9. To checkout an attendee, simply click on the Checkout button and the POS screen will appear. Select their payment method and the amount paid, then finalise the payment.