Installation JB2011
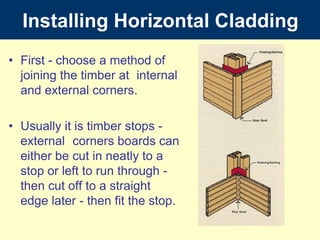
- 1. InstallingHorizontalCladdingFirst - choose a method of joining the timber at internal and external corners. Usually it is timber stops - external corners boards can either be cut in neatly to a stop or left to run through - then cut off to a straight edge later - then fit the stop.
- 2. Or cladding can be mitred at external corners and scribed at internal corners - time consuming method and requires precisionWhere cladding abuts masonry - leave clearance to prevent moisture from masonry entering the boards – or seal cladding ends and protect joint with a cover strip set in mastic
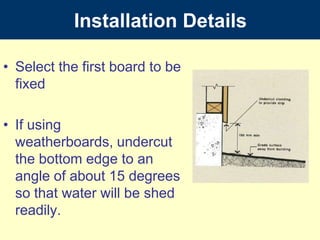
- 3. InstallationDetailsSelect the first board to be fixedIf using weatherboards, undercut the bottom edge to an angle of about 15 degrees so that water will be shed readily.
- 4. InstallationDetails (Cont.)The first board should be laid to a string line, mark out the width of one board on both corners of the wall to be clad - partly drive a nail at these points and run a string line between themPartly drive nails into every third or fourth stud along the string line - remove the string line - the first board is placed against this line of nails and fixed
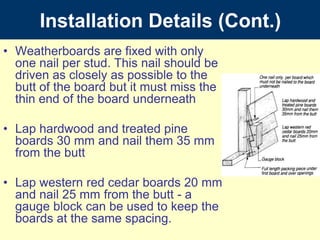
- 5. InstallationDetails (Cont.)Chamferboard and ship-lap profiles are laid similarly with the tongue facing upwards - rebate or tongue & groove are brought tight together using a chisel as a leverWeatherboards will require a full-length packing piece under the first board and as necessary over openings
- 6. InstallationDetails (Cont.)Weatherboards are fixed with only one nail per stud. This nail should be driven as closely as possible to the butt of the board but it must miss the thin end of the board underneathLap hardwood and treated pine boards 30 mm and nail them 35 mm from the buttLap western red cedar boards 20 mm and nail 25 mm from the butt - a gauge block can be used to keep the boards at the same spacing.
- 7. InstallationDetails (Cont.)Apply a primer to all freshly cut ends and seal all joints, including the stopped ends, with a paint/stain compatible mastic or silicon sealantPlace the mastic on the ends of the boards before fixing themNails should be driven with care - heavy and excessive nailing distorts the wood and may cause splitting during weather changesSome cladding boards may require pre-drilling of the nail holes at the ends to avoid splitting.
- 8. InstallationDetails (Cont.)Joints are placed over studsTight fitting joints are achieved by cutting a board slightly over-length, bowing it to get it into position and then snapping it into place.
- 9. InstallationDetails (Cont.)Progressively, take measurements at the ends of walls, beside openings and at 1800 mm centres along the wall to ensure the cladding is still runs parallel - very important either side of openings if the cladding continues above the openingIf necessary to correct this – it is best to catch up over a number of boards if the difference in parallel is greatCladding around window and doorframes need not be stopped if the butt jointing is neatWhen fixing cladding on the next wall around a corner, make sure the boards are in the same line
- 11. FastenersHot dipped galvanised or other non-corrosive nails (of suitable shank size and length) should always be used to fasten timber claddingPlain steel nails should not be used - as rust makes unsightly stains + causes gradual deterioration of timber around the nailFlat head nails are recommended to provide additional restraint for treated pine and Western Red Cedar claddingSilicon bronze nails (although expensive) produce a superior appearance when Western Red Cedar is coated with a natural or stain finish
- 12. Fasteners (Cont.)When fixing weatherboard profiles ensure nails are placed so movement of boards caused by wetting and drying do not create stresses sufficient to cause splitting of the timberThus one fixing per stud is best - ensure individual boards are not nailed togetherEdge-joint design in seasoned cladding profiles usually allows for minor seasonal movement thus two nails per stud may be usedSpacing of supports (studs) should not be more than 650 mm centres measured along the board
- 13. FinishingAfter fixing, one or two finishing coats of stain or paint should be applied - where cladding is to be painted, nail holes may be punched and filled prior to application of the finishing coats.Filling of nail holes in cladding that is to be stained is not recommended.
- 14. PlywoodCladding Apart from the style and warmth of timber structural plywood has:Cross laminated strength – resists impact and edge damageChoice of face veneer to suit applicationDurable glue bond
- 15. Other practical advantages of structural plywood cladding are:Can be bent to suit curved finishesGood acoustic propertiesEfficient thermal performanceGuaranteed quality and safety
- 16. A Lightweight Insulated System
- 17. Most structural plywood claddings have machined facesEither vertically grooved or flat faceProvides structural bracing to building
- 18. Flat machined or grooved
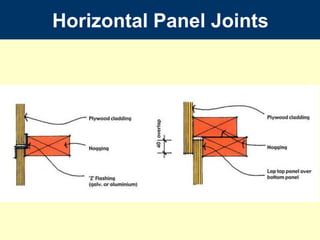
- 20. Installation of Plywood Cladding
- 26. Modern - Stylish
- 27. Hardboard Cladding• Reconstituted, natural hardwood• Environmentally friendly - only sustainable new growth hardwood used• Contains no knots, gum veins, cracks or splits• 25 year guarantee not to rot, split or crack• Hidden joining system suitable for on and off stud joining• No scarf joining• Limitless cladding and lining design solutions
- 28. Panel Sizes3660 x 1196mm3050 x 1196mm2745 x 1196mm2440 x 1196mmThickness: 9.5mmAvailable in smooth of rough sawn
- 29. Traditional
- 30. Interesting
- 31. Modern
- 32. Timber ShinglesShingles (taper sawn) or shakes (split along natural grain) provide individual and striking styleCommon in USA & Europe
- 34. Timber cladding apart from being a natural product is extremely versatile!
- 35. Interesting
- 37. AcknowledgementPrepared by:James MacGregor ConsultingThis educational resource has been prepared as part of the Forest & Wood Products AustraliaTechnical Resources Program – Supporting Timber Education & Training


