Introduction to digital photo editing
- 1. Introduction to Digital Photo Editing ( iPad Camera Roll to PowerPoint ) S p r i n g D a l e Neighbourhood Centre Pierce Jaques ( Windows 7 & Office 2010 )
- 2. iPhoto (Image Details) All photos taken with the Camera App are saved using the following pattern: IMG_XXXX.JPG ( X being a numeral, 0 ŌĆō 9 )
- 3. Manually Transfer Photos to PC ( Apple 30-pin to USB Cable )
- 4. Manually Transfer Photos to PC Click ŌĆśTrustŌĆÖ to allow your computer to access your iPad
- 5. Manually Transfer Photos to PC Your iPad will appear as a portable (storage) device
- 6. Manually Transfer Photos to PC Double-click each of the above icons (consecutively) to locate your iPads photos. This folder may be different on your iPad Note: this method will only copy photos (or videos) from the iPadŌĆÖs Camera Roll to your PC; ensure that items you need to transfer are copied to the correct location (Camera Roll) on your iPad first ŌĆō before you start.
- 7. Manually Transfer Photos to PC Copy any, or all, of the photos in this folder (on your iPad) and Paste the images into a folder on your PC ŌĆō I use a folder on my Desktop called iPad Photos.
- 8. Renaming Photos in Batches ( Photos listed in Details view ) Like other digital cameras, the iPad names each photo incrementally. For example: IMG_0078, IMG_0080, IMG_0081, IMG_0082 etcŌĆ” Note: gaps indicate deleted files.
- 9. Renaming Photos in Batches ( Medium Icons view ) Q: How can you tell which image is which? A: By renaming sets of images (within the same folder), you can sort photos into groups that belong together; e.g. Holiday, Workstation, Training, Family, Friends, etc. Note: the selected image is visible in the preview of the Details pane. ( Details view )
- 10. Renaming Photos in Batches ( Photos listed in Medium Icons view ) 1. Switch to Medium Icons (optional) 2. Use Shift (or) Control + Click to select a set of multiple files 3. Right-click on the first image in the set and select Rename 4. Replace the name, e.g. IMG_0117 with a new title e.g. Workstation 5. Each of the images selected will now be renamed incrementally as follow: ŌĆó Workstation (1) ŌĆó Workstation (2) ŌĆó Workstation (3) ŌĆó etcŌĆ”
- 11. Renaming Photos in Batches ( Photos listed in Details view ) When sorted alphabetically the renamed set (series) of photographs should appear in the identical (original) incremental order!
- 12. IrfanView http://www.irfanview.com/ http://download.cnet.com/... http://www.brothersoft.com/... IrfanView download Plugins/AddOns IrfanView can be used for the following: ŌĆó Resize by reducing the number of pixels ŌĆó Resize by reducing the number of bytes ŌĆó Crop images ŌĆó Rename Photos (in batches) Note: I recommended installing both downloads!
- 13. IrfanView: Batch Renaming File Batch Conversion/Rename Batch conversion (screen)
- 14. IrfanView: Batch Renaming Batch conversion (screen) 1. Select Batch rename 2. Open the photoŌĆÖs folder ŌĆō e.g. iPad Photos 3. Change the view to Medium Icons (optional) 4. Select the photos you wish to rename (Shift | Ctrl + Click) 5. Click the Add button ŌĆō or Add all, to rename all the photos in this folder 6. Click Browse and choose where to save the renamed files,e.g. Desktop>RENAMED 7. Select a pattern to use in the renaming processŌĆ” Note: there does not have to be a folder called RENAMED (on the Desktop) before you run this program! 1 2 3 4 56 7 ( the selected image will be displayed on the left ŌĆō as seen above )
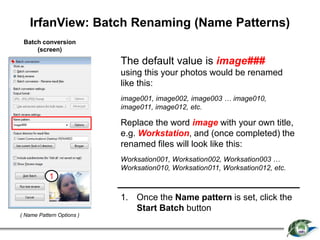
- 15. IrfanView: Batch Renaming (Name Patterns) Batch conversion (screen) ( Name Pattern Options ) The default value is image### using this your photos would be renamed like this: image001, image002, image003 ŌĆ” image010, image011, image012, etc. Replace the word image with your own title, e.g. Workstation, and (once completed) the renamed files will look like this: Worksation001, Worksation002, Worksation003 ŌĆ” Worksation010, Worksation011, Worksation012, etc. 1. Once the Name pattern is set, click the Start Batch button 1
- 16. PowerPoint (Photo Gallery) 1. Click File > New, to create a new Blank presentation ( IŌĆÖm using PowerPoint 2010 Professional Plus ) 2. Click on the Insert Tab 3. Click on the Photo Album Icon ŌĆ” 1 2 3
- 17. PowerPoint (Photo Gallery) 1 2 3 1. Click File/Disk to add photos 2. Select one, or more, of the photos in RENAMED (folder), click Insert 3. Select a picture in the album list and press the Up or Down arrows to rearrange the order of the photos 4. Use the Rotate buttons to flip the photos 90┬░ 5. Use Fit to slide for the layout 6. Click Create 4 5 6
- 18. PowerPoint (Photo Gallery) ( screenshot of ŌĆśCreatedŌĆÖ PowerPoint Photo Album )
- 19. Conclusion: what to do next? ŌĆó Try the different (Photo Album) Picture Layout methods in PowerPoint 2010 (or 2013) ŌĆó Create a video from the slide presentation created in PowerPoint 2010 (or 2013) ŌĆó Use the other editing features of IrfanView Pierce Jaques. May 2014


