IoT Implementation of Sensor Data Acquisition in Surveillance Applications - redacted
?
3 likes?1,534 views

This document describes an IoT-based surveillance system that uses sensors to acquire data. A Raspberry Pi is used as a gateway device connected to sensors on a Sensor Tag to measure environment variables. The sensor data is published to the cloud using MQTT protocol and can be monitored remotely. A camera is also used to stream visual data to a server.


IoT Implementation of Sensor Data Acquisition in Surveillance Applications - redacted
- 1. IoT Implementation of Sensor Data Acquisition in Surveillance Applications Presented by ARUN JOE JOSEPH Roll No: 8 S3 M.Tech VLSI & ES 3February2016 1
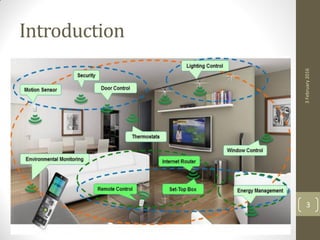
- 2. Introduction ? Surveillance is an important aspect of both military and civilian security, anywhere in the world. ? It is essential to gather data or intelligence in different forms, to add an extra layer of security in either one of the cases. ? In this project, we implement an IoT powered surveillance equipment. 3February2016 2
- 4. Objective ? Our aim in this project is to implement Internet of Things (IoT) model for surveillance which: ? Acquires data using sensors. ? Pushes the collected data into the Cloud / Server. ? Monitor this data using a remote terminal in the network. 3February2016 4
- 5. Methodology ? Raspberry Pi is used as a gateway device for the sensors that are used to collect data. ? Sensor tag consisting of different sensors, is used to measure different environment variables. ? MQTT protocol is used to publish and subscribe the sensor data into and from the cloud. ? Visual data is also collected using a camera. The collected data is streamed to a server/ cloud platform, where it can be monitored. 3February2016 5
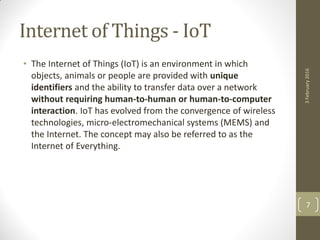
- 7. Internet of Things - IoT ? The Internet of Things (IoT) is an environment in which objects, animals or people are provided with unique identifiers and the ability to transfer data over a network without requiring human-to-human or human-to-computer interaction. IoT has evolved from the convergence of wireless technologies, micro-electromechanical systems (MEMS) and the Internet. The concept may also be referred to as the Internet of Everything. 3February2016 7
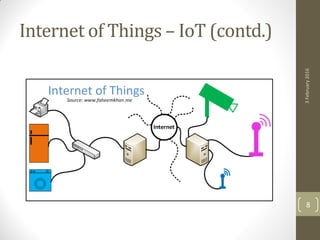
- 8. Internet of Things ©C IoT (contd.) 3February2016 8
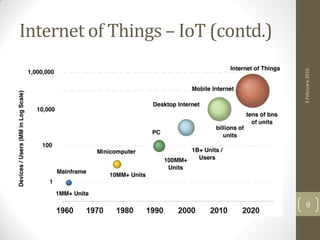
- 9. Internet of Things ©C IoT (contd.) 3February2016 9
- 10. Internet of Things ©C IoT (contd.) 3February2016 10
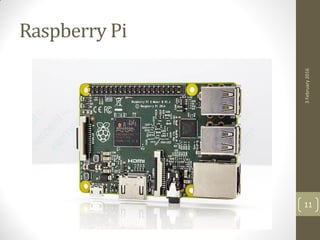
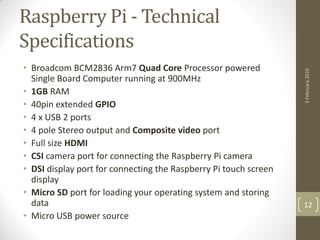
- 12. Raspberry Pi - Technical Specifications ? Broadcom BCM2836 Arm7 Quad Core Processor powered Single Board Computer running at 900MHz ? 1GB RAM ? 40pin extended GPIO ? 4 x USB 2 ports ? 4 pole Stereo output and Composite video port ? Full size HDMI ? CSI camera port for connecting the Raspberry Pi camera ? DSI display port for connecting the Raspberry Pi touch screen display ? Micro SD port for loading your operating system and storing data ? Micro USB power source 3February2016 12
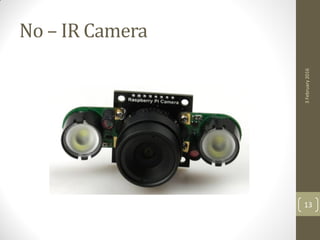
- 13. No ©C IR Camera 3February2016 13
- 14. No ©C IR Camera Features ? 5 megapixel native resolution sensor-capable of 2592 x 1944 pixel static images ? Supports 1080p30, 720p60 and 640x480p60/90 video ? Camera is capable of 2592 x 1944 pixel static images ? No Infrared filter making it perfect for taking Infrared photographs or photographing objects in low light (twilight) conditions ? 1.4 ?m X 1.4 ?m pixel with OmniBSI technology for high performance (high sensitivity, low crosstalk, low noise) ? Optical size of 1/4" 3February2016 14
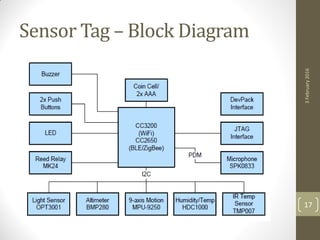
- 16. Sensor Tag Features ? Supports 10 Low-Power Sensors ? Ambient Light ? Infrared Temperature ? Ambient Temperature ? Accelerometer ? Gyroscope ? Magnetometer ? Pressure ? Humidity ? Microphone ? Magnetic Sensor 3February2016 16
- 17. Sensor Tag ©C Block Diagram 3February2016 17
- 20. Raspberry Pi ©C Camera Interfacing ? Simple approach to streaming video using a buffer and a raw byte stream. ? Leads to small delays (<100ms) and a high frame rate (~30fps) of the streamed video, making it perfect for live video streaming and feedback. ? Raspberry Pi used a utility called netcat to send data from the Pi to the computer. 3February2016 20
- 21. Raspberry Pi ©C Camera Interfacing (contd.) ? On the receiving computer, we streamed the video through the open source video player mplayer and used netcat to capture the video bits that were sent from the Pi. ? Computer we use is made ready to accept the data that the Raspberry Pi sends by running the following command in a terminal. ? nc.traditional -l -p 5000 | mplayer -fps 60 -cache 1024 - ? 3February2016 21
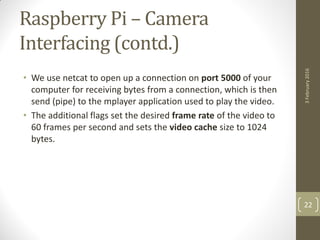
- 22. Raspberry Pi ©C Camera Interfacing (contd.) ? We use netcat to open up a connection on port 5000 of your computer for receiving bytes from a connection, which is then send (pipe) to the mplayer application used to play the video. ? The additional flags set the desired frame rate of the video to 60 frames per second and sets the video cache size to 1024 bytes. 3February2016 22
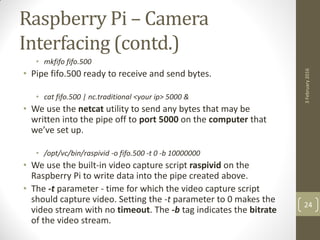
- 23. Raspberry Pi ©C Camera Interfacing (contd.) ? At transmitting end, video bytes are captured from the camera and saved into the fifo.500 pipe. ? The pipe essentially acts as a FIFO (first-in first-out) buffer that stores the video bytes as they arrive and allows the bytes to be read from the buffer by other utilities. ? We then use the netcat utility to read bytes from the pipe and send them off to the receiving terminal that weĪ»ve already set up to wait for transmitted data. ? 3February2016 23
- 24. Raspberry Pi ©C Camera Interfacing (contd.) ? mkfifo fifo.500 ? Pipe fifo.500 ready to receive and send bytes. ? cat fifo.500 | nc.traditional <your ip> 5000 & ? We use the netcat utility to send any bytes that may be written into the pipe off to port 5000 on the computer that weĪ»ve set up. ? /opt/vc/bin/raspivid -o fifo.500 -t 0 -b 10000000 ? We use the built-in video capture script raspivid on the Raspberry Pi to write data into the pipe created above. ? The -t parameter - time for which the video capture script should capture video. Setting the -t parameter to 0 makes the video stream with no timeout. The -b tag indicates the bitrate of the video stream. 3February2016 24
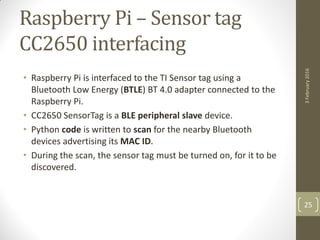
- 25. Raspberry Pi ©C Sensor tag CC2650 interfacing ? Raspberry Pi is interfaced to the TI Sensor tag using a Bluetooth Low Energy (BTLE) BT 4.0 adapter connected to the Raspberry Pi. ? CC2650 SensorTag is a BLE peripheral slave device. ? Python code is written to scan for the nearby Bluetooth devices advertising its MAC ID. ? During the scan, the sensor tag must be turned on, for it to be discovered. 3February2016 25
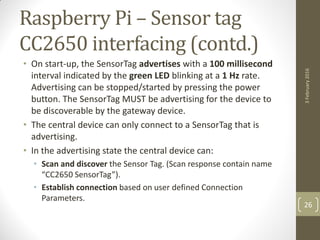
- 26. Raspberry Pi ©C Sensor tag CC2650 interfacing (contd.) ? On start-up, the SensorTag advertises with a 100 millisecond interval indicated by the green LED blinking at a 1 Hz rate. Advertising can be stopped/started by pressing the power button. The SensorTag MUST be advertising for the device to be discoverable by the gateway device. ? The central device can only connect to a SensorTag that is advertising. ? In the advertising state the central device can: ? Scan and discover the Sensor Tag. (Scan response contain name Ī░CC2650 SensorTagĪ▒). ? Establish connection based on user defined Connection Parameters. 3February2016 26
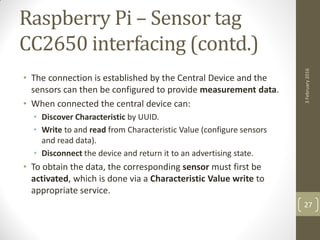
- 27. Raspberry Pi ©C Sensor tag CC2650 interfacing (contd.) ? The connection is established by the Central Device and the sensors can then be configured to provide measurement data. ? When connected the central device can: ? Discover Characteristic by UUID. ? Write to and read from Characteristic Value (configure sensors and read data). ? Disconnect the device and return it to an advertising state. ? To obtain the data, the corresponding sensor must first be activated, which is done via a Characteristic Value write to appropriate service. 3February2016 27
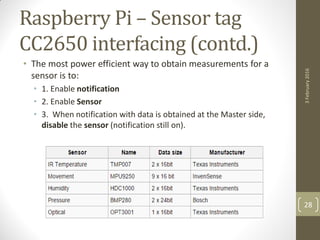
- 28. Raspberry Pi ©C Sensor tag CC2650 interfacing (contd.) ? The most power efficient way to obtain measurements for a sensor is to: ? 1. Enable notification ? 2. Enable Sensor ? 3. When notification with data is obtained at the Master side, disable the sensor (notification still on). 3February2016 28
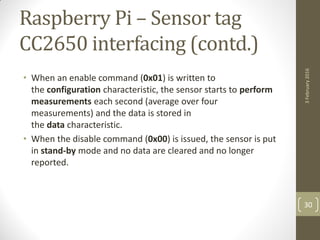
- 29. Raspberry Pi ©C Sensor tag CC2650 interfacing (contd.) ? The sensors are enabled by writing 0x01 to the corresponding configuration characteristic and then disabled by writing 0x00. ? Since the SensorTag reference platform supplies the raw, uncalibrated sensor outputs to the IoT enabled Raspberry Pi, necessary calibration for the operating environment is to be performed. 3February2016 29
- 30. Raspberry Pi ©C Sensor tag CC2650 interfacing (contd.) ? When an enable command (0x01) is written to the configuration characteristic, the sensor starts to perform measurements each second (average over four measurements) and the data is stored in the data characteristic. ? When the disable command (0x00) is issued, the sensor is put in stand-by mode and no data are cleared and no longer reported. 3February2016 30
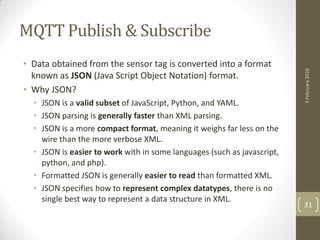
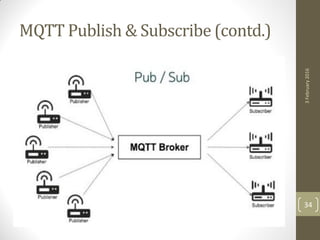
- 31. MQTT Publish & Subscribe ? Data obtained from the sensor tag is converted into a format known as JSON (Java Script Object Notation) format. ? Why JSON? ? JSON is a valid subset of JavaScript, Python, and YAML. ? JSON parsing is generally faster than XML parsing. ? JSON is a more compact format, meaning it weighs far less on the wire than the more verbose XML. ? JSON is easier to work with in some languages (such as javascript, python, and php). ? Formatted JSON is generally easier to read than formatted XML. ? JSON specifies how to represent complex datatypes, there is no single best way to represent a data structure in XML. 3February2016 31
- 32. MQTT Publish & Subscribe (contd.) ? This JSON data is published to the cloud using MQTT (Message Queue Telemetry Transport) protocol. ? Why MQTT? ? Easy, Binary, Minimal overhead. ? Data agnostic. ? Publish / Subscribe. ? Push instead of Pull. ? Reliable even when used with unreliable networks, constrained devices. ? Low bandwidth, high latency use case. 3February2016 32
- 33. MQTT Publish & Subscribe (contd.) ? mosquitto_sub -t Ī░CC2650Ī▒ ? The client can subscribe to multiple topics, downgrade topic subscriptions to a lower QoS, provide an ID for persistent sessions, define a will message, and many other options. (mosquitto_sub -h will list them.) ? mosquitto_pub -t Ī░CC2650" -m "message payload" -q 1 ©Cr ? This will publish a message to a given topic at QoS 1, retained. Many options will be listed by mosquitto_pub -h. 3February2016 33
- 34. MQTT Publish & Subscribe (contd.) 3February2016 34
- 35. MQTT Publish & Subscribe (contd.) 3February2016 35
- 36. MQTT Publish & Subscribe (contd.) ? Last known good value ? Broker saves last message for a topic. ? Client decides if the message is retained. ? Client receives the retained message after subscribing. ? Client defines Last Will and Testament. ? Broker sends message on behalf of the client after the client Ī«diedĪ». ? Real push. ? Useful for implementing on/off topic publishes. ? Mosquitto is an open source message broker that implements the MQTT protocol. 3February2016 36
- 37. Boot time execution of scripts ? The python and shell scripts are run at boot time using a crontab utility, using which scripts can be scheduled to be executed after booting. ? The crontab is a list of commands that you want to run on a regular schedule, and also the name of the command used to manage that list. ? The below commands are appended to the crontab. ? @reboot sh /home/pi/launcher.sh >/home/pi/logs/cronlog 2>&1 ? @reboot sleep 60 && sh /home/pi/livestream.sh ? Here, launcher.sh is executed at boot time and creates a cronlog, while livestream.sh is executed 60 seconds after the boot. 3February2016 37
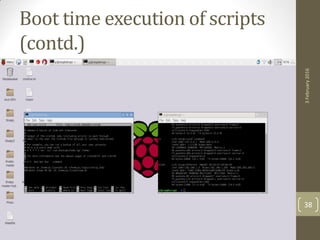
- 38. Boot time execution of scripts (contd.) 3February2016 38
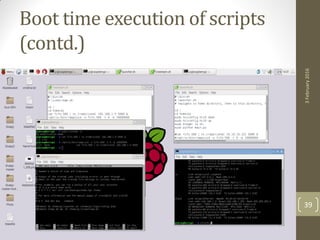
- 39. Boot time execution of scripts (contd.) 3February2016 39
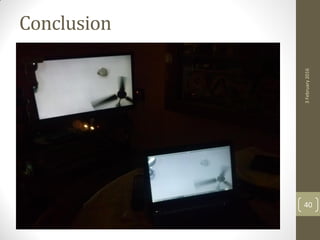
- 41. Conclusion (contd.) ? The objectives of the project have been accomplished. ? Published sensor data into the cloud using MQTT protocol via Raspberry Pi as the gateway device. ? Subscribed to the sensor data in the cloud using MQTT via a remote terminal. ? Implemented Live streaming of Low light visual data for surveillance application. 3February2016 41
- 42. References 1. http://zacharybears.com/ 2. https://www.raspberrypi.org 3. http://processors.wiki.ti.com/ 4. http://mqtt.org/ 5. https://github.com/ 6. http://hackaday.com/ 7. http://spin.atomicobject.com/ 8. https://en.wikipedia.org 3February2016 42