ºÝºÝߣ

ºÝºÝߣShare a Scribd company logo
Isometric View of a Truncated
Pentagonal Pyramid
Drawing Steps By:
SUBIN B MARKOSE
Assistant Professor
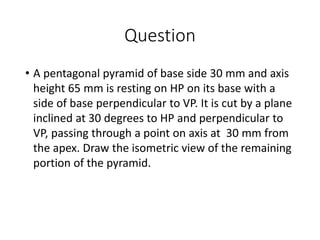
Question
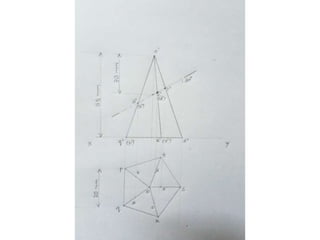
• A pentagonal pyramid of base side 30 mm and axis
height 65 mm is resting on HP on its base with a
side of base perpendicular to VP. It is cut by a plane
inclined at 30 degrees to HP and perpendicular to
VP, passing through a point on axis at 30 mm from
the apex. Draw the isometric view of the remaining
portion of the pyramid.
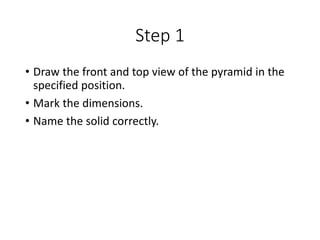
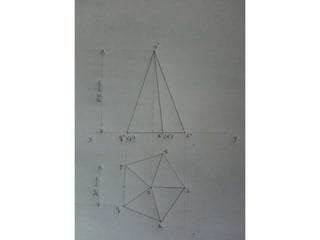
Step 1
• Draw the front and top view of the pyramid in the
specified position.
• Mark the dimensions.
• Name the solid correctly.
Isometric view of truncated pentagonal pyramid
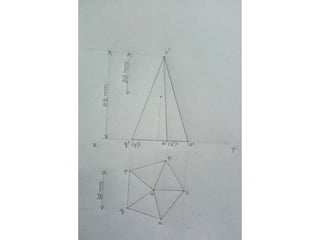
Step 2
• Mark the point on axis through which cutting plane
is passing.
• Mark the dimension.
• No separate name is given to that point.
Isometric view of truncated pentagonal pyramid
Step 3
• Draw the cutting plane inclined at 30 degrees to HP.
• The cutting plane cuts the edges of the pyramid at
the points a,b,c,d & e.
• Mark them clearly on front and top view.
Isometric view of truncated pentagonal pyramid
Step 4
• Join the cutting points on top view and shade the
region.
• Now sectional top view is complete.
Isometric view of truncated pentagonal pyramid
Step 5
• Enclose the top view inside a box.
• Name the box as 1-2-3-4.
• Draw the isometric axes and plot the point '1'.
• Similarly plot all other points of the box 2,3 & 4 on
the isometric axes and complete the box.
Isometric view of truncated pentagonal pyramid
Step 6
• The base of the pyramid is a pentagon.
• Plot all the corners of the pentagon on the
isometric view.
• This is done by plotting the points from the top
view and marking them correctly on to the
isometric axes.
• Distance of corners of pentagon should be taken
correctly from top view and plot them on the
correct edges.
Isometric view of truncated pentagonal pyramid
Step 7
• Now we are going to plot the cutting points a,b,c,d
& e on the isometric view.
• Let us start with point 'a'.
• Focus on point '5 ' on top view.
• Point '5' is obtained by drawing a horizontal line
through point 'a'.
• Point '5' is on edge 4-1.
Isometric view of truncated pentagonal pyramid
Step 8
• Plot point '5' on to isometric axis 4-1.
Isometric view of truncated pentagonal pyramid
Step 9
• Draw a line through point '5' parallel to edge 1-2 .
• Mark the distance 5-a from top view on the
parallel line as shown.
• Please look carefully as construction lines are
drawn very lightly.
Isometric view of truncated pentagonal pyramid
Step 10
• We are going to plot point 'a' on the isometric
view.
• Point 'a' is at a particular height above XY line
which can be taken from front view.
• Measure the height of point 'a' from XY line and
plot it on isometric view.
• Study the coming slides thoroughly and
draw.
Isometric view of truncated pentagonal pyramid
Step 11
• Repeat the same steps for plotting other points
b,c,d,& e.
• Draw a horizontal line through point 'b' and
mark point '6' on top view.
• From top view, plot 6 onto isometric view.
Isometric view of truncated pentagonal pyramid
Step 12
• Point 'b' is also at the same height as that of point
'a' which can be measured from front view.
• Plot 'b' at the height as shown.
• It is drawn very lightly so look carefully.
Isometric view of truncated pentagonal pyramid
Step 13
• For plotting points 'c & 'd', draw two horizontal
lines and mark points '7' & '8'.
• Repeat the same steps we used to plot the points
'a' & 'b'.
• Follow the images thoroughly.
Isometric view of truncated pentagonal pyramid
Step 14
• Now the last point 'e' has to be plotted.
• It is much easier and refer the slides for clarity.
• Repeating same steps as before.
Isometric view of truncated pentagonal pyramid
Step 15
• Now we have plotted all the cutting points on the
isometric view.
• Join them to get the top face of the pyramid.
Isometric view of truncated pentagonal pyramid
Step 16
• Join the edges of the pyramid looking at the front
and top views.
• Highlight the truncated pyramid as shown.
Isometric view of truncated pentagonal pyramid
Comments
• Feel free to rectify doubts.
• Draw lightly.
• Here you have to take measurements from both
top and front views to complete the isometric view.
• Naming the cutting points is very important.
• Draw very carefully.
• End of presentation...

More Related Content

Isometric view of truncated pentagonal pyramid

  • 1. Isometric View of a Truncated Pentagonal Pyramid Drawing Steps By: SUBIN B MARKOSE Assistant Professor
  • 2. Question • A pentagonal pyramid of base side 30 mm and axis height 65 mm is resting on HP on its base with a side of base perpendicular to VP. It is cut by a plane inclined at 30 degrees to HP and perpendicular to VP, passing through a point on axis at 30 mm from the apex. Draw the isometric view of the remaining portion of the pyramid.
  • 3. Step 1 • Draw the front and top view of the pyramid in the specified position. • Mark the dimensions. • Name the solid correctly.
  • 5. Step 2 • Mark the point on axis through which cutting plane is passing. • Mark the dimension. • No separate name is given to that point.
  • 7. Step 3 • Draw the cutting plane inclined at 30 degrees to HP. • The cutting plane cuts the edges of the pyramid at the points a,b,c,d & e. • Mark them clearly on front and top view.
  • 9. Step 4 • Join the cutting points on top view and shade the region. • Now sectional top view is complete.
  • 11. Step 5 • Enclose the top view inside a box. • Name the box as 1-2-3-4. • Draw the isometric axes and plot the point '1'. • Similarly plot all other points of the box 2,3 & 4 on the isometric axes and complete the box.
  • 15. Step 6 • The base of the pyramid is a pentagon. • Plot all the corners of the pentagon on the isometric view. • This is done by plotting the points from the top view and marking them correctly on to the isometric axes. • Distance of corners of pentagon should be taken correctly from top view and plot them on the correct edges.
  • 17. Step 7 • Now we are going to plot the cutting points a,b,c,d & e on the isometric view. • Let us start with point 'a'. • Focus on point '5 ' on top view. • Point '5' is obtained by drawing a horizontal line through point 'a'. • Point '5' is on edge 4-1.
  • 19. Step 8 • Plot point '5' on to isometric axis 4-1.
  • 21. Step 9 • Draw a line through point '5' parallel to edge 1-2 . • Mark the distance 5-a from top view on the parallel line as shown. • Please look carefully as construction lines are drawn very lightly.
  • 24. Step 10 • We are going to plot point 'a' on the isometric view. • Point 'a' is at a particular height above XY line which can be taken from front view. • Measure the height of point 'a' from XY line and plot it on isometric view. • Study the coming slides thoroughly and draw.
  • 27. Step 11 • Repeat the same steps for plotting other points b,c,d,& e. • Draw a horizontal line through point 'b' and mark point '6' on top view. • From top view, plot 6 onto isometric view.
  • 30. Step 12 • Point 'b' is also at the same height as that of point 'a' which can be measured from front view. • Plot 'b' at the height as shown. • It is drawn very lightly so look carefully.
  • 32. Step 13 • For plotting points 'c & 'd', draw two horizontal lines and mark points '7' & '8'. • Repeat the same steps we used to plot the points 'a' & 'b'. • Follow the images thoroughly.
  • 35. Step 14 • Now the last point 'e' has to be plotted. • It is much easier and refer the slides for clarity. • Repeating same steps as before.
  • 38. Step 15 • Now we have plotted all the cutting points on the isometric view. • Join them to get the top face of the pyramid.
  • 40. Step 16 • Join the edges of the pyramid looking at the front and top views. • Highlight the truncated pyramid as shown.
  • 43. Comments • Feel free to rectify doubts. • Draw lightly. • Here you have to take measurements from both top and front views to complete the isometric view. • Naming the cutting points is very important. • Draw very carefully.
  • 44. • End of presentation...