L2 Hand.pptxL2 Hand.pptxL2 Hand.pptxL2 Hand.pptx
- 1. HAND RADIOGRAPHY By Mr. Dinesh Sekar MSc Radiology Asst Professor Department Of Radiology
- 3. Hand • Posterior - anterior ~ dorsi Palmar • Anterior oblique ~ dorsi Palmar oblique • Posterior oblique ~ both hands (ball catcher's or Norgaard projection)
- 4. 1. Posterior anterior - Dorsi Palmar
- 5. Direction and centring of the X-ray beam • The vertical central ray is centered over the head of the third metacarpal.
- 6. KVP and mAs for Dorsi-Palmar view • KVP - 60 • mAs - 5
- 7. Posterior anterior - Dorsi Palmar
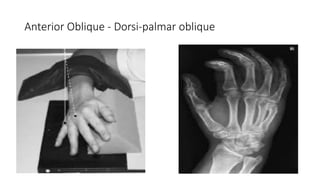
- 8. 2. Anterior oblique - Dorsi-palmar oblique Position of patient and cassette • From the basic postero-anterior position, the hand is externally rotated 45 degrees with the fingers extended. • The fingers should be separated slightly and the hand supported on a 45- degree non-opaque pad. • A sandbag is placed over the lower end of the forearm for immobilization.
- 9. Direction and centring of the X-ray beam • The vertical central ray is centred over the head of the fifth metacarpal. • The tube is then angled so that the central ray passes through the head of the third metacarpal, enabling a reduction in the size of the field.
- 10. KVP and mAs for Anterior Oblique - dorsi-palmar oblique • KVP - 60 • mAs - 6
- 11. Anterior Oblique - Dorsi-palmar oblique
- 12. 3. Posterior-Oblique - both hands (ball catcher's or Norgaard projection Position of patient and cassette • The patient is seated alongside the table. • However, if this is not possible due to the patient’s condition, the patient may be seated facing the table • Both forearms are pronated and placed on the table with the palmer surface of the hands in contact with the cassette. • The fingers are separated and extended but relaxed to ensure that they remain in contact with the cassette. • The wrists are adjusted so that the radial and ulna styloid processes are equidistant from the cassette. • A sandbag is placed over the lower forearms for immobilization.
- 13. Direction and centring of the X-ray beam • The vertical central is centred over a point midway between the inter- phalangeal joints of both thumbs.
- 14. KVP and mAs posterior oblique - both hands • KVP - 60 • mAs - 6
- 15. Posterior oblique - Both hands
- 16. Summary • At the end of the experiment , the student will be able to explain and demonstrate basic and advanced Radiographic positioning for Hand.
- 17. Reference •Clark's Positioning in Radiography •Handbook of Medical Radiography - C.Ramamohan
- 18. Disclaimer All data and content provided in this presentation are taken from the reference books, internet – websites and links, for informational purposes only.


