Lemon mix up
âĒDownload as DOCX, PDFâĒ
0 likesâĒ166 views

This document provides a 12-step tutorial for making photos more intense using Adobe Photoshop. The steps include cutting out the subject (a lime), adding dark and light gradients behind it, adjusting layers and blending modes, adding color adjustments and burns, and highlights to emphasize details and colors. With these simple steps, the tutorial aims to transform a photo into a more intense image.


Lemon mix up
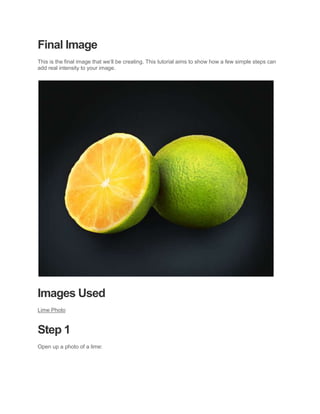
- 1. Final Image This is the final image that weâll be creating. This tutorial aims to show how a few simple steps can add real intensity to your image. Images Used Lime Photo Step 1 Open up a photo of a lime:
- 2. Step 2 Start by cutting out the lime. To do this, select it using the lasso tool or pen tool, and then paste your selection onto a new layer. Then create a new layer beneath your lime cutout layer called âbackgroundâ. Apply a radial gradient ranging from 292C2F to 0F1010. This is the first step to making your photo more intense, by positioning your photo in front of a dark background youâre giving it more contrast, and making the bright colors of your photo stand out more.
- 3. Step 3 Now create a new layer below your lime layer and above your background layer called âbackground highlightsâ. Create a couple of radial gradients ranging from white to transparent behind each piece of lime. Then reduce the opacity of this layer to 40%.
- 4. Step 4 Now apply a color overlay to your background highlights layer (color: 83BFDE).
- 6. Step 5 Now create a new layer called âbackground shadowsâ and apply a black to transparent radial gradient beneath each lime piece, and between the two pieces.
- 7. Step 6 Now duplicate your lime photo layer and change the duplicateâs blend mode to âhard lightâ. Reduce itâs layer opacity to 50%. Then duplicate your hard light layer and change the blend mode to âsoft lightâ, keeping the opacity at 50%. Then merge down both of your duplicate layers with your original lime layer, by pressing option+e twice.
- 8. Step 7 Now go to image>adjustments>hue/saturation and apply the settings shown below:
- 10. Step 8 Now go to filter>sharpen>sharpen, to emphasize the details of your lime. Step 9 Now go to image>adjustments>color balance. Make the adjustments shown below to reduce the green in your photo and give a more yellowy tint to compliment your gray background.
- 12. Step 10 Now create a new top layer called âburn layerâ. Select a large, soft black paintbrush, blend mode: âcolor burnâ, hardness: 0%, opacity 10%. Paint over the darker green areas of your limes to bring out the shadows. I reduced my burn layerâs opacity to 50% eventually in order to make the effect a little more subtle.
- 13. Step 11 Now create a new layer called âorange burnâ. You want the edges of the yellow inner part of the lime to burn to a deep orange color. Change your brush color to orange (FF6C00) and use a medium size soft brush to brush around the edges of your yellow area. Then reduce your brush size, and brush even closer to the edge of the yellow, making this area more intense with color. Finally, be sure to change the blend mode of this layer to âcolor burnâ. This will really bring out the orange color of this layer, and wonât let your of your orange brush marks overlap into your dark background.
- 14. Step 12 Now create a new layer called âwhite highlightsâ. Use a white paintbrush to paint in the highlights in the yellow area. Use a very small brush to repeatedly brush over your white edge and thin white lines. Then enlarge your brush and paint over the light areas of your green lime skin. If any of your brush marks go over into your dark background, use your magic wand tool to select outside of your lime shapes, then return to your white highlights layer and hit delete. Finally, I reduced this layerâs opacity to 40% to make the highlights more subtle and realistic.
- 15. And Weâre Done. And there you have it! Very simple photo manipulation, to create a truly intense end result. If you compare the before and after images below, you can see how these easy techniques make a real difference to your images.