Material vray for_rhino
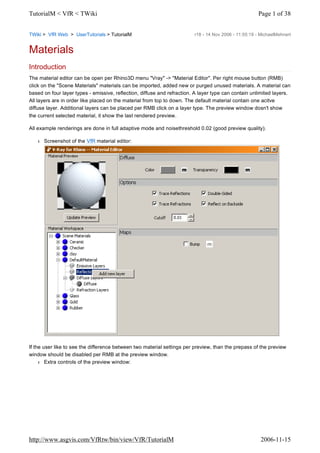
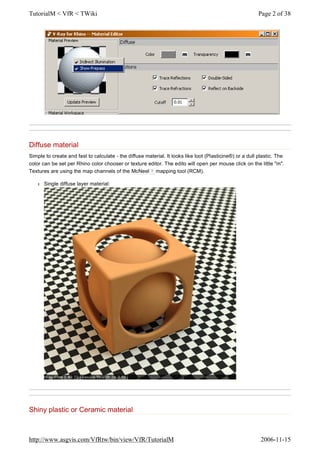
- 1. TWiki > VfR Web > UserTutorials > TutorialM Materials Introduction The material editor can be open per Rhino3D menu "Vray" -> "Material Editor". Per right mouse button (RMB) click on the "Scene Materials" materials can be imported, added new or purged unused materials. A material can based on four layer types - emissive, reflection, diffuse and refraction. A layer type can contain unlimited layers. All layers are in order like placed on the material from top to down. The default material contain one acitve diffuse layer. Additional layers can be placed per RMB click on a layer type. The preview window dosn't show the current selected material, it show the last rendered preview. All example renderings are done in full adaptive mode and noisethreshold 0.02 (good preview quality). l Screenshot of the VfR material editor: If the user like to see the difference between two material settings per preview, than the prepass of the preview window should be disabled per RMB at the preview window. l Extra controls of the preview window: r18 - 14 Nov 2006 - 11:55:19 - MichaelMehnert Page 1 of 38TutorialM < VfR < TWiki 2006-11-15http://www.asgvis.com/VfRtw/bin/view/VfR/TutorialM
- 2. Diffuse material Simple to create and fast to calculate - the diffuse material. It looks like loot (Plasticine?) or a dull plastic. The color can be set per Rhino color chooser or texture editor. The edito will open per mouse click on the little "m". Textures are using the map channels of the McNeel ? mapping tool (RCM). l Single diffuse layer material: Shiny plastic or Ceramic material Page 2 of 38TutorialM < VfR < TWiki 2006-11-15http://www.asgvis.com/VfRtw/bin/view/VfR/TutorialM
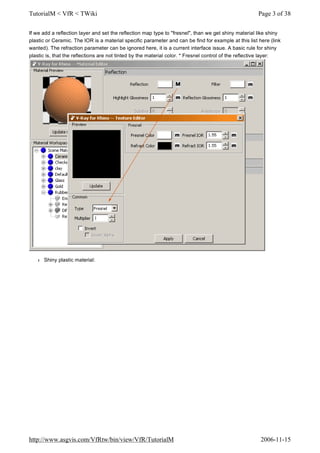
- 3. If we add a reflection layer and set the reflection map type to "fresnel", than we get shiny material like shiny plastic or Ceramic. The IOR is a material specific parameter and can be find for example at this list here (link wanted). The refraction parameter can be ignored here, it is a current interface issue. A basic rule for shiny plastic is, that the reflections are not tinted by the material color. * Fresnel control of the reflective layer: l Shiny plastic material: Page 3 of 38TutorialM < VfR < TWiki 2006-11-15http://www.asgvis.com/VfRtw/bin/view/VfR/TutorialM
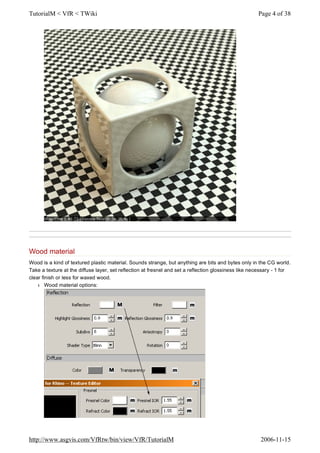
- 4. Wood material Wood is a kind of textured plastic material. Sounds strange, but anything are bits and bytes only in the CG world. Take a texture at the diffuse layer, set reflection at fresnel and set a reflection glossiness like necessary - 1 for clear finish or less for waxed wood. l Wood material options: Page 4 of 38TutorialM < VfR < TWiki 2006-11-15http://www.asgvis.com/VfRtw/bin/view/VfR/TutorialM
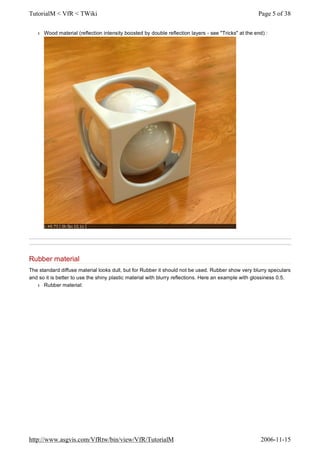
- 5. l Wood material (reflection intensity boosted by double reflection layers - see "Tricks" at the end) : Rubber material The standard diffuse material looks dull, but for Rubber it should not be used. Rubber show very blurry speculars and so it is better to use the shiny plastic material with blurry reflections. Here an example with glossiness 0.5. l Rubber material: Page 5 of 38TutorialM < VfR < TWiki 2006-11-15http://www.asgvis.com/VfRtw/bin/view/VfR/TutorialM
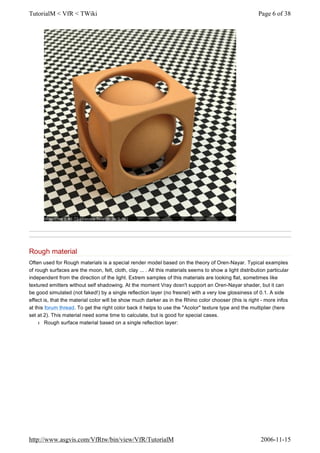
- 6. Rough material Often used for Rough materials is a special render model based on the theory of Oren-Nayar. Typical examples of rough surfaces are the moon, felt, cloth, clay ... . All this materials seems to show a light distribution particular independent from the direction of the light. Extrem samples of this materials are looking flat, sometimes like textured emitters without self shadowing. At the moment Vray dosn't support an Oren-Nayar shader, but it can be good simulated (not faked!) by a single reflection layer (no fresnel) with a very low glossiness of 0.1. A side effect is, that the material color will be show much darker as in the Rhino color chooser (this is right - more infos at this forum thread. To get the right color back it helps to use the "Acolor" texture type and the multiplier (here set at 2). This material need some time to calculate, but is good for special cases. l Rough surface material based on a single reflection layer: Page 6 of 38TutorialM < VfR < TWiki 2006-11-15http://www.asgvis.com/VfRtw/bin/view/VfR/TutorialM
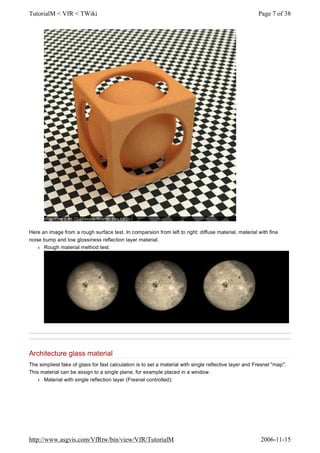
- 7. Here an image from a rough surface test. In comparsion from left to right: diffuse material, material with fine noise bump and low glossiness reflection layer material. l Rough material method test: Architecture glass material The simpliest fake of glass for fast calculation is to set a material with single reflective layer and Fresnel "map". This material can be assign to a single plane, for example placed in a window. l Material with single reflection layer (Fresnel controlled): Page 7 of 38TutorialM < VfR < TWiki 2006-11-15http://www.asgvis.com/VfRtw/bin/view/VfR/TutorialM
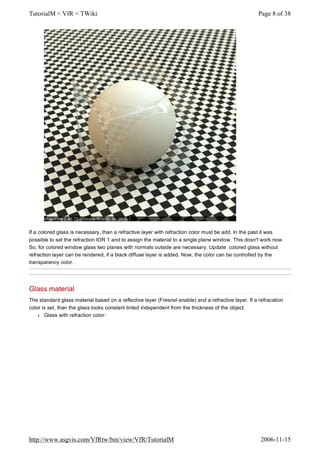
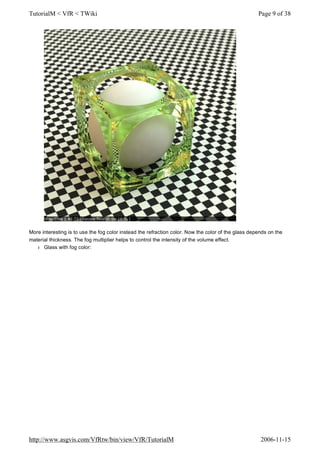
- 8. If a colored glass is necessary, than a refractive layer with refraction color must be add. In the past it was possible to set the refraction IOR 1 and to assign the material to a single plane window. This dosn't work now. So, for colored window glass two planes with normals outside are necessary. Update: colored glass without refraction layer can be rendered, if a black diffuse layer is added. Now, the color can be controlled by the transparency color. Glass material The standard glass material based on a reflective layer (Fresnel enable) and a refractive layer. If a refracation color is set, than the glass looks constant tinted independent from the thickness of the object. l Glass with refraction color: Page 8 of 38TutorialM < VfR < TWiki 2006-11-15http://www.asgvis.com/VfRtw/bin/view/VfR/TutorialM
- 9. More interesting is to use the fog color instead the refraction color. Now the color of the glass depends on the material thickness. The fog multiplier helps to control the intensity of the volume effect. l Glass with fog color: Page 9 of 38TutorialM < VfR < TWiki 2006-11-15http://www.asgvis.com/VfRtw/bin/view/VfR/TutorialM
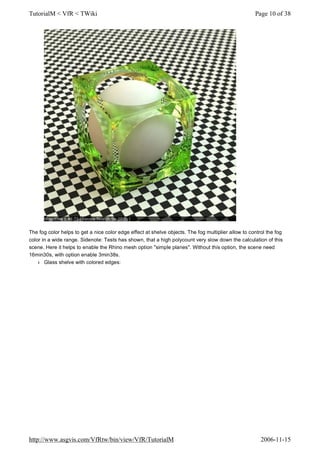
- 10. The fog color helps to get a nice color edge effect at shelve objects. The fog multiplier allow to control the fog color in a wide range. Sidenote: Tests has shown, that a high polycount very slow down the calculation of this scene. Here it helps to enable the Rhino mesh option "simple planes". Without this option, the scene need 16min30s, with option enable 3min38s. l Glass shelve with colored edges: Page 10 of 38TutorialM < VfR < TWiki 2006-11-15http://www.asgvis.com/VfRtw/bin/view/VfR/TutorialM
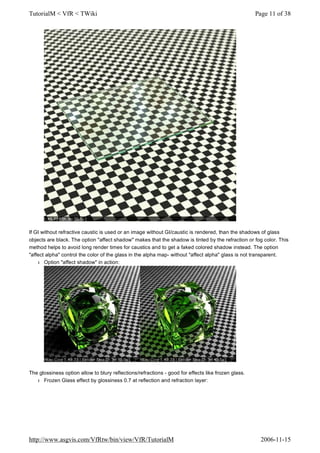
- 11. If GI without refractive caustic is used or an image without GI/caustic is rendered, than the shadows of glass objects are black. The option "affect shadow" makes that the shadow is tinted by the refraction or fog color. This method helps to avoid long render times for caustics and to get a faked colored shadow instead. The option "affect alpha" control the color of the glass in the alpha map- without "affect alpha" glass is not transparent. l Option "affect shadow" in action: The glossiness option allow to blury reflections/refractions - good for effects like frozen glass. l Frozen Glass effect by glossiness 0.7 at reflection and refraction layer: Page 11 of 38TutorialM < VfR < TWiki 2006-11-15http://www.asgvis.com/VfRtw/bin/view/VfR/TutorialM
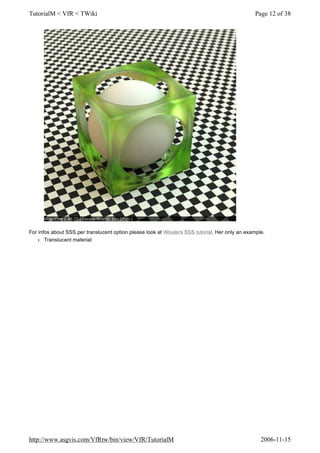
- 12. For infos about SSS per translucent option please look at Wouters SSS tutorial. Her only an example. l Translucent material: Page 12 of 38TutorialM < VfR < TWiki 2006-11-15http://www.asgvis.com/VfRtw/bin/view/VfR/TutorialM
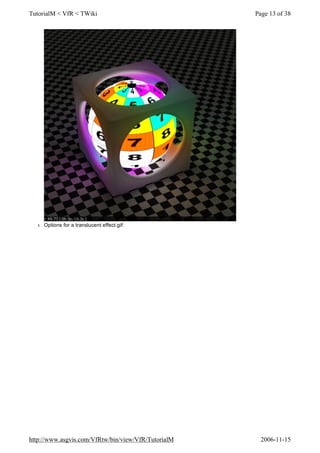
- 13. l Options for a translucent effect.gif: Page 13 of 38TutorialM < VfR < TWiki 2006-11-15http://www.asgvis.com/VfRtw/bin/view/VfR/TutorialM
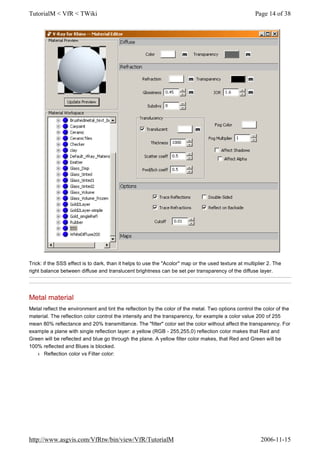
- 14. Trick: if the SSS effect is to dark, than it helps to use the "Acolor" map or the used texture at multiplier 2. The right balance between diffuse and translucent brightness can be set per transparency of the diffuse layer. Metal material Metal reflect the environment and tint the reflection by the color of the metal. Two options control the color of the material. The reflection color control the intensity and the transparency, for example a color value 200 of 255 mean 80% reflectance and 20% transmittance. The "filter" color set the color without affect the transparency. For example a plane with single reflection layer: a yellow (RGB - 255,255,0) reflection color makes that Red and Green will be reflected and blue go through the plane. A yellow filter color makes, that Red and Green will be 100% reflected and Blues is blocked. l Reflection color vs Filter color: Page 14 of 38TutorialM < VfR < TWiki 2006-11-15http://www.asgvis.com/VfRtw/bin/view/VfR/TutorialM
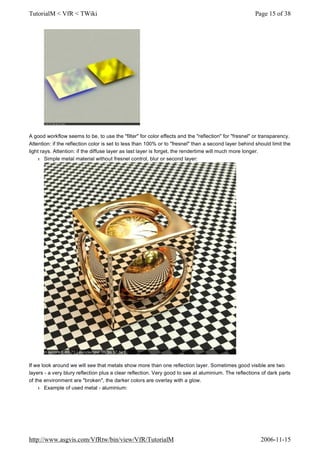
- 15. A good workflow seems to be, to use the "filter" for color effects and the "reflection" for "fresnel" or transparency. Attention: if the reflection color is set to less than 100% or to "fresnel" than a second layer behind should limit the light rays. Attention: if the diffuse layer as last layer is forget, the rendertime will much more longer. l Simple metal material without fresnel control, blur or second layer: If we look around we will see that metals show more than one reflection layer. Sometimes good visible are two layers - a very blury reflection plus a clear reflection. Very good to see at aluminium. The reflections of dark parts of the environment are "broken", the darker colors are overlay with a glow. l Example of used metal - aluminium: Page 15 of 38TutorialM < VfR < TWiki 2006-11-15http://www.asgvis.com/VfRtw/bin/view/VfR/TutorialM
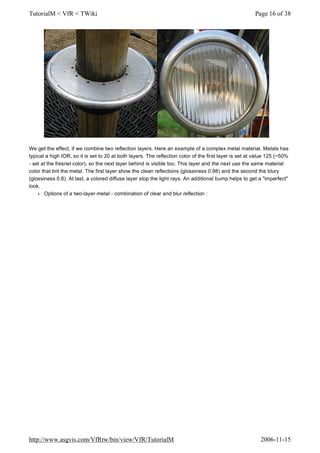
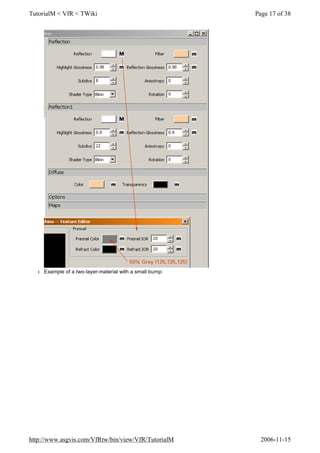
- 16. We get the effect, if we combine two reflection layers. Here an example of a complex metal material. Metals has typical a high IOR, so it is set to 20 at both layers. The reflection color of the first layer is set at value 125 (~50% - set at the fresnel color), so the next layer behind is visible too. This layer and the next use the same material color that tint the metal. The first layer show the clean reflections (glossiness 0.98) and the second the blury (glossiness 0.8). At last, a colored diffuse layer stop the light rays. An additional bump helps to get a "imperfect" look. l Options of a two-layer-metal - combination of clear and blur reflection : Page 16 of 38TutorialM < VfR < TWiki 2006-11-15http://www.asgvis.com/VfRtw/bin/view/VfR/TutorialM
- 17. l Example of a two-layer-material with a small bump: Page 17 of 38TutorialM < VfR < TWiki 2006-11-15http://www.asgvis.com/VfRtw/bin/view/VfR/TutorialM
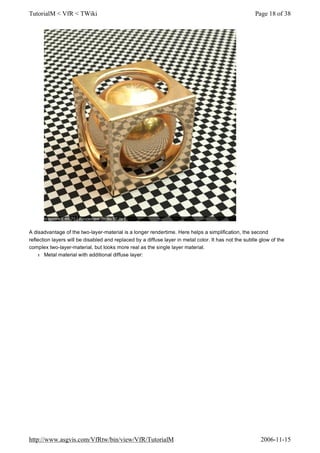
- 18. A disadvantage of the two-layer-material is a longer rendertime. Here helps a simplification, the second reflection layers will be disabled and replaced by a diffuse layer in metal color. It has not the subtle glow of the complex two-layer-material, but looks more real as the single layer material. l Metal material with additional diffuse layer: Page 18 of 38TutorialM < VfR < TWiki 2006-11-15http://www.asgvis.com/VfRtw/bin/view/VfR/TutorialM
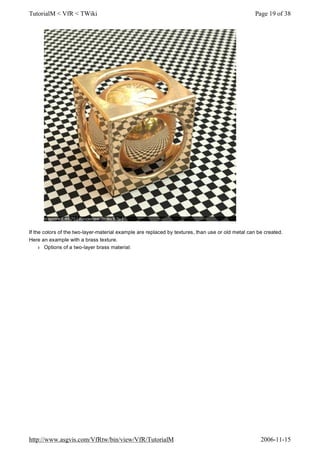
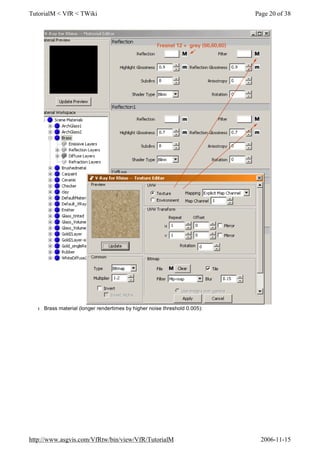
- 19. If the colors of the two-layer-material example are replaced by textures, than use or old metal can be created. Here an example with a brass texture. l Options of a two-layer brass material: Page 19 of 38TutorialM < VfR < TWiki 2006-11-15http://www.asgvis.com/VfRtw/bin/view/VfR/TutorialM
- 20. l Brass material (longer rendertimes by higher noise threshold 0.005): Page 20 of 38TutorialM < VfR < TWiki 2006-11-15http://www.asgvis.com/VfRtw/bin/view/VfR/TutorialM
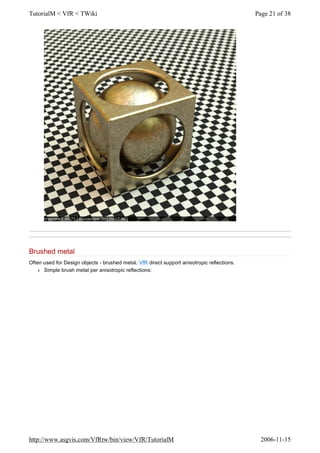
- 21. Brushed metal Often used for Design objects - brushed metal. VfR direct support anisotropic reflections. l Simple brush metal per anisotropic reflections: Page 21 of 38TutorialM < VfR < TWiki 2006-11-15http://www.asgvis.com/VfRtw/bin/view/VfR/TutorialM
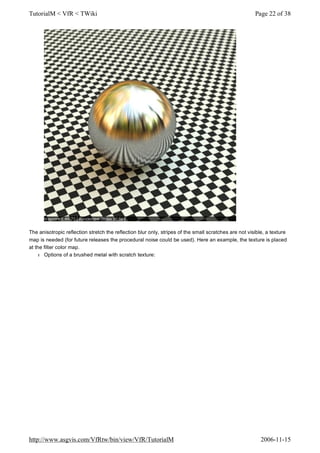
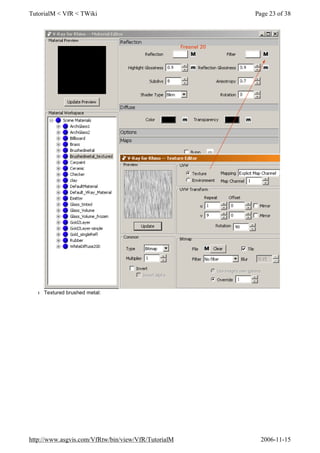
- 22. The anisotropic reflection stretch the reflection blur only, stripes of the small scratches are not visible, a texture map is needed (for future releases the procedural noise could be used). Here an example, the texture is placed at the filter color map. l Options of a brushed metal with scratch texture: Page 22 of 38TutorialM < VfR < TWiki 2006-11-15http://www.asgvis.com/VfRtw/bin/view/VfR/TutorialM
- 23. l Textured brushed metal: Page 23 of 38TutorialM < VfR < TWiki 2006-11-15http://www.asgvis.com/VfRtw/bin/view/VfR/TutorialM
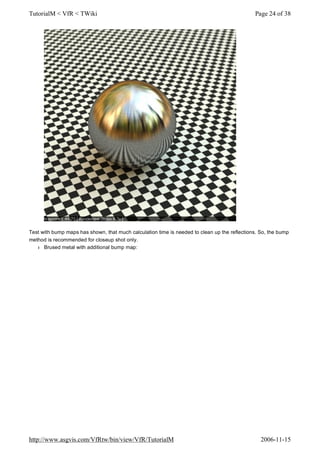
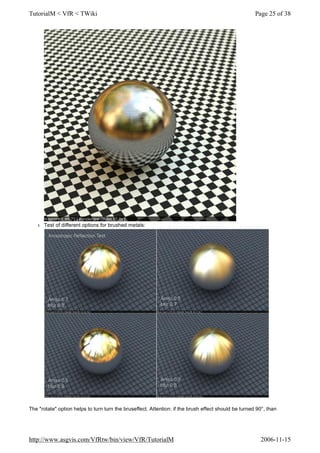
- 24. Test with bump maps has shown, that much calculation time is needed to clean up the reflections. So, the bump method is recommended for closeup shot only. l Brused metal with additional bump map: Page 24 of 38TutorialM < VfR < TWiki 2006-11-15http://www.asgvis.com/VfRtw/bin/view/VfR/TutorialM
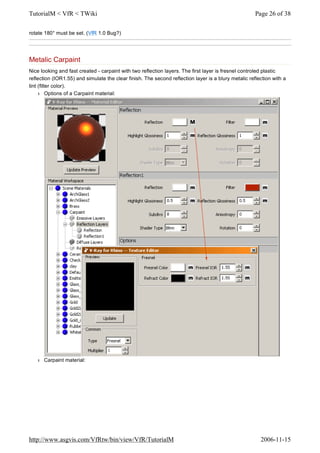
- 25. l Test of different options for brushed metals: The "rotate" option helps to turn turn the bruseffect. Attention: if the brush effect should be turned 90°, than Page 25 of 38TutorialM < VfR < TWiki 2006-11-15http://www.asgvis.com/VfRtw/bin/view/VfR/TutorialM
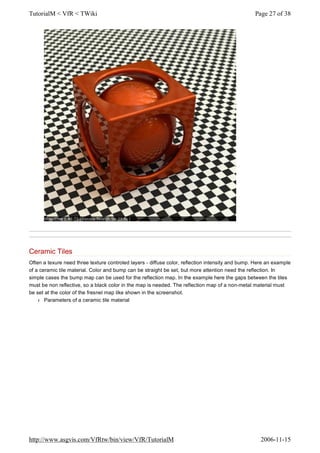
- 26. rotate 180° must be set. (VfR 1.0 Bug?) Metalic Carpaint Nice looking and fast created - carpaint with two reflection layers. The first layer is fresnel controled plastic reflection (IOR1.55) and simulate the clear finish. The second reflection layer is a blury metalic reflection with a tint (filter color). l Options of a Carpaint material: l Carpaint material: Page 26 of 38TutorialM < VfR < TWiki 2006-11-15http://www.asgvis.com/VfRtw/bin/view/VfR/TutorialM
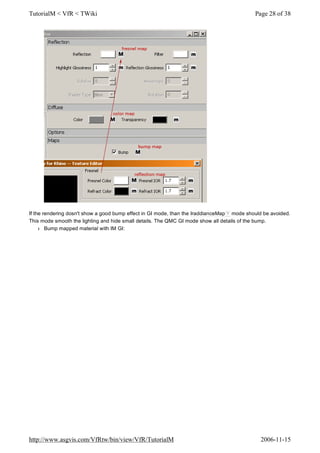
- 27. Ceramic Tiles Often a texure need three texture controled layers - diffuse color, reflection intensity and bump. Here an example of a ceramic tile material. Color and bump can be straight be set, but more attention need the reflection. In simple cases the bump map can be used for the reflection map. In the example here the gaps between the tiles must be non reflective, so a black color in the map is needed. The reflection map of a non-metal material must be set at the color of the fresnel map like shown in the screenshot. l Parameters of a ceramic tile material Page 27 of 38TutorialM < VfR < TWiki 2006-11-15http://www.asgvis.com/VfRtw/bin/view/VfR/TutorialM
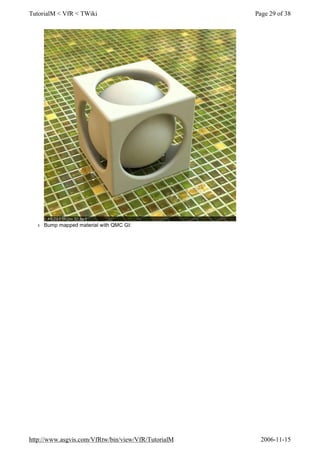
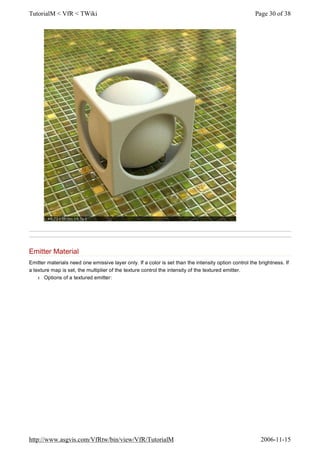
- 28. If the rendering dosn't show a good bump effect in GI mode, than the IraddianceMap ? mode should be avoided. This mode smooth the lighting and hide small details. The QMC GI mode show all details of the bump. l Bump mapped material with IM GI: Page 28 of 38TutorialM < VfR < TWiki 2006-11-15http://www.asgvis.com/VfRtw/bin/view/VfR/TutorialM
- 29. l Bump mapped material with QMC GI: Page 29 of 38TutorialM < VfR < TWiki 2006-11-15http://www.asgvis.com/VfRtw/bin/view/VfR/TutorialM
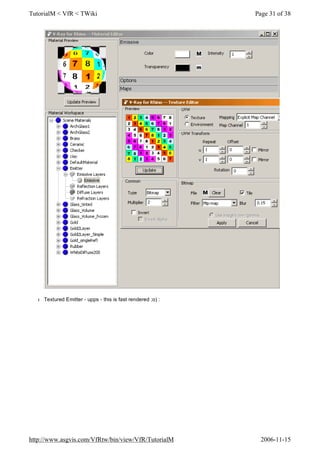
- 30. Emitter Material Emitter materials need one emissive layer only. If a color is set than the intensity option control the brightness. If a texture map is set, the multiplier of the texture control the intensity of the textured emitter. l Options of a textured emitter: Page 30 of 38TutorialM < VfR < TWiki 2006-11-15http://www.asgvis.com/VfRtw/bin/view/VfR/TutorialM
- 31. l Textured Emitter - upps - this is fast rendered ;o) : Page 31 of 38TutorialM < VfR < TWiki 2006-11-15http://www.asgvis.com/VfRtw/bin/view/VfR/TutorialM
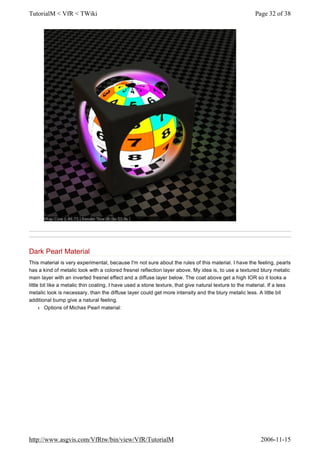
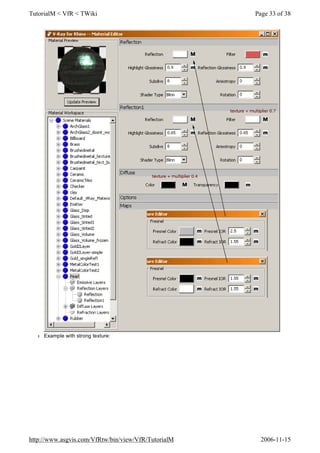
- 32. Dark Pearl Material This material is very experimental, because I'm not sure about the rules of this material. I have the feeling, pearls has a kind of metalic look with a colored fresnel reflection layer above. My idea is, to use a textured blury metalic main layer with an inverted fresnel effect and a diffuse layer below. The coat above get a high IOR so it looks a little bit like a metalic thin coating. I have used a stone texture, that give natural texture to the material. If a less metalic look is necessary, than the diffuse layer could get more intensity and the blury metalic less. A little bit additional bump give a natural feeling. l Options of Michas Pearl material: Page 32 of 38TutorialM < VfR < TWiki 2006-11-15http://www.asgvis.com/VfRtw/bin/view/VfR/TutorialM
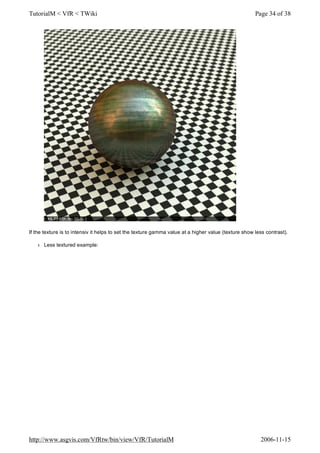
- 33. l Example with strong texture: Page 33 of 38TutorialM < VfR < TWiki 2006-11-15http://www.asgvis.com/VfRtw/bin/view/VfR/TutorialM
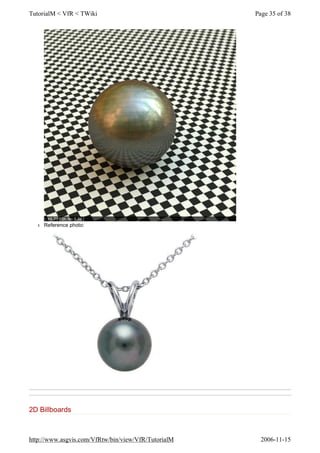
- 34. If the texture is to intensiv it helps to set the texture gamma value at a higher value (texture show less contrast). l Less textured example: Page 34 of 38TutorialM < VfR < TWiki 2006-11-15http://www.asgvis.com/VfRtw/bin/view/VfR/TutorialM
- 35. l Reference photo: 2D Billboards Page 35 of 38TutorialM < VfR < TWiki 2006-11-15http://www.asgvis.com/VfRtw/bin/view/VfR/TutorialM
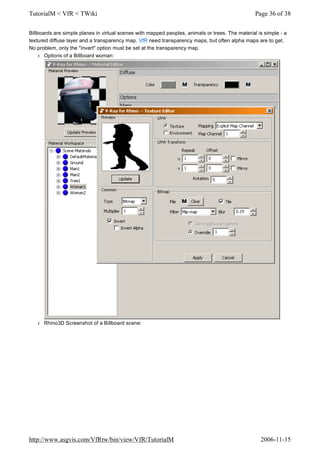
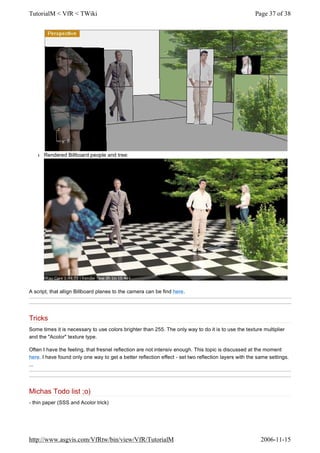
- 36. Billboards are simple planes in virtual scenes with mapped peoples, animals or trees. The material is simple - a textured diffuse layer and a transparency map. VfR need transparency maps, but often alpha maps are to get. No problem, only the "invert" option must be set at the transparency map. l Options of a Billboard woman: l Rhino3D Screenshot of a Billboard scene: Page 36 of 38TutorialM < VfR < TWiki 2006-11-15http://www.asgvis.com/VfRtw/bin/view/VfR/TutorialM
- 37. l Rendered Billboard people and tree: A script, that allign Billboard planes to the camera can be find here. Tricks Some times it is necessary to use colors brighter than 255. The only way to do it is to use the texture multiplier and the "Acolor" texture type. Often I have the feeling, that fresnel reflection are not intensiv enough. This topic is discussed at the moment here. I have found only one way to get a better reflection effect - set two reflection layers with the same settings. ... Michas Todo list ;o) - thin paper (SSS and Acolor trick) Page 37 of 38TutorialM < VfR < TWiki 2006-11-15http://www.asgvis.com/VfRtw/bin/view/VfR/TutorialM
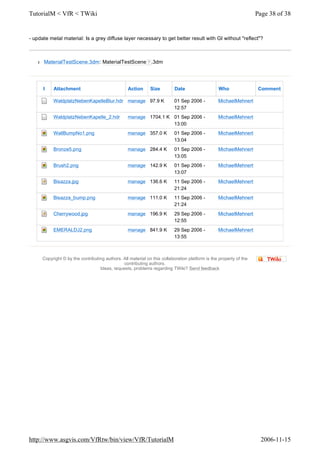
- 38. Copyright ? by the contributing authors. All material on this collaboration platform is the property of the contributing authors. Ideas, requests, problems regarding TWiki? Send feedback - update metal material: Is a grey diffuse layer necessary to get better result with GI without "reflect"? l MaterialTestScene.3dm: MaterialTestScene ? .3dm I Attachment Action Size Date Who Comment WaldplatzNebenKapelleBlur.hdr manage 97.9 K 01 Sep 2006 - 12:57 MichaelMehnert WaldplatzNebenKapelle_2.hdr manage 1704.1 K 01 Sep 2006 - 13:00 MichaelMehnert WallBumpNo1.png manage 357.0 K 01 Sep 2006 - 13:04 MichaelMehnert Bronze5.png manage 284.4 K 01 Sep 2006 - 13:05 MichaelMehnert Brush2.png manage 142.9 K 01 Sep 2006 - 13:07 MichaelMehnert Bisazza.jpg manage 136.6 K 11 Sep 2006 - 21:24 MichaelMehnert Bisazza_bump.png manage 111.0 K 11 Sep 2006 - 21:24 MichaelMehnert Cherrywood.jpg manage 196.9 K 29 Sep 2006 - 12:55 MichaelMehnert EMERALDJ2.png manage 841.9 K 29 Sep 2006 - 13:55 MichaelMehnert Page 38 of 38TutorialM < VfR < TWiki 2006-11-15http://www.asgvis.com/VfRtw/bin/view/VfR/TutorialM

