Maven TestNg frame work (1) (1)
- 2. Benefits of Maven over Ant 1. It makes project build process easy. 2. It provides easy and uniform build system. 3. It provides quality project document Information. 4. Managing project dependencies. 5. Provides guild lines for better project management practices. 6. It allows to build project using project object model (POM). 7. It downloads required dependency's jar files automatically from Maven central repositories.
- 3. Maven Setup (1) Step 1: To setup Maven, download the maven’s latest version form Apache depending upon different OS. Step 2: Unzip the folder and save it on the local disk. Step 3: Create environment variable for MAVEN_HOME. Follow the below step: Navigate to System Properties ->Advanced System Setting->Environment Variable - >System Variable ->New ->Add path of Maven folder Step 4: Edit path variable and provide the bin folder path.
- 4. Maven Setup (2) Step 5: Now verify the maven installation using command prompt and don’t forget to setup JAVA_HOME Use mvn –version to verify maven version and output comes like below.
- 5. Install Maven IDE in Eclipse Maven provides IDE to integrate with eclipse. I am using eclipse Juno here. Navigate to Help->Eclipse Marketplace-> Search maven ->Maven Integration for Eclipse ->INSTAL. After installation you have to restart eclipse. Then right click on pom.xml and verify all the options are available like below
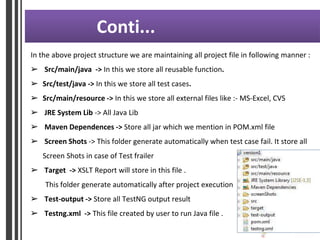
- 7. Create Maven Project For Selenium 2 Step 1: Navigate to File- new-others-Maven-Maven Project-Click Next Step 2: Check the Create a simple project and click next Step 3: Provide Group Id and Artefact Id .You can change the version of Jar as per your wish. Here I am using default name. Click Finish. Step 4: After finish you will find the project structure is created like below. pom.xml is created which is used to download all dependencies.
- 8. Conti... In the above project structure we are maintaining all project file in following manner : ➢ Src/main/java -> In this we store all reusable function. ➢ Src/test/java -> In this we store all test cases. ➢ Src/main/resource -> In this we store all external files like :- MS-Excel, CVS ➢ JRE System Lib -> All Java Lib ➢ Maven Dependences -> Store all jar which we mention in POM.xml file ➢ Screen Shots -> This folder generate automatically when test case fail. It store all Screen Shots in case of Test frailer ➢ Target -> XSLT Report will store in this file . This folder generate automatically after project execution ➢ Test-output -> Store all TestNG output result ➢ Testng.xml -> This file created by user to run Java file .
- 9. Why Continuous Integration with Jenkins ? Project Management Detect system development problems earlier Reduce risks of cost, schedule, and budget Code Quality Measurable and visible code quality Continuous automatic regression unit test
- 10. Workflow View
- 11. Jenkins Setup (1) Step1.Go to http://jenkins-ci.org/ and download jenkin.war file Step2: Keep This Jenkins. War File where your project is lying/Where you have workspace for Example: C: UsersWorkspacesProject Name Step3: Open Command prompt and go till project home directory and append "Java -jar Jenkins. War and run it.
- 12. Jenkins Setup (2) Now Jenkins is fully up. Step4: Open your Browser and give local host url :> localhost:8080. Step5: Now click on Configure System Step6: Now set The jdk path. Step7: Add the path of your jdk. Now click on Add jdk Step8: Now Create a New Job. To run your Test Case. We have to create a New Job Click on New Item
- 13. Jenkins Setup (3) Step9: Now Add the Path of your Project...In directory.. Step10:Click on Add build step Click on Build Now
- 14. XSLT Reports (1) A custom report style, which gives the entire overview of the execution status, pass %, fail %, and complete list of the test cases executed. Case I :- When Complete Test Scenario Pass
- 15. XSLT Reports (2) Case II :- When Complete Test Scenario Fail
- 16. XSLT Reports (3) Details description about each Test Case
- 17. XSLT Reports (4) Details description about each Test Steps
- 18. Hitech Cit, Plot no 17, Shilpi Vally, Gaffor Nagar, Image Hospital Road, Hyderabad 500081 INDIA Ph:+91-40:65 70 57 57 , +91-93 92 91 89 support@qaprogrammer.com


