Media Evaluation
- 1. -How did you use media technologies in the construction and research, planning and evaluating stages?
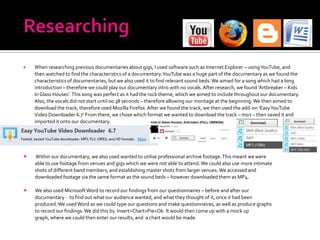
- 2. ’éĪ When researching previous documentaries about gigs, I used software such as Internet Explorer ŌĆō using YouTube, and then watched to find the characteristics of a documentary. YouTube was a huge part of the documentary as we found the characteristics of documentaries, but we also used it to find relevant sound beds. We aimed for a song which had a long introduction ŌĆō therefore we could play our documentary intro with no vocals. After research, we found ŌĆśArtbreaker ŌĆō Kids In Glass HousesŌĆÖ. This song was perfect as it had the rock theme, which we aimed to include throughout our documentary. Also, the vocals did not start until 00.38 seconds ŌĆō therefore allowing our montage at the beginning. We then aimed to download the track, therefore used Mozilla Firefox. After we found the track, we then used the add-on ŌĆśEasy YouTube Video Downloader 6.7ŌĆÖ From there, we chose which format we wanted to download the track ŌĆō mp3 ŌĆō then saved it and imported it onto our documentary. ’éĪ Within our documentary, we also used wanted to utilise professional archive footage. This meant we were able to use footage from venues and gigs which we were not able to attend. We could also use more intimate shots of different band members, and establishing master shots from larger venues. We accessed and downloaded footage via the same format as the sound beds ŌĆō however downloaded them as MP4. ’éĪ We also used Microsoft Word to record our findings from our questionnaires ŌĆō before and after our documentary - to find out what our audience wanted, and what they thought of it, once it had been produced. We used Word as we could type our questions and make questionnaires, as well as produce graphs to record our findings. We did this by Insert>Chart>Pie>Ok. It would then come up with a mock up graph, where we could then enter our results, and a chart would be made.
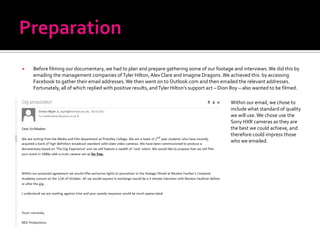
- 3. ’éĪ Before filming our documentary, we had to plan and prepare gathering some of our footage and interviews. We did this by emailing the management companies of Tyler Hilton, Alex Clare and Imagine Dragons. We achieved this by accessing Facebook to gather their email addresses. We then went on to Outlook.com and then emailed the relevant addresses. Fortunately, all of which replied with positive results, and Tyler HiltonŌĆÖs support act ŌĆō Dion Roy ŌĆō also wanted to be filmed. Within our email, we chose to include what standard of quality we will use. We chose use the Sony HXR cameras as they are the best we could achieve, and therefore could impress those who we emailed.
- 4. For filming our documentary, we filmed on Sony HXR-MC200E cameras. Which we borrowed from college. These cameras are 1080p quality & solid state therefore, they were the best cameras we could use. For our filming of the gigs, we emailed the managers vowing to use this standard of camera as they would produce a professional style quality. The Sony cameras allowed us to use various microphones for recording. This varied from the clip on mics ŌĆō primarily used for interviews ŌĆō and boom mics. We used the clip on microphones for interviews with Alex Clare, Tyler Hilton, Alex Clare, Dion Roy and especially our vox pop. It was vital we used this microphone when recording her voice as we were in the gig venue, and if we had used the boom mic, it wouldnŌĆÖt have heard her and would have just recorded the ambience. However we did use the boom microphones whilst recording our gigs. We chose this because we could then capture the audience reactions, the instruments as well as the singer, therefore include the entire gig experience. Whilst recording, we used headphones to ensure the appropriate sound was being recorded. For our gigs footage, and for the interviews, we used a Manfrotto tripod due to its stability. By using a tripod it meant that we could have a balanced camera, which would also have steady and reliant footage. Whilst planning our documentary, we always intended for it to be played on MTV LIVE HD. Therefore filming our documentary on a HD camera was vital to ensure it would use the best standard and quality that we could achieve. In order to make our documentary as professional as possible, we practised prior to the ŌĆśofficialŌĆÖ filming to ensure we knew what to do, and how to use the cameras. This included actions such as record, slow zoom, fast zoom and checking our footage recorded. By doing this, we then made our documentary as professional looking as we could, by having steady camera work, appropriate zooms and eye level interviews. This camera also allowed the grid to be shown on the screen when filming. This allowed us to correctly position the interview within rule thirds ŌĆō to therefore make it more professional.
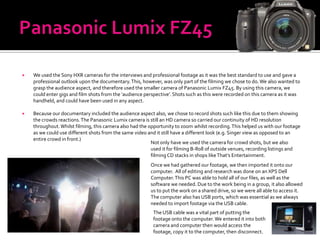
- 5. ’éĪ We used the Sony HXR cameras for the interviews and professional footage as it was the best standard to use and gave a professional outlook upon the documentary. This, however, was only part of the filming we chose to do. We also wanted to grasp the audience aspect, and therefore used the smaller camera of Panasonic Lumix FZ45. By using this camera, we could enter gigs and film shots from the ŌĆśaudience perspectiveŌĆÖ. Shots such as this were recorded on this camera as it was handheld, and could have been used in any aspect. ’éĪ Because our documentary included the audience aspect also, we chose to record shots such like this due to them showing the crowds reactions. The Panasonic Lumix camera is still an HD camera so carried our continuity of HD resolution throughout. Whilst filming, this camera also had the opportunity to zoom whilst recording. This helped us with our footage as we could use different shots from the same video and it still have a different look (e.g. Singer view as opposed to an entire crowd in front.) Not only have we used the camera for crowd shots, but we also used it for filming B-Roll of outside venues, recording listings and filming CD stacks in shops like ThatŌĆÖs Entertainment. Once we had gathered our footage, we then imported it onto our computer. All of editing and research was done on an XPS Dell Computer. This PC was able to hold all of our files, as well as the software we needed. Due to the work being in a group, it also allowed us to put the work on a shared drive, so we were all able to access it. The computer also has USB ports, which was essential as we always needed to import footage via the USB cable. The USB cable was a vital part of putting the footage onto the computer. We entered it into both camera and computer then would access the footage, copy it to the computer, then disconnect.
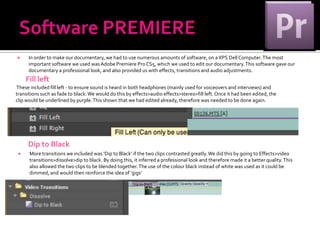
- 6. ’éĪ In order to make our documentary, we had to use numerous amounts of software, on a XPS Dell Computer. The most important software we used was Adobe Premiere Pro CS5, which we used to edit our documentary. This software gave our documentary a professional look, and also provided us with effects, transitions and audio adjustments. Fill left These included fill left - to ensure sound is heard in both headphones (mainly used for voiceovers and interviews) and transitions such as fade to black. We would do this by effects>audio effects>stereo>fill left. Once it had been edited, the clip would be underlined by purple. This shown that we had edited already, therefore was needed to be done again. Dip to Black ’éĪ More transitions we included was ŌĆśDip to BlackŌĆÖ if the two clips contrasted greatly. We did this by going to Effects>video transitions>dissolve>dip to black. By doing this, it inferred a professional look and therefore made it a better quality. This also allowed the two clips to be blended together. The use of the colour black instead of white was used as it could be dimmed, and would then reinforce the idea of ŌĆśgigsŌĆÖ
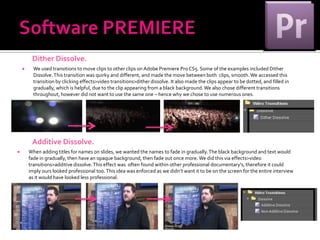
- 7. Dither Dissolve. ’éĪ We used transitions to move clips to other clips on Adobe Premiere Pro CS5. Some of the examples included Dither Dissolve. This transition was quirky and different, and made the move between both clips, smooth. We accessed this transition by clicking effects>video transitions>dither dissolve. It also made the clips appear to be dotted, and filled in gradually, which is helpful, due to the clip appearing from a black background. We also chose different transitions throughout, however did not want to use the same one ŌĆō hence why we chose to use numerous ones. Additive Dissolve. ’éĪ When adding titles for names on slides, we wanted the names to fade in gradually. The black background and text would fade in gradually, then have an opaque background, then fade out once more. We did this via effects>video transitions>additive dissolve. This effect was often found within other professional documentary's, therefore it could imply ours looked professional too. This idea was enforced as we didnŌĆÖt want it to be on the screen for the entire interview as it would have looked less professional.
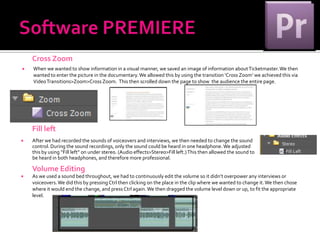
- 8. Cross Zoom ’éĪ When we wanted to show information in a visual manner, we saved an image of information about Ticketmaster. We then wanted to enter the picture in the documentary. We allowed this by using the transition ŌĆśCross ZoomŌĆÖ we achieved this via Video Transitions>Zoom>Cross Zoom. This then scrolled down the page to show the audience the entire page. Fill left ’éĪ After we had recorded the sounds of voiceovers and interviews, we then needed to change the sound control. During the sound recordings, only the sound could be heard in one headphone. We adjusted this by using ŌĆ£Fill leftŌĆØ on under stereo. (Audio effects>Stereo>Fill left.) This then allowed the sound to be heard in both headphones, and therefore more professional. Volume Editing ’éĪ As we used a sound bed throughout, we had to continuously edit the volume so it didnŌĆÖt overpower any interviews or voiceovers. We did this by pressing Ctrl then clicking on the place in the clip where we wanted to change it. We then chose where it would end the change, and press Ctrl again. We then dragged the volume level down or up, to fit the appropriate level.
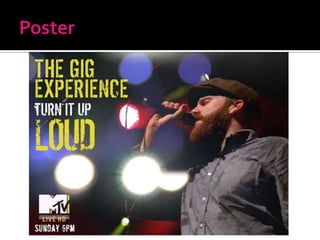
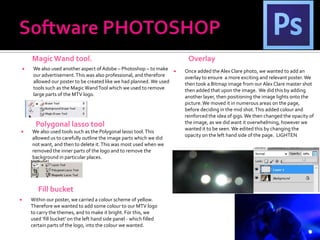
- 10. Magic Wand tool. Overlay ’éĪ We also used another aspect of Adobe ŌĆō Photoshop ŌĆō to make ’éĪ Once added the Alex Clare photo, we wanted to add an our advertisement. This was also professional, and therefore overlay to ensure a more exciting and relevant poster. We allowed our poster to be created like we had planned. We used then took a Bitmap image from our Alex Clare master shot tools such as the Magic Wand Tool which we used to remove then added that upon the image. We did this by adding large parts of the MTV logo. another layer, then positioning the image lights onto the picture. We moved it in numerous areas on the page, before deciding in the mid shot. This added colour and reinforced the idea of gigs. We then changed the opacity of Polygonal lasso tool the image, as we did want it overwhelming, however we wanted it to be seen. We edited this by changing the ’éĪ We also used tools such as the Polygonal lasso tool. This opacity on the left hand side of the page. LIGHTEN allowed us to carefully outline the image parts which we did not want, and then to delete it. This was most used when we removed the inner parts of the logo and to remove the background in particular places. Fill bucket ’éĪ Within our poster, we carried a colour scheme of yellow. Therefore we wanted to add some colour to our MTV logo to carry the themes, and to make it bright. For this, we used ŌĆśfill bucketŌĆÖ on the left hand side panel - which filled certain parts of the logo, into the colour we wanted.
