際際滷

際際滷Share a Scribd company logo
Macromedia Flash Module

MODULE 1: WORKING WITH TEXT TOOL

Duration       :      80 minutes

Objectives     :      Students will be able to:

                      1. Add, delete & rename layer
                      2. Use the frame operation such as add frame & keyframe, remove, copy and paste.
                      3. Create text use the text tool
                      4. Editing text using the text properties
                      5. Use the transform function to change the text layout.

Contents       :

Follow the instructions step-by-step.

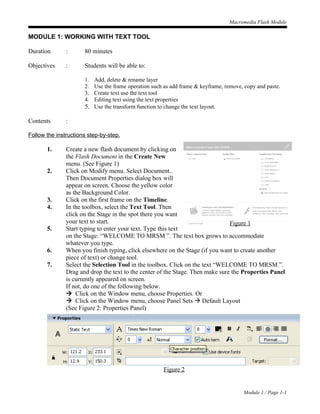
       1.      Create a new flash document by clicking on
               the Flash Document in the Create New
               menu. (See Figure 1)
       2.      Click on Modify menu. Select Document..
               Then Document Properties dialog box will
               appear on screen. Choose the yellow color
               as the Background Color.
       3.      Click on the first frame on the Timeline.
       4.      In the toolbox, select the Text Tool. Then
               click on the Stage in the spot there you want
               your text to start.                                              Figure 1
       5.      Start typing to enter your text. Type this text
               on the Stage: WELCOME TO MRSM . The text box grows to accommodate
               whatever you type.
       6.      When you finish typing, click elsewhere on the Stage (if you want to create another
               piece of text) or change tool.
       7.      Select the Selection Tool in the toolbox. Click on the text WELCOME TO MRSM .
               Drag and drop the text to the center of the Stage. Then make sure the Properties Panel
               is currently appeared on screen.
               If not, do one of the following below.
                Click on the Window menu, choose Properties. Or
                Click on the Window menu, choose Panel Sets  Default Layout
               (See Figure 2: Properties Panel)


                                                      Figure 2


                                                                                       Module 1 / Page 1-1
Macromedia Flash Module

8.    Click on the Align Center. Then click on the Font Size to increase the size of text.
      Select 30 point. You can change the typeface of text by clicking on the Font style.
      Select Arial. Then click toggle the bold style. Change that text to the blue color. Then
      set the character spacing to 15 point.

9.    In the toolbox select the Free Transform Tool then the text will appear as Figure 3.


                                                             Figure 3


      If you point the cursor to each corner or line of the box there are three types of arrow
      that will be appear. These arrow can do scaling, rotating and skewing.


                                                      Scaling


                                                     Skewing


                                                     Rotating


10.   Save the work in your diskette. Click File menu, choose Save or Save As. Then the
      Save As dialog box will appear on screen. Type Module1  Text as a filename then
      click save button.


                                                                               Module 1 / Page 1-2

More Related Content

Modul 1: Menggunakan text tool

  • 1. Macromedia Flash Module MODULE 1: WORKING WITH TEXT TOOL Duration : 80 minutes Objectives : Students will be able to: 1. Add, delete & rename layer 2. Use the frame operation such as add frame & keyframe, remove, copy and paste. 3. Create text use the text tool 4. Editing text using the text properties 5. Use the transform function to change the text layout. Contents : Follow the instructions step-by-step. 1. Create a new flash document by clicking on the Flash Document in the Create New menu. (See Figure 1) 2. Click on Modify menu. Select Document.. Then Document Properties dialog box will appear on screen. Choose the yellow color as the Background Color. 3. Click on the first frame on the Timeline. 4. In the toolbox, select the Text Tool. Then click on the Stage in the spot there you want your text to start. Figure 1 5. Start typing to enter your text. Type this text on the Stage: WELCOME TO MRSM . The text box grows to accommodate whatever you type. 6. When you finish typing, click elsewhere on the Stage (if you want to create another piece of text) or change tool. 7. Select the Selection Tool in the toolbox. Click on the text WELCOME TO MRSM . Drag and drop the text to the center of the Stage. Then make sure the Properties Panel is currently appeared on screen. If not, do one of the following below. Click on the Window menu, choose Properties. Or Click on the Window menu, choose Panel Sets Default Layout (See Figure 2: Properties Panel) Figure 2 Module 1 / Page 1-1
  • 2. Macromedia Flash Module 8. Click on the Align Center. Then click on the Font Size to increase the size of text. Select 30 point. You can change the typeface of text by clicking on the Font style. Select Arial. Then click toggle the bold style. Change that text to the blue color. Then set the character spacing to 15 point. 9. In the toolbox select the Free Transform Tool then the text will appear as Figure 3. Figure 3 If you point the cursor to each corner or line of the box there are three types of arrow that will be appear. These arrow can do scaling, rotating and skewing. Scaling Skewing Rotating 10. Save the work in your diskette. Click File menu, choose Save or Save As. Then the Save As dialog box will appear on screen. Type Module1 Text as a filename then click save button. Module 1 / Page 1-2