Neutrino_quick_start_guide
- 2. Contents Neutrino Introduction........................................................................................................................4 Prerequisites.............................................................................................................................4 Managing and Versioning Projects..................................................................................................4 Creating a project.........................................................................................................................4 Prerequisites.............................................................................................................................4 Creating a book............................................................................................................................7
- 3. Table of Figures Figure 1. New Project Page............................................................................................................ 5 Figure 2. Create a new project page .............................................................................................. 5 Figure 3. Edit page with the DocSet Tree Structure ...................................................................... 6 Figure 4. Content Folder................................................................................................................. 7
- 4. Neutrino Introduction Neutrino is an open-source Java-based application server that manage, author, and publish technical documentation. It is based on XML DocBook standard and has the ability to interface with any XML editor to give an output in pdf or html format. This document gives a comprehensive overview on how to create a project and book using Neutrino, without getting into the details of how the XML content are organized, authored, edited and published as a set of books in the documentation projects. Neutrino download is available at https://sourceforge.net/projects/neutrino-xml PREREQUISITES Following are the standard prerequisites required for Neutrino to work. ď‚· Check Neutrino is installed on your server and all workstations that access the server. ď‚· Check Mozilla Firefox web browser is installed on all the workstations that access the Neutrino server. ď‚· Check XML editor is installed on all workstations. Managing and Versioning Projects Projects in Neutrino are defined workspaces that are placed under the Sub-versioning system to track and manage XML files that you create. Each Neutrino projects corresponds to a documentation set or folder containing modules or books. The modules or books comprises of chapters and topics that can be visualized as in a tree hierarchy. You can create new project and version them appropriately, if your document set has significant changes during each release. The following sections describe the overall procedure on how the documentation structure are hierarchically arranged into books and chapters. Creating a project PREREQUISITES ď‚· The user accessing the Neutrino server from the workstation must have a user account created with a user name and password. ď‚· All workstations accessing Neutrino server must be integrated with the recommended sub- versioning system. The following procedure creates a new project from a workstation. 1. Open Mozilla Firefox and enter the Neutrino server address http://tomcatURL/Neutrino in the address field and press Enter. System response- The Neutrino Login window opens. 2. Type your user name in the User field and type your password in the Password field. Press Enter. System response- The Neutrino Projects page is displayed.
- 5. Figure 1. New Project Page 3. Click new project. System response- Create a new project page opens. Figure 2. Create a new project page 4. In the Doc set title field, enter the name of the documentation set (Test_1 for example). Note: The Doc set title field must not contain any spaces or special characters. An underscore is permitted and 32 is the maximum allowed characters. System response- The Document set title name is displayed in the Neutrino Edit page when you edit a project, refer Figure 3. Edit page with the DocSet Tree Structure. 5. In the Project name field, enter the name of the folder that is created in your workspace to contain the project files (letstrytoday for example). Note: The Project name must not contain any spaces, special characters or underscore character. System response- The Project name is created as a folder in the Neutrino server when you commit files. 6. From the Customer drop-down field, select the customer name. The Customer name is the name of the client, with their applied style while producing the html or pdf output. 7. Click create new project.
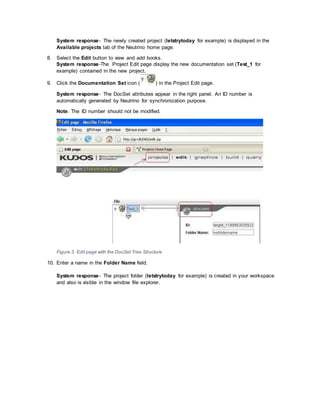
- 6. System response- The newly created project (letstrytoday for example) is displayed in the Available projects tab of the Neutrino home page. 8. Select the Edit button to view and add books. System response-The Project Edit page display the new documentation set (Test_1 for example) contained in the new project. 9. Click the Documentation Set icon ( ) in the Project Edit page. System response- The DocSet attributes appear in the right panel. An ID number is automatically generated by Neutrino for synchronization purpose. Note: The ID number should not be modified. Figure 3. Edit page with the DocSet Tree Structure 10. Enter a name in the Folder Name field. System response- The project folder (letstrytoday for example) is created in your workspace and also is visible in the window file explorer.
- 7. Figure 4. ContentFolder Note: The folder name must not contain any spaces and special characters. If you do not define a name, then the default folder name is “nofoldername”. Tips! The html or pdf output is generated in the output folder in your workspace at the DocSet level and “letstrytoday” contains the xml source files at the Project level in the content folder, refer Figure 4. Content Folder. Creating a book A book in Neutrino is a hierarchical setup of related documents that contain the TOC, chapters, topics, sub-topics, glossary, index and appendix. The following procedure creates a book from the project (letstrytoday for example) that we created in Figure 2. Create a new project page. 1. In the DocSet tree structure (Figure 3. Edit page with the DocSet Tree Structure), select the documentation set name. 2. Right-click and select New/Book. System response- The ( ) icon representing a new book is added to the tree. Tips! Depending on the context in the tree structure, different DocSet names (New/Book, New/Chapter, New/Preface, New/Glossary, New/Index, and New/Appendix) exist. You can select the names appropriately. 3. Right click New/Book to edit the book attributes. System Response- Edit Attributes for your book is displayed in the right panel. 4. Just as you did in the DocSet tree structure of your Project Edit page (Figure 3. Edit page with the DocSet Tree Structure), in the Folder Name field of your Edit Attributes- Book, enter a name for your book (User Guide for example).


