Omega headlight adjusters-1
Download as doc, pdf0 likes2,842 views

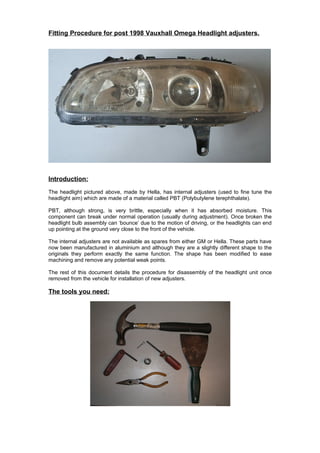
This document provides instructions for replacing broken internal adjusters in post-1998 Vauxhall Omega headlights. The adjusters, made of brittle PBT plastic, commonly break which can cause headlight aiming or visibility issues. The procedure involves removing various components to access the adjuster, heating the unit to soften sealant bonding the lens, removing the lens, extracting the broken adjuster, and installing a new aluminum replacement adjuster. Reassembly follows the reverse order of disassembly.
1 of 8
Downloaded 11 times

Ad
Recommended
Demo sequencemountingwheelsrs1steelmachinephotos
Demo sequencemountingwheelsrs1steelmachinephotosDon Neubauer
╠²
The document describes how to mount a wheel and tire assembly onto the NewArcTM Model SRS1 steel wheel machine. The assembly can then be configured for the patented dual-axis straightening process. This process applies independent and alternating pressure from different angles in a massaging motion to provide maximum strain relief. It is more effective than other machines and often requires little or no heat for minor bends. For severe bends requiring prolonged heat, it is best to remove the tire first.Demo sequencemountingwheel30srs2photos
Demo sequencemountingwheel30srs2photosDon Neubauer
╠²
The document describes the process for quickly mounting a wheel and tire assembly on a machine capable of performing dual-axis straightening. The machine allows mounting of the assembly with the tire still attached, though for more severe bends it is best to remove the tire first. The process involves installing a centering cone, mounting bolts, and spanner nut to secure the wheel to the machine, after which the lower module and dual axes can be installed and adjusted as needed to straighten bends through applied hydraulic pressure and limited heat.Cub cadet 3205 tractor service repair manual
Cub cadet 3205 tractor service repair manualufjjdjkksekmd
╠²
The document is a service manual for the Cub Cadet 3000 series. It contains sections on pre-delivery checks, engineering updates for 1999 models, procedures for removing and replacing parts like fenders and hydraulic cylinders, and troubleshooting hydraulic and electrical systems. The table of contents lists 18 sections that provide step-by-step instructions for maintenance, repairs, and inspections.Intalacion valvula descarga
Intalacion valvula descargasergiostation
╠²
The document provides fitting instructions for relocating the dump valve on a Ford Focus ST. It involves removing parts like the headlamp and covers to access the pipes and valves. The original dump valve is disabled by removing it from the turbocharger and replacing its return spring with a stronger one provided in the kit. Customers should be aware that installing the kit could trigger error warnings on some engine management systems due to re-calibration issues. The instructions note that later model year cars may require removing the drive shaft for better access to the original valve.Hyster h006 (h155 ft) forklift service repair manual
Hyster h006 (h155 ft) forklift service repair manualfujdfjjskkkemw
╠²
This document provides instructions for servicing various components of a lift truck, including:
1) Removing and installing side covers, the seat, dash, kick panel, and seal plate.
2) Removing and installing the hood support and door assembly, including disconnecting related components.
3) Removing and installing the hood door assembly on each side of the lift truck.
4) Instructions are provided for each component with detailed steps and diagrams to guide the process. Safety warnings are included for working with certain systems like the LPG tank.SEO Guru Houston
SEO Guru Houstonbharatishahi
╠²
SEO Guru Houston offers best search engine optimization & PPC services04 - BAIXOJeffDaSilvaPeres
╠²
O documento apresenta escalas para baixo em diferentes posi├¦├Ąes no bra├¦o, at├® a 12a casa, com notas naturais, sustenidos e bem├│is. Inclui disposi├¦├Ąes das notas em cada posi├¦├Żo e uma cita├¦├Żo sobre organizar as notas musicais.Vnx.su ą▒čĆąŠąĮą║ąŠ 2-čä-čüąĄčĆąĖčÅ_čćą░čüčéčī2
Vnx.su ą▒čĆąŠąĮą║ąŠ 2-čä-čüąĄčĆąĖčÅ_čćą░čüčéčī27gsxr
╠²
This document provides instructions for removing and installing various components on a Ford vehicle, including:
1. The windshield washer fluid reservoir, windshield washer motor, instrument cluster, tachometer, speedometer cable core, fuel gauge, switches, and lighting components like headlights and turn signals.
2. The steps generally involve disconnecting electrical connections and negative battery cable, removing retaining screws or clips, replacing components, and reinstalling in reverse order while reconnecting any electrical connections.
3. Precautions are provided for working with electronic modules to avoid static electricity damage, and instructions for aiming headlights properly after replacement.Vnx.su ą▒čĆąŠąĮą║ąŠ 2-čä-čüąĄčĆąĖčÅ_čćą░čüčéčī2
Vnx.su ą▒čĆąŠąĮą║ąŠ 2-čä-čüąĄčĆąĖčÅ_čćą░čüčéčī27gsxr
╠²
This document provides instructions for servicing various components of a vehicle, including:
1. Removal and installation steps for windshield wiper linkage, washer fluid reservoir, washer motor, speedometer cable, instrument cluster, tachometer, fuel gauge, wiper and headlight switches.
2. Precautions for working with electronic modules to avoid static damage.
3. Removal and installation of headlight bulbs, including warnings about high pressure halogen gas and contaminants.Husqvarna 345 fxt brushcutter trimmer service repair manual
Husqvarna 345 fxt brushcutter trimmer service repair manualdidkkskddm
╠²
This workshop manual provides instructions for servicing models 343R, 345RX, 343F, 345FX, and 345FXT brushcutters and trimmers. The document covers starter maintenance including dismantling, assembly, and replacing drive dogs. It also details electrical system checks such as verifying ignition spark, replacing the spark plug cover, and dismantling and assembling the drive dogs and ignition system components. Proper lubrication and cleaning of parts is emphasized throughout.Husqvarna 345 fxt brushcutter trimmer service repair manual
Husqvarna 345 fxt brushcutter trimmer service repair manualfhsjekkdkem
╠²
This document is a workshop manual that provides instructions for servicing various components of brushcutters and trimmers, including:
1. The starter system can be dismantled for cleaning or replacing worn parts like return springs or the starter cord. Proper spring tension must be checked during reassembly.
2. The electrical system section covers checking and adjusting the ignition spark, replacing the spark plug cover or drive dogs, and dismantling components like the flywheel or ignition module. Air gap and cable connections should be inspected.
3. Heated handles contain ceramic heating elements that are self-regulating and do not require a separate thermostat. Accessing the element involves removing the throttle and cover.Husqvarna 345 fxt brushcutter trimmer service repair manual
Husqvarna 345 fxt brushcutter trimmer service repair manualfjskedsxmmem
╠²
This workshop manual provides instructions for servicing models 343R, 345RX, 343F, 345FX, and 345FXT brushcutters and trimmers. The document covers starter maintenance including dismantling, assembly, and replacing drive dogs. It also details electrical system checks such as verifying ignition spark, replacing the spark plug cover, and dismantling and assembling the drive dogs and ignition system components. Proper lubrication and cleaning of parts is emphasized throughout.Husqvarna 343 r brushcutter trimmer service repair manual
Husqvarna 343 r brushcutter trimmer service repair manualfhsjekkdkem
╠²
The document is a workshop manual that provides instructions for servicing various systems of brushcutters and trimmers, including:
1. Checking the ignition spark by cleaning the spark plug electrodes, checking the gap, and testing for a spark.
2. Replacing the spark plug cover by threading the ignition cable through the cover and making a hole for the ignition coil.
3. Troubleshooting electrical issues such as checking cable connections if no spark occurs, and replacing faulty components like the stop switch if needed.Husqvarna 345 rx brushcutter trimmer service repair manual
Husqvarna 345 rx brushcutter trimmer service repair manualdidkkskddm
╠²
This workshop manual provides instructions for servicing models 343R, 345RX, 343F, 345FX, and 345FXT brushcutters and trimmers. The document covers starter maintenance including dismantling, assembly, and replacing drive dogs. It also details electrical system checks such as verifying ignition spark, replacing the spark plug cover, and dismantling and assembling the drive dogs and ignition coil. Procedures for checking cables and connections are provided to troubleshoot no spark issues.Husqvarna 345 rx brushcutter trimmer service repair manual
Husqvarna 345 rx brushcutter trimmer service repair manualfhsjekkdkem
╠²
This document is a workshop manual that provides instructions for servicing various components of brushcutters and trimmers, including:
1. The starter system can be dismantled for cleaning or replacing worn parts like return springs or the starter cord. Proper spring tension must be checked during reassembly.
2. The electrical system section covers checking and adjusting the ignition spark, replacing the spark plug cover or drive dogs, and dismantling components like the flywheel or ignition module. Air gap and cable connections should be inspected.
3. Heated handles contain ceramic heating elements that self-regulate temperature without a separate thermostat. Accessing the element involves removing the throttle and cover.Husqvarna 345 fx brushcutter trimmer service repair manual
Husqvarna 345 fx brushcutter trimmer service repair manualfhsjekkdkem
╠²
This document is a workshop manual that provides instructions for servicing various components of brushcutters and trimmers, including:
1. The starter system can be dismantled for cleaning or replacing worn parts like return springs or the starter cord. Proper spring tension must be checked during reassembly.
2. The electrical system section covers checking and adjusting the spark plug and ignition coil. It provides troubleshooting steps if no spark occurs, such as checking cable connections and the air gap.
3. Replacing parts like the drive dogs that connect the starter to the flywheel is described. Proper assembly order and alignment is emphasized.Husqvarna 343 f brushcutter trimmer service repair manual
Husqvarna 343 f brushcutter trimmer service repair manualfjskedsxmmem
╠²
The document is a workshop manual that provides instructions for servicing various systems of brushcutters and trimmers, including:
1. Checking the ignition spark by cleaning the spark plug electrodes, checking the gap, and testing for a spark.
2. Replacing the spark plug cover by threading the ignition cable through the cover and making a hole for the ignition coil.
3. Troubleshooting electrical issues such as checking cable connections if no spark occurs, and replacing faulty components like the stop switch if needed.Husqvarna 343 f brushcutter trimmer service repair manual
Husqvarna 343 f brushcutter trimmer service repair manualfhsjekkdkem
╠²
This document is a workshop manual that provides instructions for servicing various components of brushcutters and trimmers, including:
1. The starter system can be dismantled for cleaning or replacing worn parts like return springs or the starter cord. Proper spring tension must be checked during reassembly.
2. The electrical system section covers checking and adjusting the ignition spark, replacing the spark plug cover or drive dogs, and dismantling components like the flywheel or ignition module. Air gap and cable connections should be checked if no spark occurs.
3. Heated handles contain ceramic heating elements that are self-regulating and do not require a separate thermostat. Accessing the element involves removing the throttle andHusqvarna 343 r brushcutter trimmer service repair manual
Husqvarna 343 r brushcutter trimmer service repair manualdidkkskddm
╠²
This workshop manual provides instructions for servicing models 343R, 345RX, 343F, 345FX, and 345FXT brushcutters and trimmers. The document covers starter maintenance including dismantling, assembly, and replacing drive dogs. It also details electrical system checks such as verifying ignition spark, replacing the spark plug cover, and dismantling and assembling the drive dogs and ignition coil. Procedures for checking cables and connections are provided to troubleshoot no spark issues.Husqvarna 343 r brushcutter trimmer service repair manual
Husqvarna 343 r brushcutter trimmer service repair manualfjskedsxmmem
╠²
This workshop manual provides instructions for servicing models 343R, 345RX, 343F, 345FX, and 345FXT brushcutters and trimmers. The document covers starter maintenance including dismantling, assembly, and replacing drive dogs. It also details electrical system checks such as verifying ignition spark, replacing the spark plug cover, and dismantling and assembling the drive dogs and other electrical components. Proper lubrication and cleaning of parts is emphasized throughout.Husqvarna 345 rx brushcutter trimmer service repair manual
Husqvarna 345 rx brushcutter trimmer service repair manualfjskedsxmmem
╠²
The document is a workshop manual that provides instructions for servicing various systems of brushcutters and trimmers, including:
1. Checking the ignition spark by cleaning the spark plug electrodes, checking the gap, and testing for a spark.
2. Replacing the spark plug cover by threading the ignition cable through the cover and making a hole for the ignition coil.
3. Troubleshooting electrical issues such as checking cable connections if no spark occurs, and replacing faulty components like the stop switch if needed.Husqvarna 345 fx brushcutter trimmer service repair manual
Husqvarna 345 fx brushcutter trimmer service repair manualfjskedsxmmem
╠²
This document is a workshop manual that provides instructions for servicing various components of brushcutters and trimmers, including:
1. The starter system can be dismantled for cleaning or replacing worn parts like return springs or the starter cord. Proper spring tension must be checked during reassembly.
2. The electrical system section covers checking and adjusting the ignition spark, replacing the spark plug cover or drive dogs, and dismantling components like the flywheel for inspection. Air gap and cable connections should be checked if no spark occurs.
3. Heated handles contain self-regulating ceramic plates that maintain a safe temperature without an additional thermostat. Accessing these elements involves removing mounting bolts and coversHusqvarna 345 fx brushcutter trimmer service repair manual
Husqvarna 345 fx brushcutter trimmer service repair manualdidkkskddm
╠²
This document is a workshop manual that provides instructions for servicing various components of brushcutters and trimmers, including:
1. The starter system can be dismantled for cleaning or replacing worn parts like return springs or the starter cord. Proper spring tension must be checked during reassembly.
2. The electrical system section covers checking and adjusting the ignition spark, replacing the spark plug cover or drive dogs, and dismantling components like the flywheel or ignition module. Air gap and cable connections should be inspected.
3. Heated handles contain ceramic heating elements that are self-regulating and do not require a separate thermostat. Accessing the element involves removing the throttle and cover.Husqvarna 343 f brushcutter trimmer service repair manual
Husqvarna 343 f brushcutter trimmer service repair manualdidkkskddm
╠²
The document is a workshop manual that provides instructions for servicing various systems of brushcutters and trimmers, including:
1. Checking the ignition spark by cleaning the spark plug electrodes, checking the gap, and testing for a spark.
2. Replacing the spark plug cover by threading the ignition cable through the cover and making a hole for the ignition coil.
3. Troubleshooting electrical issues such as checking cable connections if no spark occurs, and replacing faulty components like the stop switch if needed.Fmintlfs instructions
Fmintlfs instructionsJavi Trameando
╠²
The document provides instructions for fitting a turbo twintercooler to a SEAT Leon mk2 2.0fsi vehicle. It is a 10 step process that involves removing the front bumper, lowering the horns, drilling holes in crash bar brackets, attaching the intercooler brackets, fitting new hoses between the turbo, intercooler and engine, and refitting the bumper once complete. Tools required include various screwdrivers, spanners, and safety equipment.Jcb 4 cx backhoe loader service repair manual sn from 2509500 and up
Jcb 4 cx backhoe loader service repair manual sn from 2509500 and upcdfvvv
╠²
This service manual provides instructions for servicing components of JCB backhoe loaders models 3CX, 4CX, and 5CX. It contains sections covering various systems of the machine including the engine, fuel and exhaust systems, cooling system, brake system, hydraulic system, and electrical system. The manual instructs technicians on removing, installing, and servicing components and includes diagrams identifying parts. Safety warnings are provided throughout advising technicians to follow instructions carefully and wear proper protective equipment when servicing machines.Jcb 5 cx backhoe loader service repair manual sn from 2509500 and up
Jcb 5 cx backhoe loader service repair manual sn from 2509500 and upkmf8sueddkk
╠²
This service manual provides instructions for servicing and repairing backhoe loaders with 3CX, 4CX and 5CX engines. It contains sections on machine components, attachments, body and framework, operator station, HVAC, engine, fuel and exhaust systems, cooling system, brake system, steering system, driveline, hydraulic system and electrical system. The manual instructs technicians to carefully study instructions before operating or maintaining equipment and to ask for assistance if anything is unclear.Jcb 3 cx backhoe loader service repair manual sn from 2509500 and up
Jcb 3 cx backhoe loader service repair manual sn from 2509500 and upcdfvvv
╠²
This service manual provides instructions for servicing components of JCB 3CX, 4CX, and 5CX backhoe loaders, including the machine, attachments, body, operator station, HVAC, engine, fuel and exhaust systems, cooling system, brake system, steering system, driveline, hydraulic system, electrical system, fasteners, consumable products, and after sales. The manual contains safety warnings and instructions for removing and installing components. It provides identification diagrams and specifications for proper servicing.New Holland Lx465 Problems Repair Manual.pdf
New Holland Lx465 Problems Repair Manual.pdfService Repair Manual
╠²
This technical manual provides instructions for servicing. It contains sections on specifications, identification numbers, tools, component locations, schematics, theory of operation, operation and diagnostics, tests and adjustments, and repair. The introduction explains that the manual is intended for experienced technicians and contains product-specific information organized into relevant sections. Safety precautions are outlined, including proper use of protective equipment and safe work practices when handling batteries, pressurized fluids, and other hazards.Daewoo doosan mega 300 v Troubleshooting and maintenance manual.pdf
Daewoo doosan mega 300 v Troubleshooting and maintenance manual.pdfService Repair Manual
╠²
This technical manual provides instructions for servicing. It contains sections on specifications, identification numbers, tools, component locations, schematics, theory of operation, operation and diagnostics, tests and adjustments, and repair. The introduction explains that the manual is intended for experienced technicians and contains product-specific information organized into relevant sections. Safety precautions are outlined, including proper use of protective equipment and safe work practices when handling batteries, pressurized fluids, and other hazards.More Related Content
Similar to Omega headlight adjusters-1 (20)
Vnx.su ą▒čĆąŠąĮą║ąŠ 2-čä-čüąĄčĆąĖčÅ_čćą░čüčéčī2
Vnx.su ą▒čĆąŠąĮą║ąŠ 2-čä-čüąĄčĆąĖčÅ_čćą░čüčéčī27gsxr
╠²
This document provides instructions for servicing various components of a vehicle, including:
1. Removal and installation steps for windshield wiper linkage, washer fluid reservoir, washer motor, speedometer cable, instrument cluster, tachometer, fuel gauge, wiper and headlight switches.
2. Precautions for working with electronic modules to avoid static damage.
3. Removal and installation of headlight bulbs, including warnings about high pressure halogen gas and contaminants.Husqvarna 345 fxt brushcutter trimmer service repair manual
Husqvarna 345 fxt brushcutter trimmer service repair manualdidkkskddm
╠²
This workshop manual provides instructions for servicing models 343R, 345RX, 343F, 345FX, and 345FXT brushcutters and trimmers. The document covers starter maintenance including dismantling, assembly, and replacing drive dogs. It also details electrical system checks such as verifying ignition spark, replacing the spark plug cover, and dismantling and assembling the drive dogs and ignition system components. Proper lubrication and cleaning of parts is emphasized throughout.Husqvarna 345 fxt brushcutter trimmer service repair manual
Husqvarna 345 fxt brushcutter trimmer service repair manualfhsjekkdkem
╠²
This document is a workshop manual that provides instructions for servicing various components of brushcutters and trimmers, including:
1. The starter system can be dismantled for cleaning or replacing worn parts like return springs or the starter cord. Proper spring tension must be checked during reassembly.
2. The electrical system section covers checking and adjusting the ignition spark, replacing the spark plug cover or drive dogs, and dismantling components like the flywheel or ignition module. Air gap and cable connections should be inspected.
3. Heated handles contain ceramic heating elements that are self-regulating and do not require a separate thermostat. Accessing the element involves removing the throttle and cover.Husqvarna 345 fxt brushcutter trimmer service repair manual
Husqvarna 345 fxt brushcutter trimmer service repair manualfjskedsxmmem
╠²
This workshop manual provides instructions for servicing models 343R, 345RX, 343F, 345FX, and 345FXT brushcutters and trimmers. The document covers starter maintenance including dismantling, assembly, and replacing drive dogs. It also details electrical system checks such as verifying ignition spark, replacing the spark plug cover, and dismantling and assembling the drive dogs and ignition system components. Proper lubrication and cleaning of parts is emphasized throughout.Husqvarna 343 r brushcutter trimmer service repair manual
Husqvarna 343 r brushcutter trimmer service repair manualfhsjekkdkem
╠²
The document is a workshop manual that provides instructions for servicing various systems of brushcutters and trimmers, including:
1. Checking the ignition spark by cleaning the spark plug electrodes, checking the gap, and testing for a spark.
2. Replacing the spark plug cover by threading the ignition cable through the cover and making a hole for the ignition coil.
3. Troubleshooting electrical issues such as checking cable connections if no spark occurs, and replacing faulty components like the stop switch if needed.Husqvarna 345 rx brushcutter trimmer service repair manual
Husqvarna 345 rx brushcutter trimmer service repair manualdidkkskddm
╠²
This workshop manual provides instructions for servicing models 343R, 345RX, 343F, 345FX, and 345FXT brushcutters and trimmers. The document covers starter maintenance including dismantling, assembly, and replacing drive dogs. It also details electrical system checks such as verifying ignition spark, replacing the spark plug cover, and dismantling and assembling the drive dogs and ignition coil. Procedures for checking cables and connections are provided to troubleshoot no spark issues.Husqvarna 345 rx brushcutter trimmer service repair manual
Husqvarna 345 rx brushcutter trimmer service repair manualfhsjekkdkem
╠²
This document is a workshop manual that provides instructions for servicing various components of brushcutters and trimmers, including:
1. The starter system can be dismantled for cleaning or replacing worn parts like return springs or the starter cord. Proper spring tension must be checked during reassembly.
2. The electrical system section covers checking and adjusting the ignition spark, replacing the spark plug cover or drive dogs, and dismantling components like the flywheel or ignition module. Air gap and cable connections should be inspected.
3. Heated handles contain ceramic heating elements that self-regulate temperature without a separate thermostat. Accessing the element involves removing the throttle and cover.Husqvarna 345 fx brushcutter trimmer service repair manual
Husqvarna 345 fx brushcutter trimmer service repair manualfhsjekkdkem
╠²
This document is a workshop manual that provides instructions for servicing various components of brushcutters and trimmers, including:
1. The starter system can be dismantled for cleaning or replacing worn parts like return springs or the starter cord. Proper spring tension must be checked during reassembly.
2. The electrical system section covers checking and adjusting the spark plug and ignition coil. It provides troubleshooting steps if no spark occurs, such as checking cable connections and the air gap.
3. Replacing parts like the drive dogs that connect the starter to the flywheel is described. Proper assembly order and alignment is emphasized.Husqvarna 343 f brushcutter trimmer service repair manual
Husqvarna 343 f brushcutter trimmer service repair manualfjskedsxmmem
╠²
The document is a workshop manual that provides instructions for servicing various systems of brushcutters and trimmers, including:
1. Checking the ignition spark by cleaning the spark plug electrodes, checking the gap, and testing for a spark.
2. Replacing the spark plug cover by threading the ignition cable through the cover and making a hole for the ignition coil.
3. Troubleshooting electrical issues such as checking cable connections if no spark occurs, and replacing faulty components like the stop switch if needed.Husqvarna 343 f brushcutter trimmer service repair manual
Husqvarna 343 f brushcutter trimmer service repair manualfhsjekkdkem
╠²
This document is a workshop manual that provides instructions for servicing various components of brushcutters and trimmers, including:
1. The starter system can be dismantled for cleaning or replacing worn parts like return springs or the starter cord. Proper spring tension must be checked during reassembly.
2. The electrical system section covers checking and adjusting the ignition spark, replacing the spark plug cover or drive dogs, and dismantling components like the flywheel or ignition module. Air gap and cable connections should be checked if no spark occurs.
3. Heated handles contain ceramic heating elements that are self-regulating and do not require a separate thermostat. Accessing the element involves removing the throttle andHusqvarna 343 r brushcutter trimmer service repair manual
Husqvarna 343 r brushcutter trimmer service repair manualdidkkskddm
╠²
This workshop manual provides instructions for servicing models 343R, 345RX, 343F, 345FX, and 345FXT brushcutters and trimmers. The document covers starter maintenance including dismantling, assembly, and replacing drive dogs. It also details electrical system checks such as verifying ignition spark, replacing the spark plug cover, and dismantling and assembling the drive dogs and ignition coil. Procedures for checking cables and connections are provided to troubleshoot no spark issues.Husqvarna 343 r brushcutter trimmer service repair manual
Husqvarna 343 r brushcutter trimmer service repair manualfjskedsxmmem
╠²
This workshop manual provides instructions for servicing models 343R, 345RX, 343F, 345FX, and 345FXT brushcutters and trimmers. The document covers starter maintenance including dismantling, assembly, and replacing drive dogs. It also details electrical system checks such as verifying ignition spark, replacing the spark plug cover, and dismantling and assembling the drive dogs and other electrical components. Proper lubrication and cleaning of parts is emphasized throughout.Husqvarna 345 rx brushcutter trimmer service repair manual
Husqvarna 345 rx brushcutter trimmer service repair manualfjskedsxmmem
╠²
The document is a workshop manual that provides instructions for servicing various systems of brushcutters and trimmers, including:
1. Checking the ignition spark by cleaning the spark plug electrodes, checking the gap, and testing for a spark.
2. Replacing the spark plug cover by threading the ignition cable through the cover and making a hole for the ignition coil.
3. Troubleshooting electrical issues such as checking cable connections if no spark occurs, and replacing faulty components like the stop switch if needed.Husqvarna 345 fx brushcutter trimmer service repair manual
Husqvarna 345 fx brushcutter trimmer service repair manualfjskedsxmmem
╠²
This document is a workshop manual that provides instructions for servicing various components of brushcutters and trimmers, including:
1. The starter system can be dismantled for cleaning or replacing worn parts like return springs or the starter cord. Proper spring tension must be checked during reassembly.
2. The electrical system section covers checking and adjusting the ignition spark, replacing the spark plug cover or drive dogs, and dismantling components like the flywheel for inspection. Air gap and cable connections should be checked if no spark occurs.
3. Heated handles contain self-regulating ceramic plates that maintain a safe temperature without an additional thermostat. Accessing these elements involves removing mounting bolts and coversHusqvarna 345 fx brushcutter trimmer service repair manual
Husqvarna 345 fx brushcutter trimmer service repair manualdidkkskddm
╠²
This document is a workshop manual that provides instructions for servicing various components of brushcutters and trimmers, including:
1. The starter system can be dismantled for cleaning or replacing worn parts like return springs or the starter cord. Proper spring tension must be checked during reassembly.
2. The electrical system section covers checking and adjusting the ignition spark, replacing the spark plug cover or drive dogs, and dismantling components like the flywheel or ignition module. Air gap and cable connections should be inspected.
3. Heated handles contain ceramic heating elements that are self-regulating and do not require a separate thermostat. Accessing the element involves removing the throttle and cover.Husqvarna 343 f brushcutter trimmer service repair manual
Husqvarna 343 f brushcutter trimmer service repair manualdidkkskddm
╠²
The document is a workshop manual that provides instructions for servicing various systems of brushcutters and trimmers, including:
1. Checking the ignition spark by cleaning the spark plug electrodes, checking the gap, and testing for a spark.
2. Replacing the spark plug cover by threading the ignition cable through the cover and making a hole for the ignition coil.
3. Troubleshooting electrical issues such as checking cable connections if no spark occurs, and replacing faulty components like the stop switch if needed.Fmintlfs instructions
Fmintlfs instructionsJavi Trameando
╠²
The document provides instructions for fitting a turbo twintercooler to a SEAT Leon mk2 2.0fsi vehicle. It is a 10 step process that involves removing the front bumper, lowering the horns, drilling holes in crash bar brackets, attaching the intercooler brackets, fitting new hoses between the turbo, intercooler and engine, and refitting the bumper once complete. Tools required include various screwdrivers, spanners, and safety equipment.Jcb 4 cx backhoe loader service repair manual sn from 2509500 and up
Jcb 4 cx backhoe loader service repair manual sn from 2509500 and upcdfvvv
╠²
This service manual provides instructions for servicing components of JCB backhoe loaders models 3CX, 4CX, and 5CX. It contains sections covering various systems of the machine including the engine, fuel and exhaust systems, cooling system, brake system, hydraulic system, and electrical system. The manual instructs technicians on removing, installing, and servicing components and includes diagrams identifying parts. Safety warnings are provided throughout advising technicians to follow instructions carefully and wear proper protective equipment when servicing machines.Jcb 5 cx backhoe loader service repair manual sn from 2509500 and up
Jcb 5 cx backhoe loader service repair manual sn from 2509500 and upkmf8sueddkk
╠²
This service manual provides instructions for servicing and repairing backhoe loaders with 3CX, 4CX and 5CX engines. It contains sections on machine components, attachments, body and framework, operator station, HVAC, engine, fuel and exhaust systems, cooling system, brake system, steering system, driveline, hydraulic system and electrical system. The manual instructs technicians to carefully study instructions before operating or maintaining equipment and to ask for assistance if anything is unclear.Jcb 3 cx backhoe loader service repair manual sn from 2509500 and up
Jcb 3 cx backhoe loader service repair manual sn from 2509500 and upcdfvvv
╠²
This service manual provides instructions for servicing components of JCB 3CX, 4CX, and 5CX backhoe loaders, including the machine, attachments, body, operator station, HVAC, engine, fuel and exhaust systems, cooling system, brake system, steering system, driveline, hydraulic system, electrical system, fasteners, consumable products, and after sales. The manual contains safety warnings and instructions for removing and installing components. It provides identification diagrams and specifications for proper servicing.Recently uploaded (20)
New Holland Lx465 Problems Repair Manual.pdf
New Holland Lx465 Problems Repair Manual.pdfService Repair Manual
╠²
This technical manual provides instructions for servicing. It contains sections on specifications, identification numbers, tools, component locations, schematics, theory of operation, operation and diagnostics, tests and adjustments, and repair. The introduction explains that the manual is intended for experienced technicians and contains product-specific information organized into relevant sections. Safety precautions are outlined, including proper use of protective equipment and safe work practices when handling batteries, pressurized fluids, and other hazards.Daewoo doosan mega 300 v Troubleshooting and maintenance manual.pdf
Daewoo doosan mega 300 v Troubleshooting and maintenance manual.pdfService Repair Manual
╠²
This technical manual provides instructions for servicing. It contains sections on specifications, identification numbers, tools, component locations, schematics, theory of operation, operation and diagnostics, tests and adjustments, and repair. The introduction explains that the manual is intended for experienced technicians and contains product-specific information organized into relevant sections. Safety precautions are outlined, including proper use of protective equipment and safe work practices when handling batteries, pressurized fluids, and other hazards.Caterpillar Cat 318D2 L Excavator (Prefix HAH) Service Repair Manual Instant ...
Caterpillar Cat 318D2 L Excavator (Prefix HAH) Service Repair Manual Instant ...nu174136zhao
╠²
Please open the website below to get the complete manual
https://www.ebooklibonline.comNew Holland Lx465 Engine Service Manual.pdf
New Holland Lx465 Engine Service Manual.pdfService Repair Manual
╠²
This technical manual provides instructions for servicing. It contains sections on specifications, identification numbers, tools, component locations, schematics, theory of operation, operation and diagnostics, tests and adjustments, and repair. The introduction explains that the manual is intended for experienced technicians and contains product-specific information organized into relevant sections. Safety precautions are outlined, including proper use of protective equipment and safe work practices when handling batteries, pressurized fluids, and other hazards.Caterpillar Cat 304E Mini Hydraulic Excavator (Prefix TSR) Service Repair Man...
Caterpillar Cat 304E Mini Hydraulic Excavator (Prefix TSR) Service Repair Man...jie2404li
╠²
Please open the website below to get the complete manual
https://www.ebooklibonline.comDaewoo doosan mega 250 v wheel loader operation manual
Daewoo doosan mega 250 v wheel loader operation manualService Repair Manual
╠²
Daewoo Doosan mega 250 v wheel loader operation manual, This technical manual provides instructions for servicing. It contains sections on specifications, identification numbers, tools, component locations, schematics, theory of operation, operation and diagnostics, tests and adjustments, and repair. The introduction explains that the manual is intended for experienced technicians and contains product-specific information organized into relevant sections. Safety precautions are outlined, including proper use of protective equipment and safe work practices when handling batteries, pressurized fluids, and other hazards.T4020 New holland Gearbox Control Systems Repair Manual.pdf
T4020 New holland Gearbox Control Systems Repair Manual.pdfService Repair Manual
╠²
This document provides maintenance and repair instructions for a New holland
T4020 Deluxe - T4020 Supersteer - T4030 Deluxe -T4030 Supersteer - T4040 Deluxe - T4040 Supersteer -T4050 Deluxe - T4050 Supersteer TRACTORS SERVICE MANUAL systems Repair Manual. It details procedures for disassembling the transmission and torque converter components. This includes removing clutches, gears, shafts, bearings, seals and other parts. Illustrations demonstrate each step in the disassembly process. The document is part of a shop manual for servicing the T4020 Deluxe - T4020 Supersteer - T4030 Deluxe -T4030 Supersteer - T4040 Deluxe - T4040 Supersteer -T4050 Deluxe - T4050 Supersteer TRACTORSSERVICE MANUAL.Caterpillar Cat 318B N Excavator (Prefix 7KZ) Service Repair Manual Instant D...
Caterpillar Cat 318B N Excavator (Prefix 7KZ) Service Repair Manual Instant D...nu174136zhao
╠²
Please open the website below to get the complete manual
https://www.ebooklibonline.comCaterpillar Cat 325L EXCAVATOR (Prefix 6RM) Service Repair Manual Instant Dow...
Caterpillar Cat 325L EXCAVATOR (Prefix 6RM) Service Repair Manual Instant Dow...er6juheng
╠²
Please open the website below to get the complete manual
https://www.ebooklibonline.comCaterpillar Cat 311C U Excavator (Prefix CKE) Service Repair Manual Instant D...
Caterpillar Cat 311C U Excavator (Prefix CKE) Service Repair Manual Instant D...nu174136zhao
╠²
Please open the website below to get the complete manual
https://www.ebooklibonline.comNew holland T8.320 Powershift Transmission Manual Pdf.pdf
New holland T8.320 Powershift Transmission Manual Pdf.pdfService Repair Manual
╠²
This document provides maintenance and repair instructions for a New holland T8.320 / T8.350 / T8.380 / T8.410 / Powershift Transmission Hydraulic systems Repair Manual. It details procedures for disassembling the transmission and torque converter components. This includes removing clutches, gears, shafts, bearings, seals and other parts. Illustrations demonstrate each step in the disassembly process. The document is part of a shop manual for servicing the T8.320 / T8.350 / T8.380 / T8.410 / Powershift Transmission.
This document is an operation and maintenance manual for a Daewoo wheel loader. It contains safety information and warnings, operating instructions, maintenance schedules and procedures. The safety section emphasizes avoiding unauthorized modifications to the machine, using caution around power lines, digging safely to avoid collapse, and other precautions.Caterpillar Cat 329D2L Excavator (Prefix RGA) Service Repair Manual Instant D...
Caterpillar Cat 329D2L Excavator (Prefix RGA) Service Repair Manual Instant D...su09540343
╠²
Please open the website below to get the complete manual
https://www.ebooklibonline.comHow a Government-Approved Scraper Can Help in Vehicle Scrapping
How a Government-Approved Scraper Can Help in Vehicle ScrappingSmart Kabadi - Car scrapper
╠²
Looking to scrap your old car and get the best price in Ahmedabad? Smart Kabadi is a government-approved vehicle scrapping dealer offering top value for your unused, accidental, or damaged cars. With hassle-free pickup, on-the-spot payment, and proper documentation, we make the process quick and transparent. Whether your vehicle is no longer roadworthy or just taking up space, Smart Kabadi ensures eco-friendly recycling and the highest return for your scrap car. Trusted, recognized, and reliableŌĆöSmart Kabadi is the smart way to scrap!
Caterpillar Cat 345B Series II Excavator (Prefix DCW) Service Repair Manual I...
Caterpillar Cat 345B Series II Excavator (Prefix DCW) Service Repair Manual I...yunsuij35094
╠²
Please open the website below to get the complete manual
https://www.ebooklibonline.comNew holland T4040 Electrical System Manual Pdf.pdf
New holland T4040 Electrical System Manual Pdf.pdfService Repair Manual
╠²
This document provides maintenance and repair instructions for a New holland
T4020 Deluxe - T4020 Supersteer - T4030 Deluxe -T4030 Supersteer - T4040 Deluxe - T4040 Supersteer -T4050 Deluxe - T4050 Supersteer TRACTORS SERVICE MANUAL systems Repair Manual. It details procedures for disassembling the transmission and torque converter components. This includes removing clutches, gears, shafts, bearings, seals and other parts. Illustrations demonstrate each step in the disassembly process. The document is part of a shop manual for servicing the T4020 Deluxe - T4020 Supersteer - T4030 Deluxe -T4030 Supersteer - T4040 Deluxe - T4040 Supersteer -T4050 Deluxe - T4050 Supersteer TRACTORSSERVICE MANUAL.Presentation 1.pdf Presentation 1.pdfPresentation 1.pdfPresentation 1.pdfPres...
Presentation 1.pdf Presentation 1.pdfPresentation 1.pdfPresentation 1.pdfPres...lilogamer224
╠²
powerpoint world saveJohn Deere 120C Excavator Operation and Test Service Manual
John Deere 120C Excavator Operation and Test Service ManualService Repair Manual
╠²
This technical manual provides instructions for servicing the TM1934. It contains sections on specifications, identification numbers, tools, component locations, schematics, theory of operation, operation and diagnostics, tests and adjustments, and repair. The introduction explains that the manual is intended for experienced technicians and contains product-specific information organized into relevant sections. Safety precautions are outlined, including proper use of protective equipment and safe work practices when handling batteries, pressurized fluids, and other hazards.Caterpillar Cat M317D2 Wheeled Excavator (Prefix CA6) Service Repair Manual I...
Caterpillar Cat M317D2 Wheeled Excavator (Prefix CA6) Service Repair Manual I...liu51084
╠²
Please open the website below to get the complete manual
https://www.ebooklibonline.comCaterpillar Cat 428D BACKHOE LOADER (Prefix BNS) Service Repair Manual Instan...
Caterpillar Cat 428D BACKHOE LOADER (Prefix BNS) Service Repair Manual Instan...xue582shao
╠²
Please open the website below to get the complete manual
https://www.ebooklibonline.comAd
Omega headlight adjusters-1
- 1. Fitting Procedure for post 1998 Vauxhall Omega Headlight adjusters. Introduction: The headlight pictured above, made by Hella, has internal adjusters (used to fine tune the headlight aim) which are made of a material called PBT (Polybutylene terephthalate). PBT, although strong, is very brittle, especially when it has absorbed moisture. This component can break under normal operation (usually during adjustment). Once broken the headlight bulb assembly can ŌĆśbounceŌĆÖ due to the motion of driving, or the headlights can end up pointing at the ground very close to the front of the vehicle. The internal adjusters are not available as spares from either GM or Hella. These parts have now been manufactured in aluminium and although they are a slightly different shape to the originals they perform exactly the same function. The shape has been modified to ease machining and remove any potential weak points. The rest of this document details the procedure for disassembly of the headlight unit once removed from the vehicle for installation of new adjusters. The tools you need:
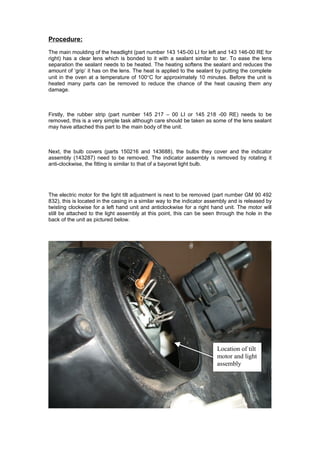
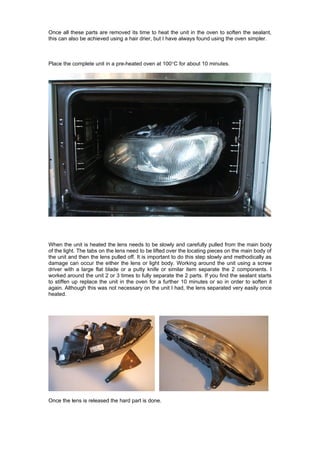
- 2. Procedure: The main moulding of the headlight (part number 143 145-00 LI for left and 143 146-00 RE for right) has a clear lens which is bonded to it with a sealant similar to tar. To ease the lens separation the sealant needs to be heated. The heating softens the sealant and reduces the amount of ŌĆśgripŌĆÖ it has on the lens. The heat is applied to the sealant by putting the complete unit in the oven at a temperature of 100┬░C for approximately 10 minutes. Before the unit is heated many parts can be removed to reduce the chance of the heat causing them any damage. Firstly, the rubber strip (part number 145 217 ŌĆō 00 LI or 145 218 -00 RE) needs to be removed, this is a very simple task although care should be taken as some of the lens sealant may have attached this part to the main body of the unit. Next, the bulb covers (parts 150216 and 143688), the bulbs they cover and the indicator assembly (143287) need to be removed. The indicator assembly is removed by rotating it anti-clockwise, the fitting is similar to that of a bayonet light bulb. The electric motor for the light tilt adjustment is next to be removed (part number GM 90 492 832), this is located in the casing in a similar way to the indicator assembly and is released by twisting clockwise for a left hand unit and anticlockwise for a right hand unit. The motor will still be attached to the light assembly at this point, this can be seen through the hole in the back of the unit as pictured below. Location of tilt motor and light assembly
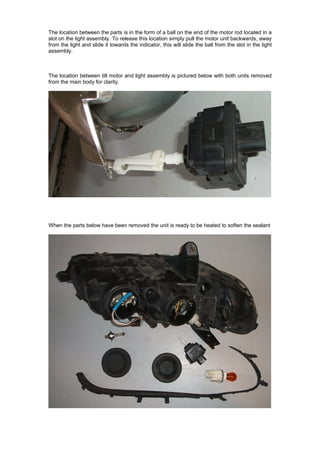
- 3. The location between the parts is in the form of a ball on the end of the motor rod located in a slot on the light assembly. To release this location simply pull the motor unit backwards, away from the light and slide it towards the indicator, this will slide the ball from the slot in the light assembly. The location between tilt motor and light assembly is pictured below with both units removed from the main body for clarity. When the parts below have been removed the unit is ready to be heated to soften the sealant
- 4. Once all these parts are removed its time to heat the unit in the oven to soften the sealant, this can also be achieved using a hair drier, but I have always found using the oven simpler. Place the complete unit in a pre-heated oven at 100┬░C for about 10 minutes. When the unit is heated the lens needs to be slowly and carefully pulled from the main body of the light. The tabs on the lens need to be lifted over the locating pieces on the main body of the unit and then the lens pulled off. It is important to do this step slowly and methodically as damage can occur the either the lens or light body. Working around the unit using a screw driver with a large flat blade or a putty knife or similar item separate the 2 components. I worked around the unit 2 or 3 times to fully separate the 2 parts. If you find the sealant starts to stiffen up replace the unit in the oven for a further 10 minutes or so in order to soften it again. Although this was not necessary on the unit I had, the lens separated very easily once heated. Once the lens is released the hard part is done.
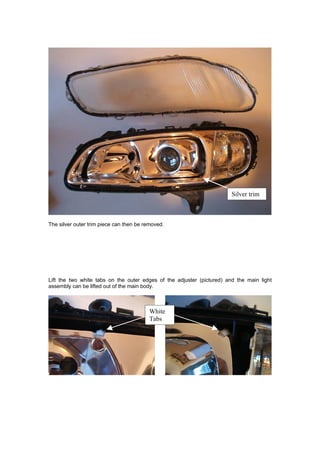
- 5. Silver trim The silver outer trim piece can then be removed. Lift the two white tabs on the outer edges of the adjuster (pictured) and the main light assembly can be lifted out of the main body. White Tabs
- 6. You now need to remove the broken ŌĆśball endŌĆÖ of the adjuster from the white ŌĆśsocketŌĆÖ. I did this by breaking the rest of the black ball end until what was left was a smaller diameter than the size of the hole in the white socket. I then rested the whole assembly on a 3/8ŌĆØ socket and hammered a screw through the hole in the white socket to release the black ball.
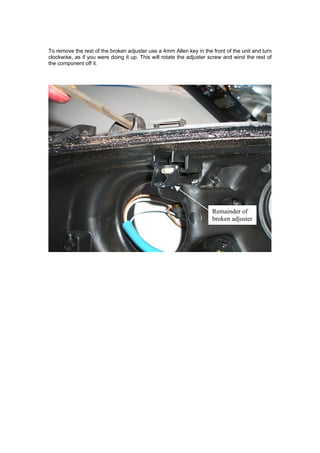
- 7. To remove the rest of the broken adjuster use a 4mm Allen key in the front of the unit and turn clockwise, as if you were doing it up. This will rotate the adjuster screw and wind the rest of the component off it. Remainder of broken adjuster
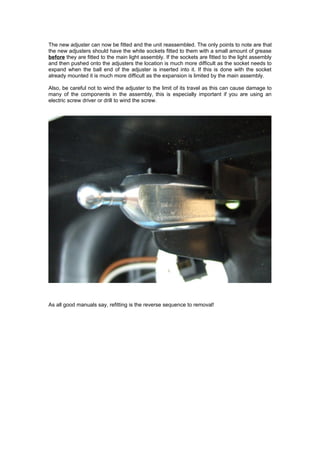
- 8. The new adjuster can now be fitted and the unit reassembled. The only points to note are that the new adjusters should have the white sockets fitted to them with a small amount of grease before they are fitted to the main light assembly. If the sockets are fitted to the light assembly and then pushed onto the adjusters the location is much more difficult as the socket needs to expand when the ball end of the adjuster is inserted into it. If this is done with the socket already mounted it is much more difficult as the expansion is limited by the main assembly. Also, be careful not to wind the adjuster to the limit of its travel as this can cause damage to many of the components in the assembly, this is especially important if you are using an electric screw driver or drill to wind the screw. As all good manuals say, refitting is the reverse sequence to removal!