ݺߣ

ݺߣShare a Scribd company logo
Bouquet (poinsettia) : Assembly Instructions                                                                                                                                   © Canon Inc. © Taka Taka


                                                                                                                          Before starting assembly :
                                                                                                                                                                                                    Indicates where sections should
                                                                                                                          Writing the number of each section on its back side before                be glued together.
                                                                                                                          cutting out the sections is highly recommended.
                                                                                                                          (* This way, you can be sure which section is which even after            Curve parts as indicated by
                                                                                                                                                                                                    these arrows.
                                                                                                                          cutting out the sections.)


                                                                                                                        For durability, we recommend use of Canon Matte Photo Paper and woodworking adhesive.

                                                                                                                                  Indicates front/reverse of sections to                              To curve the paper
                                                                                                                                  be glued. Glue the same numbers to                                  Use a pencil, screwdriver
                                                                                                                                  each other. These numbers indicate the                              or other rod-like object.
                                                                                                                                  order for applying glue.

                                                                                                                        Basket assembly
                                                                                                                        Crease the parts and apply glue. To simplify assembly, apply glue to parts in order,
                                                                                                                        as indicated by the numbers.


View of completed model
* This model was designed for Papercraft and may differ from the original in some respects.

    Assembly Instructions : Five A4 sheets (No. 1 to No. 5)
* Build the model by carefully reading the Assembly Instructions , in the parts sheet page order.


                                     *Hint: Trace along the folds with a ruler                                                Make these parts rounded
                                      and an exhausted pen (no ink) to get a sharper, easier fold.
                                                                                                                              and apply glue.


                                      Assembly Instructions
                                                                             Glue
                             Mountain fold(dotted line)
                                                                                    The glue spot(colored dot)
                             Make a mountain fold.
                                                                                    shows where to apply the glue.
                             Valley fold(dashed and dotted line)       Glue spot(Red dot)
                             Make a valley fold.                       Glue parts with the same number together.
                             Scissors line(solid line)                 Glue spot(Green dot)
                             Cut along the line.                       Glue within the same part.
                             Cut in line(solid line)                   Glue spot(Blue dot)
                             Cut along the line.                       Glue to the rear of the other part.

                                               Scissors, set square, glue(We recommend stick glue), pencil, used
   Tools and materials                         ballpoint pen, toothpicks, tweezers, (useful for handling small parts)

                                               Before gluing, crease the paper along mountain fold and valley
        Assembly tip                           fold lines and make sure rounded sections are nice and stiff.
                                                                                                                                     Make two ribbons.
                                               Glue, scissors and other tools may be dangerous to young children
           Caution                             so be sure to keep them out of the reach of young children.
Bouquet (poinsettia) : Assembly Instructions                                                                                                        © Canon Inc. © Taka Taka


                                                                                                        Poinsettia assembly
                                                                                                        The bouquet consists of six poinsettias, in three
                                                                                                                                                            Reference
                                                                                                        sizes and three colors. All poinsettias are          number
                                                                                                                                                                                          Total
                                                                                                        assembled in the same way. The example shows
                                                                                                        assembly of poinsettia A.                            Color

                                                                                                        Assemble poinsettia A, then assemble the other        Size
                                                                                                        poinsettias. To simplify assembly, apply glue to
                                                                                                        parts in order, as indicated by numbers.            Number


                                                                                                                                                                               Completed
                                                                                                                                             Completed flower                  attachment ring


                                              © Taka Taka


                                                 CAUTION

                             Do not hit other people with the pointed edges.
                                     Doing so could result in injury.
                       Adults should make sure that children observe this caution.


                                                                                                         Curve parts A2 to A13
                                                                                                         (leaves) from the base to the tip
                                                                                                         of each leaf, and fold creases
                                                                                                         as indicated. Then apply glue.


                                                                                                               Enlarged view of
                                                                                     Completed basket          hexagonal flap
Bouquet (poinsettia) : Assembly Instructions                                                       © Canon Inc. © Taka Taka


Assemble parts A1 to A13 by layering with the hexagonal flap at the center of the flower.


                                                      Layer
   Layer                                              underneath
   underneath


                                                                                      Layer
                                                                                      underneath
      Layer
      underneath


                                   Layer
                                   underneath


                                                                                                            Completed poinsettia A
Bouquet (poinsettia) : Assembly Instructions                                                                                                   © Canon Inc. © Taka Taka


Poinsettia B assembly                                 Poinsettias C, D, E, & F assembly                     Mini-bouquet assembly
Assemble poinsettia B, following steps                Poinsettias C, D, E and F do not have green leaves.
to   from instruction    for poinsettia A.            Assemble the red leaves, following steps      to
Do not glue part B14 at this time.                    from instruction    for poinsettia A.
                                                      Then follow steps     and    to attach parts that
                                                      correspond to A1 and A14.


                                                                                                                       Glue mini-bouquet ribbons together
                                                                                                                       at a pleasing angle.


Bouquet decorative ribbon assembly
The three types of decorative ribbons
(parts 2-1, 2-2, and 2-3) are different
patterns and sizes, but the assembly process
for each is the same.
                                                                                                                                                     Poinsettia B
                                               Glue reverse sides together.


Bouquet decorative leaf assembly
There are three types of decorative
leaves.


                              Curve parts 3-1 and 3-2 from              Part 3-3 should be assembled
                              the base to the tip of each leaf.         following steps    and     from                             Completed mini-bouquet
                                                                        instruction   for poinsettia A.
Bouquet (poinsettia) : Assembly Instructions                                                                                  © Canon Inc. © Taka Taka


bouquet assembly


                                           Glue the yellow dots on the ribbons and
                                           the backs of the leaves to the basket as if
                                           you were creating a flower arrangement.


         Glue the red dots on the
         attachment rings to the basket.


                                                                                                                        Completed poinsettia bouquet


                                                                                         Enjoy the Paper Craft mixed arrangements pictured below.


                                                                                           Bouquet (roses)                                     Bouquet (tulips)

More Related Content

Poinsettia i e_a4

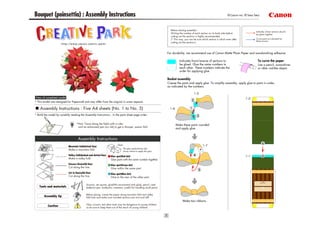
  • 1. Bouquet (poinsettia) : Assembly Instructions © Canon Inc. © Taka Taka Before starting assembly : Indicates where sections should Writing the number of each section on its back side before be glued together. cutting out the sections is highly recommended. (* This way, you can be sure which section is which even after Curve parts as indicated by these arrows. cutting out the sections.) For durability, we recommend use of Canon Matte Photo Paper and woodworking adhesive. Indicates front/reverse of sections to To curve the paper be glued. Glue the same numbers to Use a pencil, screwdriver each other. These numbers indicate the or other rod-like object. order for applying glue. Basket assembly Crease the parts and apply glue. To simplify assembly, apply glue to parts in order, as indicated by the numbers. View of completed model * This model was designed for Papercraft and may differ from the original in some respects. Assembly Instructions : Five A4 sheets (No. 1 to No. 5) * Build the model by carefully reading the Assembly Instructions , in the parts sheet page order. *Hint: Trace along the folds with a ruler Make these parts rounded and an exhausted pen (no ink) to get a sharper, easier fold. and apply glue. Assembly Instructions Glue Mountain fold(dotted line) The glue spot(colored dot) Make a mountain fold. shows where to apply the glue. Valley fold(dashed and dotted line) Glue spot(Red dot) Make a valley fold. Glue parts with the same number together. Scissors line(solid line) Glue spot(Green dot) Cut along the line. Glue within the same part. Cut in line(solid line) Glue spot(Blue dot) Cut along the line. Glue to the rear of the other part. Scissors, set square, glue(We recommend stick glue), pencil, used Tools and materials ballpoint pen, toothpicks, tweezers, (useful for handling small parts) Before gluing, crease the paper along mountain fold and valley Assembly tip fold lines and make sure rounded sections are nice and stiff. Make two ribbons. Glue, scissors and other tools may be dangerous to young children Caution so be sure to keep them out of the reach of young children.
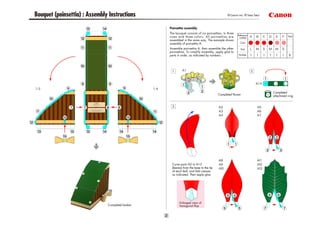
  • 2. Bouquet (poinsettia) : Assembly Instructions © Canon Inc. © Taka Taka Poinsettia assembly The bouquet consists of six poinsettias, in three Reference sizes and three colors. All poinsettias are number Total assembled in the same way. The example shows assembly of poinsettia A. Color Assemble poinsettia A, then assemble the other Size poinsettias. To simplify assembly, apply glue to parts in order, as indicated by numbers. Number Completed Completed flower attachment ring © Taka Taka CAUTION Do not hit other people with the pointed edges. Doing so could result in injury. Adults should make sure that children observe this caution. Curve parts A2 to A13 (leaves) from the base to the tip of each leaf, and fold creases as indicated. Then apply glue. Enlarged view of Completed basket hexagonal flap
  • 3. Bouquet (poinsettia) : Assembly Instructions © Canon Inc. © Taka Taka Assemble parts A1 to A13 by layering with the hexagonal flap at the center of the flower. Layer Layer underneath underneath Layer underneath Layer underneath Layer underneath Completed poinsettia A
  • 4. Bouquet (poinsettia) : Assembly Instructions © Canon Inc. © Taka Taka Poinsettia B assembly Poinsettias C, D, E, & F assembly Mini-bouquet assembly Assemble poinsettia B, following steps Poinsettias C, D, E and F do not have green leaves. to from instruction for poinsettia A. Assemble the red leaves, following steps to Do not glue part B14 at this time. from instruction for poinsettia A. Then follow steps and to attach parts that correspond to A1 and A14. Glue mini-bouquet ribbons together at a pleasing angle. Bouquet decorative ribbon assembly The three types of decorative ribbons (parts 2-1, 2-2, and 2-3) are different patterns and sizes, but the assembly process for each is the same. Poinsettia B Glue reverse sides together. Bouquet decorative leaf assembly There are three types of decorative leaves. Curve parts 3-1 and 3-2 from Part 3-3 should be assembled the base to the tip of each leaf. following steps and from Completed mini-bouquet instruction for poinsettia A.
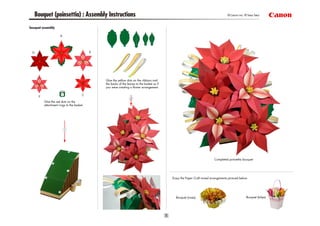
  • 5. Bouquet (poinsettia) : Assembly Instructions © Canon Inc. © Taka Taka bouquet assembly Glue the yellow dots on the ribbons and the backs of the leaves to the basket as if you were creating a flower arrangement. Glue the red dots on the attachment rings to the basket. Completed poinsettia bouquet Enjoy the Paper Craft mixed arrangements pictured below. Bouquet (roses) Bouquet (tulips)