Polling in WebEx Meetings
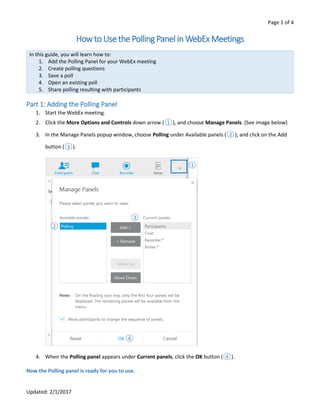
- 1. Page 1 of 4 Updated: 2/1/2017 Howto Use the Polling Panel in WebEx Meetings In this guide, you will learn how to: 1. Add the Polling Panel for your WebEx meeting 2. Create polling questions 3. Save a poll 4. Open an existing poll 5. Share polling resulting with participants Part 1: Adding the Polling Panel 1. Start the WebEx meeting. 2. Click the More Options and Controls down arrow (â—‹1 ), and choose Manage Panels. (See image below) 3. In the Manage Panels popup window, choose Polling under Available panels (â—‹2 ); and click on the Add button (â—‹3 ). 4. When the Polling panel appears under Current panels, click the OK button (â—‹4 ). Now the Polling panel is ready for you to use. â—‹1 â—‹2 â—‹3 â—‹4
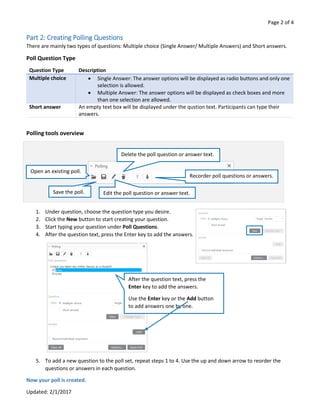
- 2. Page 2 of 4 Updated: 2/1/2017 Part 2: Creating Polling Questions There are mainly two types of questions: Multiple choice (Single Answer/ Multiple Answers) and Short answers. Poll Question Type Question Type Description Multiple choice ď‚· Single Answer: The answer options will be displayed as radio buttons and only one selection is allowed. ď‚· Multiple Answer: The answer options will be displayed as check boxes and more than one selection are allowed. Short answer An empty text box will be displayed under the qustion text. Participants can type their answers. Polling tools overview 1. Under question, choose the question type you desire. 2. Click the New button to start creating your question. 3. Start typing your question under Poll Questions. 4. After the question text, press the Enter key to add the answers. 5. To add a new question to the poll set, repeat steps 1 to 4. Use the up and down arrow to reorder the questions or answers in each question. Now your poll is created. After the question text, press the Enter key to add the answers. Use the Enter key or the Add button to add answers one by one. Open an existing poll. Save the poll. Edit the poll question or answer text. Delete the poll question or answer text. Recorder poll questions or answers.
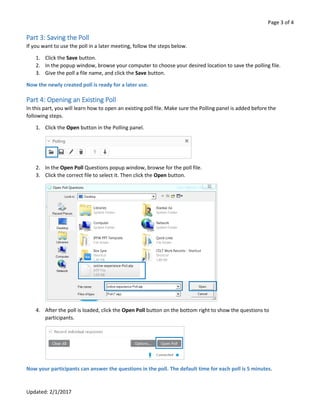
- 3. Page 3 of 4 Updated: 2/1/2017 Part 3: Saving the Poll If you want to use the poll in a later meeting, follow the steps below. 1. Click the Save button. 2. In the popup window, browse your computer to choose your desired location to save the polling file. 3. Give the poll a file name, and click the Save button. Now the newly created poll is ready for a later use. Part 4: Opening an Existing Poll In this part, you will learn how to open an existing poll file. Make sure the Polling panel is added before the following steps. 1. Click the Open button in the Polling panel. 2. In the Open Poll Questions popup window, browse for the poll file. 3. Click the correct file to select it. Then click the Open button. 4. After the poll is loaded, click the Open Poll button on the bottom right to show the questions to participants. Now your participants can answer the questions in the poll. The default time for each poll is 5 minutes.
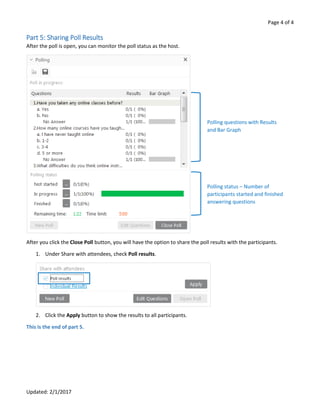
- 4. Page 4 of 4 Updated: 2/1/2017 Part 5: Sharing Poll Results After the poll is open, you can monitor the poll status as the host. After you click the Close Poll button, you will have the option to share the poll results with the participants. 1. Under Share with attendees, check Poll results. 2. Click the Apply button to show the results to all participants. This is the end of part 5. Polling questions with Results and Bar Graph Polling status – Number of participants started and finished answering questions


