Powerpoint 2010 Unit B PPT
- 1. Microsoft PowerPoint 2010- Illustrated Unit B: Modifying A Presentation
- 2. Objectives • Enter text in the Outline tab • Format text • Convert text to SmartArt • Insert and modify shapes Microsoft Office 2010 - Illustrated
- 3. Objectives • Edit and duplicate shapes • Align and group objects • Add slide headers and footers • Use proofing and language tools Microsoft Office 2010 - Illustrated
- 4. Entering Text in the Outline Tab • The Outline tab is a great place to enter type when you want to focus on text and not the layout • The Outline tab is organized with slide titles as headings and bulleted text as indented lines Microsoft Office 2010 - Illustrated
- 5. Entering Text in the Outline Tab Microsoft Office 2010 - Illustrated
- 6. Entering Text in the Outline Tab • When you create a new slide in the Outline tab, a new slide appears • A blinking insertion point indicates you can enter slide title • Press [Enter], then [Tab] to start a new bullet Microsoft Office 2010 - Illustrated
- 7. Entering Text in the Outline Tab • To rearrange the order of slides, simply drag a şÝşÝߣ Icon to a new location in the Outline tab • A horizontal indicator line appears to show the new location of the slide Microsoft Office 2010 - Illustrated
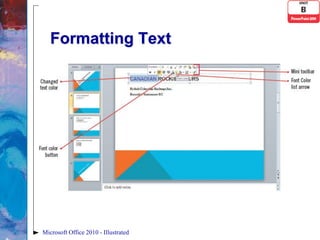
- 8. Formatting Text • Once text is entered, you can format it with fonts, colors and sizes • Formatting text allows you to make specific points stand out and grab the audience’s attention • To format text • Select a text box or • Highlight a word or phrase • Use buttons on the Mini toolbar to format selected text Microsoft Office 2010 - Illustrated
- 9. Formatting Text Microsoft Office 2010 - Illustrated
- 10. Converting Text to SmartArt • The ability to convert text to a SmartArt graphic increases your ability to create dynamic-looking text. • A SmartArt graphic is a professional- quality diagram that visually illustrates text. • There are eight categories, or types, of SmartArt graphics Microsoft Office 2010 - Illustrated
- 11. Converting Text to SmartArt • You can convert existing text into a SmartArt graphic or start from scratch • To convert existing text, select the text box, then click Convert to SmartArt button in Paragraph group • A SmartArt Style is a pre-set combination of simple and 3-D formatting options that follows the presentation theme Microsoft Office 2010 - Illustrated
- 12. Converting Text to SmartArt Microsoft Office 2010 - Illustrated
- 13. Inserting and Modifying Shapes • In PowerPoint you can insert many different types of shapes including lines, geometric figures, arrows, stars, callouts, and banners • You can create single shapes or combine several shapes together to make a more complex figure Microsoft Office 2010-Illustrated
- 14. Inserting and Modifying Shapes • To resize a shape, drag a resizing handle or use the Width and Height commands in the Size group on the Ribbon • If you press [Shift] as you drag to create a shape, the shape maintains even proportions Microsoft Office 2010-Illustrated
- 15. Inserting and Modifying Shapes • You can also apply a Quick Style • A Quick Style is a set of formatting options, including line style, fill color, and effect Microsoft Office 2010-Illustrated
- 16. Editing and Duplicating Shapes • With PowerPoint, you have the ability to refine the aspects of a shape • You use the adjustment handle—a small yellow diamond—to change the appearance of an object Microsoft Office 2010-Illustrated
- 17. Editing and Duplicating Shapes Rotate handle • The rotate handle is used to rotate an object in the direction and the amount that you drag the handle Microsoft Office 2010-Illustrated
- 18. Editing and Duplicating Shapes • As you drag a handle, a semitransparent copy shows the updated image before you release the handle • PowerPoint uses gridlines to align objects Microsoft Office 2010-Illustrated
- 19. Aligning and Grouping Objects • You can position objects accurately on the slide using Align commands in the Arrange group • You can align objects relative to each other by snapping them to a grid of evenly spaced vertical and horizontal lines Microsoft Office 2010-Illustrated
- 20. Aligning and Grouping Objects Microsoft Office 2010-Illustrated
- 21. Aligning and Grouping Objects • You can group objects to secure their relative position to each other • Click the Arrange button, then click Group • To distribute objects is to evenly space them horizontally or vertically relative to each other or the slide Microsoft Office 2010-Illustrated
- 22. Adding şÝşÝߣ Headers and Footers • Headers and footers are information that you can add to each slide, such as a company name or the date • To insert headers and/or footers, click the Insert tab, then click Header & Footer Microsoft Office 2010-Illustrated
- 23. Adding şÝşÝߣ Headers and Footers Microsoft Office 2010-Illustrated
- 24. Adding şÝşÝߣ Headers and Footers • The placement of footer text objects is dependent upon the presentation theme • The Header and Footer dialog box has two tabs: a şÝşÝߣ tab and a Notes and Handouts tab • There are three types of footer text, Date and time, şÝşÝߣ number, and Footer Microsoft Office 2010-Illustrated
- 25. Using Proofing and Language Tools • You can use the spell-checking feature in PowerPoint to check for and correct spelling errors Microsoft Office 2010-Illustrated
- 26. Using Proofing and Language Tools • Click Change or Change All to correct a misspelled word • Use the correctly spelled suggested word • For proper names you can click Ignore All • The spell-checker will not question any more occurrences of the word Microsoft Office 2010-Illustrated
- 27. Using Proofing and Language Tools • The Microsoft Translator can translate your text to a different language • Click the Translate button in the Language group Microsoft Office 2010-Illustrated
- 28. Summary In this chapter you learned how to: • Enter text in the Outline tab • Format text • Convert text to SmartArt • Insert and modify shapes Microsoft Office 2010-Illustrated
- 29. Summary In this chapter you learned how to: • Edit and duplicate shapes • Align and group objects • Add slide headers and footers • Use proofing and language tools Microsoft Office 2010-Illustrated


![Entering Text in the Outline Tab
• When you create a new slide in the
Outline tab, a new slide appears
• A blinking insertion point indicates you
can enter slide title
• Press [Enter], then [Tab] to start a new
bullet
Microsoft Office 2010 - Illustrated](https://image.slidesharecdn.com/powerpoint2010unitb-121212104502-phpapp01/85/Powerpoint-2010-Unit-B-PPT-6-320.jpg)




![Inserting and Modifying
Shapes
• To resize a shape, drag a resizing
handle or use the Width and Height
commands in the Size group on the
Ribbon
• If you press [Shift] as you drag to
create a shape, the shape maintains
even proportions
Microsoft Office 2010-Illustrated](https://image.slidesharecdn.com/powerpoint2010unitb-121212104502-phpapp01/85/Powerpoint-2010-Unit-B-PPT-14-320.jpg)


