ºÝºÝߣ

ºÝºÝߣShare a Scribd company logo
Executive Interface installation instructions for Voce & Infinity models
1 EXEC CONV KIT – Executive Interface conversion kit, contents include:
ï‚· EL10266000 Executive interface PCB x 1
ï‚· ME10267000 Executive mech transformer x 1
ï‚· FA03289000 M4 self locking nut x 2
ï‚· LO14337000 Loom Exec Mech Power x 1
ï‚· LO14338000 Loom Exec Mech Comms x 1
Installation Procedure for Evolution & Genesis
1. Beware of Electricity: Ensure that the mains electricity supply is isolated before removing
any protective panels involved in this operation.
2. Important! Always disconnect the machine from the electricity supply before any operations
below are carried out.
3. Check that you have all parts in the kit, listed above.
4. Remove product canisters, and then remove the right hand internal cover
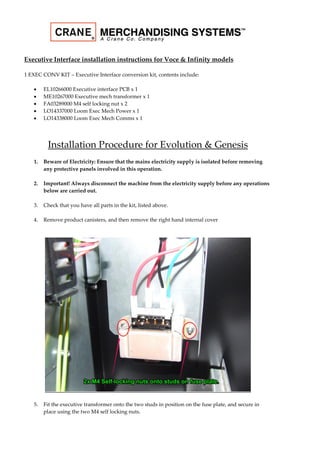
5. Fit the executive transformer onto the two studs in position on the fuse plate, and secure in
place using the two M4 self locking nuts.
6. Release the connections from the harness bundle tied in position, and connect the wires to the
transformer as follows
Red – 24V
Black – 20VA
Red– 240V
Blue –0V
7. Replace all covers and product canisters.
8. Open the internal monetary door to gain access to the main control board.
+
9. Fit the Executive pcb (EL10266000) onto the main control board lower left hand side (position
J39), and connect the executive comms harness plug (H4). Next, mate this plug with the coin
mech’s plug.
10. Mate the power plugs together.
11. Secure the Loom Exec Mech Power with 4 cable ties.
12. Re-connect the machine to the power and wait for the machine to initialise. Go into the
Engineers program, select ‘System Settings’, then ‘Monetary’, then ‘Coin Mechanism’ and select
‘Exec Coin Mechanism’ option.
13. The machine is now ready in Executive mode.
PR13674000.doc Revision New 23/08/2013

More Related Content

PR14754000 Edited

  • 1. Executive Interface installation instructions for Voce & Infinity models 1 EXEC CONV KIT – Executive Interface conversion kit, contents include: ï‚· EL10266000 Executive interface PCB x 1 ï‚· ME10267000 Executive mech transformer x 1 ï‚· FA03289000 M4 self locking nut x 2 ï‚· LO14337000 Loom Exec Mech Power x 1 ï‚· LO14338000 Loom Exec Mech Comms x 1 Installation Procedure for Evolution & Genesis 1. Beware of Electricity: Ensure that the mains electricity supply is isolated before removing any protective panels involved in this operation. 2. Important! Always disconnect the machine from the electricity supply before any operations below are carried out. 3. Check that you have all parts in the kit, listed above. 4. Remove product canisters, and then remove the right hand internal cover 5. Fit the executive transformer onto the two studs in position on the fuse plate, and secure in place using the two M4 self locking nuts.
  • 2. 6. Release the connections from the harness bundle tied in position, and connect the wires to the transformer as follows Red – 24V Black – 20VA Red– 240V Blue –0V 7. Replace all covers and product canisters. 8. Open the internal monetary door to gain access to the main control board. +
  • 3. 9. Fit the Executive pcb (EL10266000) onto the main control board lower left hand side (position J39), and connect the executive comms harness plug (H4). Next, mate this plug with the coin mech’s plug. 10. Mate the power plugs together. 11. Secure the Loom Exec Mech Power with 4 cable ties. 12. Re-connect the machine to the power and wait for the machine to initialise. Go into the Engineers program, select ‘System Settings’, then ‘Monetary’, then ‘Coin Mechanism’ and select ‘Exec Coin Mechanism’ option. 13. The machine is now ready in Executive mode. PR13674000.doc Revision New 23/08/2013