Presentation1
âĒDownload as PPT, PDFâĒ
0 likesâĒ86 views

A storyboard is a graphic representation of a video presented as a series of illustrations or pictures in squares that represent each shot of the video along with notes on what is happening and being said. Storyboards allow filmmakers to plan their video shot-by-shot to understand what types of shots and angles to use and ensure the actors' positions and sequencing make sense before filming. They create a framework to help achieve the desired end result and have something to refer to in the filmmaking process.


Presentation1
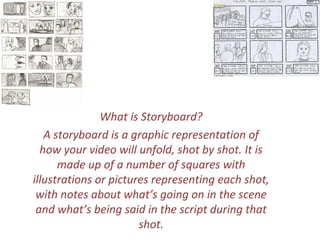
- 1. What is Storyboard? A storyboard is a graphic representation of how your video will unfold, shot by shot. It is made up of a number of squares with illustrations or pictures representing each shot, with notes about whatâs going on in the scene and whatâs being said in the script during that shot.
- 2. Why we use Storyboard? Storyboarding simply requires each shot to be drawn in a box, often writing to explain what is happening. By making a storyboard we can see whether our clip makes any sense. Storyboard allows us to see how our clip would look, therefore before making the actual clip storyboard is required to understand whether which types of shot could be used, whether the positions of actors are right, and whether which types of angle could be used. Therefore overall it allows us to make any corrections before starting to shoot our cli. Creating a storyboard is an important point during the whole process of pre-music clip making. By making a storyboard we understand what we are aiming to achieve and have something to
- 3. Making the Storyboard We had a hard-working week, working during our free time with our storyboard which we already finished. We wanted it to look as nice as possible therefore we spent fairly a long amount of time correcting it and rectifying. We decided to have a fair division of labour where each of us would have an equal amount of work to do. Unfortunately I don't know how to draw, therefore all the drawing were done by other members of the group, whereas I checked the sequence and animated the information. The process wasn't so hard, but long-lasting which kind made us exhausted.
- 4. Animatics After we finished making our storyboard we started to animate it. Animatics gives us a better idea about the timing and a rough idea of how our clip would look We spent approximately about one hour shooting the five seconds of each picture of storyboard and then we had to edit it. We used final cut pro to edit animatic, which we also used last year to edit our prelim task. The first thing we did is created a new rush bin, where we could transform the five second clips we made. Afterwards we copied and pasted the music into our folder where from we grabbed it and placed it on the timeline. Now what we had to do is to listen the music and mark the every beat we hear, so afterwards we could place the pictures on the marked points