Psytrance part 1_kick_and_bass
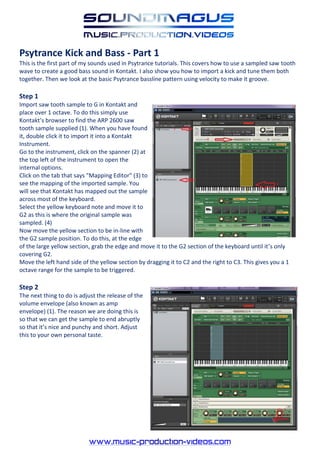
- 2. Psytrance Kick and Bass - Part 1 This is the first part of my sounds used in Psytrance tutorials. This covers how to use a sampled saw tooth wave to create a good bass sound in Kontakt. I also show you how to import a kick and tune them both together. Then we look at the basic Psytrance bassline pattern using velocity to make it groove. Step 1 Import saw tooth sample to G in Kontakt and place over 1 octave. To do this simply use KontaktÔÇÖs browser to find the ARP 2600 saw tooth sample supplied (1). When you have found it, double click it to import it into a Kontakt Instrument. Go to the instrument, click on the spanner (2) at the top left of the instrument to open the internal options. Click on the tab that says "Mapping Editor" (3) to see the mapping of the imported sample. You will see that Kontakt has mapped out the sample across most of the keyboard. Select the yellow keyboard note and move it to G2 as this is where the original sample was sampled. (4) Now move the yellow section to be in-line with the G2 sample position. To do this, at the edge of the large yellow section, grab the edge and move it to the G2 section of the keyboard until itÔÇÖs only covering G2. Move the left hand side of the yellow section by dragging it to C2 and the right to C3. This gives you a 1 octave range for the sample to be triggered. Step 2 The next thing to do is adjust the release of the volume envelope (also known as amp envelope) (1). The reason we are doing this is so that we can get the sample to end abruptly so that itÔÇÖs nice and punchy and short. Adjust this to your own personal taste.
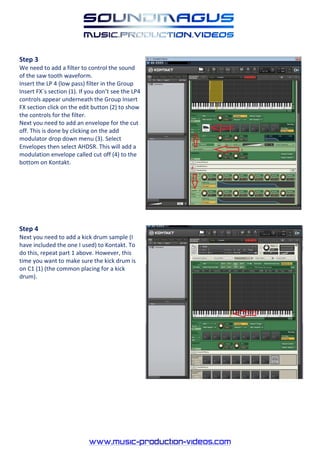
- 3. Step 3 We need to add a filter to control the sound of the saw tooth waveform. Insert the LP 4 (low pass) filter in the Group Insert FX`s section (1). If you donÔÇÖt see the LP4 controls appear underneath the Group Insert FX section click on the edit button (2) to show the controls for the filter. Next you need to add an envelope for the cut off. This is done by clicking on the add modulator drop down menu (3). Select Envelopes then select AHDSR. This will add a modulation envelope called cut off (4) to the bottom on Kontakt. Step 4 Next you need to add a kick drum sample (I have included the one I used) to Kontakt. To do this, repeat part 1 above. However, this time you want to make sure the kick drum is on C1 (1) (the common placing for a kick drum).
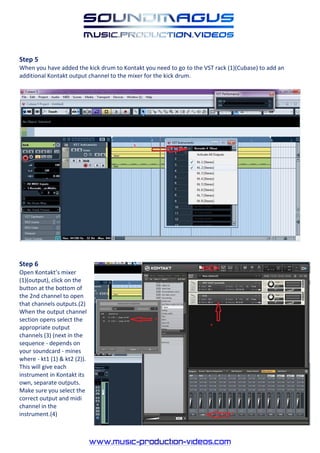
- 4. Step 5 When you have added the kick drum to Kontakt you need to go to the VST rack (1)(Cubase) to add an additional Kontakt output channel to the mixer for the kick drum. Step 6 Open KontaktÔÇÖs mixer (1)(output), click on the button at the bottom of the 2nd channel to open that channels outputs.(2) When the output channel section opens select the appropriate output channels (3) (next in the sequence - depends on your soundcard - mines where - kt1 (1) & kt2 (2)). This will give each instrument in Kontakt its own, separate outputs. Make sure you select the correct output and midi channel in the instrument.(4)
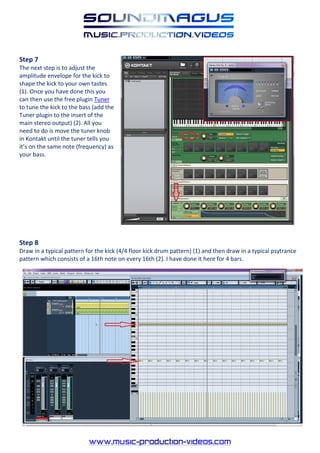
- 5. Step 7 The next step is to adjust the amplitude envelope for the kick to shape the kick to your own tastes (1). Once you have done this you can then use the free plugin Tuner to tune the kick to the bass (add the Tuner plugin to the insert of the main stereo output) (2). All you need to do is move the tuner knob in Kontakt until the tuner tells you itÔÇÖs on the same note (frequency) as your bass. Step 8 Draw in a typical pattern for the kick (4/4 floor kick drum pattern) (1) and then draw in a typical psytrance pattern which consists of a 16th note on every 16th (2). I have done it here for 4 bars.
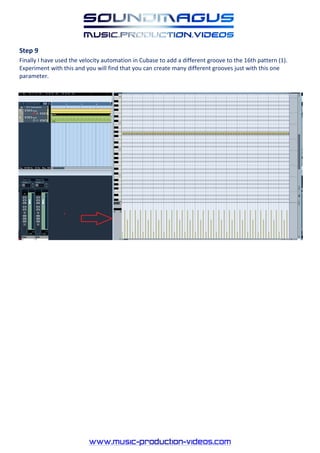
- 6. Step 9 Finally I have used the velocity automation in Cubase to add a different groove to the 16th pattern (1). Experiment with this and you will find that you can create many different grooves just with this one parameter.

