Rosa kawasaki
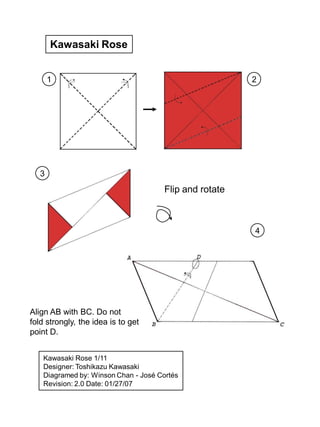
- 1. Kawasaki Rose 1 2 3 Flip and rotate 4 Align AB with BC. Do not fold strongly, the idea is to get point D. Kawasaki Rose 1/11 Designer: Toshikazu Kawasaki Diagramed by: Winson Chan - JosÃĐ CortÃĐs Revision: 2.0 Date: 01/27/07
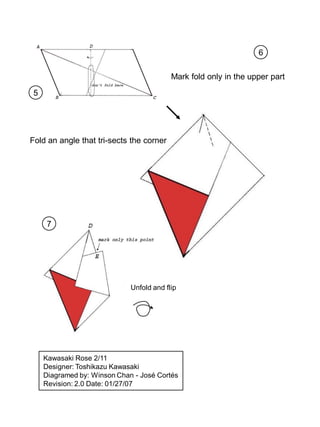
- 2. 6 Mark fold only in the upper part 5 Fold an angle that tri-sects the corner 7 Unfold and flip Kawasaki Rose 2/11 Designer: Toshikazu Kawasaki Diagramed by: Winson Chan - JosÃĐ CortÃĐs Revision: 2.0 Date: 01/27/07
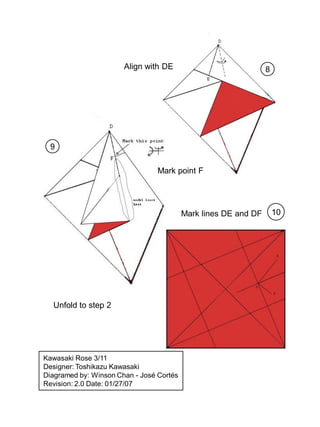
- 3. Align with DE 8 9 Mark point F Mark lines DE and DF 10 Unfold to step 2 Kawasaki Rose 3/11 Designer: Toshikazu Kawasaki Diagramed by: Winson Chan - JosÃĐ CortÃĐs Revision: 2.0 Date: 01/27/07
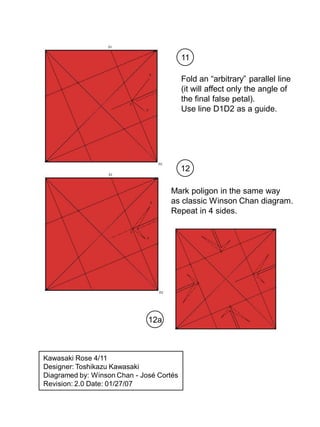
- 4. 11 Fold an âarbitraryâ parallel line (it will affect only the angle of the final false petal). Use line D1D2 as a guide. 12 Mark poligon in the same way as classic Winson Chan diagram. Repeat in 4 sides. 12a Kawasaki Rose 4/11 Designer: Toshikazu Kawasaki Diagramed by: Winson Chan - JosÃĐ CortÃĐs Revision: 2.0 Date: 01/27/07
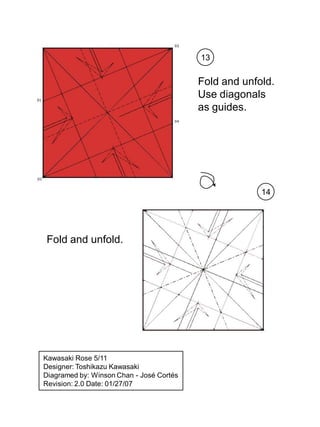
- 5. 13 Fold and unfold. Use diagonals as guides. 14 Fold and unfold. Kawasaki Rose 5/11 Designer: Toshikazu Kawasaki Diagramed by: Winson Chan - JosÃĐ CortÃĐs Revision: 2.0 Date: 01/27/07
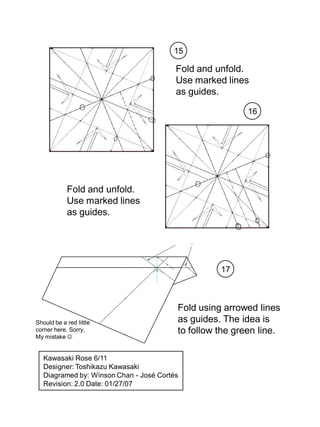
- 6. 15 Fold and unfold. Use marked lines as guides. 16 Fold and unfold. Use marked lines as guides. 17 Fold using arrowed lines Should be a red little as guides. The idea is corner here. Sorry, to follow the green line. My mistake ï Kawasaki Rose 6/11 Designer: Toshikazu Kawasaki Diagramed by: Winson Chan - JosÃĐ CortÃĐs Revision: 2.0 Date: 01/27/07
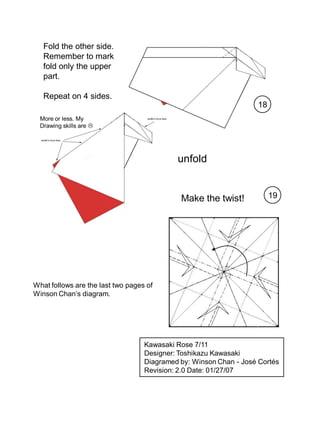
- 7. Fold the other side. Remember to mark fold only the upper part. Repeat on 4 sides. 18 More or less. My Drawing skills are ï unfold Make the twist! 19 What follows are the last two pages of Winson Chanâs diagram. Kawasaki Rose 7/11 Designer: Toshikazu Kawasaki Diagramed by: Winson Chan - JosÃĐ CortÃĐs Revision: 2.0 Date: 01/27/07
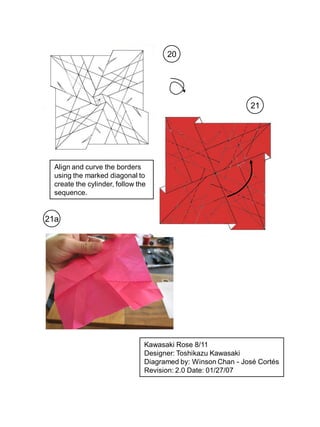
- 8. 20 21 Align and curve the borders using the marked diagonal to create the cylinder, follow the sequence. 21a Kawasaki Rose 8/11 Designer: Toshikazu Kawasaki Diagramed by: Winson Chan - JosÃĐ CortÃĐs Revision: 2.0 Date: 01/27/07
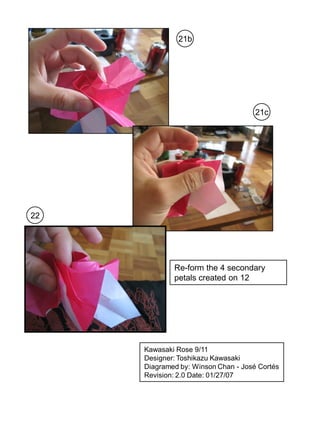
- 9. 21b 21c 22 Re-form the 4 secondary petals created on 12 Kawasaki Rose 9/11 Designer: Toshikazu Kawasaki Diagramed by: Winson Chan - JosÃĐ CortÃĐs Revision: 2.0 Date: 01/27/07
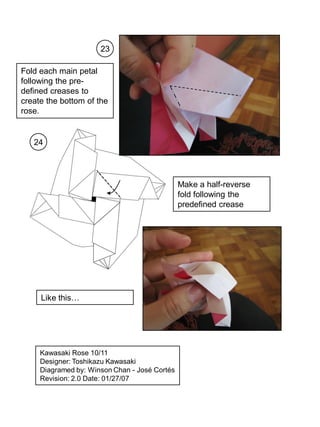
- 10. 23 Fold each main petal following the pre- defined creases to create the bottom of the rose. 24 Make a half-reverse fold following the predefined crease Like thisâĶ Kawasaki Rose 10/11 Designer: Toshikazu Kawasaki Diagramed by: Winson Chan - JosÃĐ CortÃĐs Revision: 2.0 Date: 01/27/07
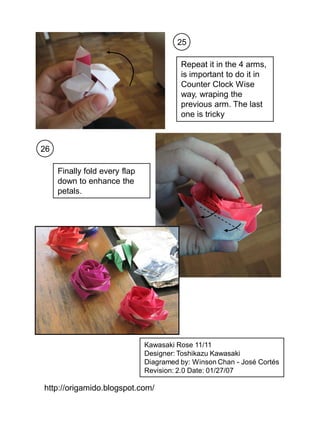
- 11. 25 Repeat it in the 4 arms, is important to do it in Counter Clock Wise way, wraping the previous arm. The last one is tricky 26 Finally fold every flap down to enhance the petals. Kawasaki Rose 11/11 Designer: Toshikazu Kawasaki Diagramed by: Winson Chan - JosÃĐ CortÃĐs Revision: 2.0 Date: 01/27/07 http://origamido.blogspot.com/

