Sales Navigator Quick Start
ŌĆóDownload as DOCX, PDFŌĆó
0 likesŌĆó378 views

Take these simple steps to get set up to use Sales Navigator in a matter of minutes. Change the way that you prospect intelligently and socially.


Sales Navigator Quick Start
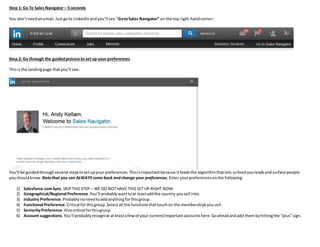
- 1. Step 1: Go To Sales Navigator ŌĆō 5 seconds You donŌĆÖt need an email. Just go to LinkedIn and youŌĆÖll see ŌĆ£Go to Sales NavigatorŌĆØ on the top right-hand corner: Step 2: Go through the guided process to set up your preferences This is the landing page that youŌĆÖll see: YouŌĆÖll be guided through several steps to set up your preferences. This is important because it feeds the algorithm that lets us feed you leads and surface people you should know. Note that you can ALWAYS come back and change your preferences. Enter your preferences on the following: 1) Salesforce.com Sync. SKIP THIS STEP ŌĆō WE DO NOT HAVE THIS SET UP RIGHT NOW 2) Geographical/Regional Preference. YouŌĆÖll probably want to at least add the country you sell into. 3) Industry Preference. Probably no need to add anything for this group. 4) Functional Preference. Critical for this group. Select all the functions that touch on the memberships you sell. 5) Seniority Preference. Also critical for this group. 6) Account suggestions. YouŌĆÖll probably recognize at least a few of your current/important accounts here. Go ahead and add them by hitting the ŌĆ£plusŌĆØ sign.
- 2. Step 3: Search for each of your accounts and save them ŌĆō 3 minutes Input account name here: A dropdown will give you a number of options related to that account name. Choose it from the dropdown. Once you get to the company page, click the big, blue button to save the account: Step 4 ŌĆō Search for your current contacts by name- 5 to 15 min Input name here: Once you get the individual results, click ŌĆ£Save as LeadŌĆØ. Saving people as leads is one of the most important and powerful things that you can do in Sales Navigator. Once youŌĆÖve saved a lead, we a) automatically push updates about that lead to you (like when theyŌĆÖve posted something or changed jobs) and b) we use that to make the algorithm that surfaces new leads smarter and more relevant.
- 3. Step 5 ŌĆō Start looking for new leads Click in the search bar at the top of the page. This will open Lead Builder. Insert your parameters and hit Search. Save leads the same way you do in Step 4. Add additional filters and keywords as you see fit. See next page for filter examples. In Sales Navigator, youŌĆÖll see these on the left-hand side. Note that you can leverage ŌĆ£Past CompanyŌĆØ to search for people that might have been happy members at other companies but are not yet members in your pool.
- 4. THATŌĆÖS IT! YouŌĆÖre off to the races. Once you find people, get an introduction. Or send an InMail!