About Selenium Webdriver
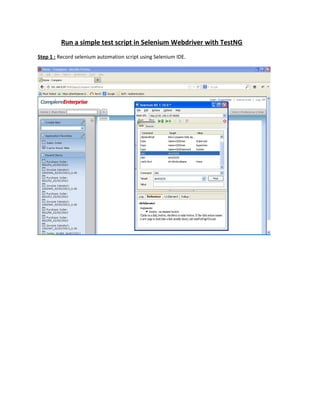
- 1. Run a simple test script in Selenium Webdriver with TestNG Step 1 : Record selenium automation script using Selenium IDE.
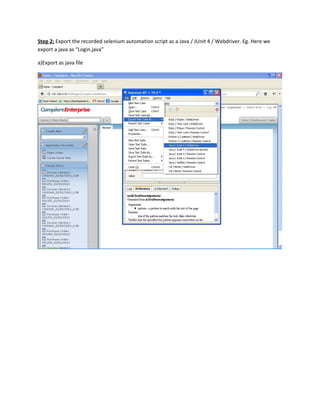
- 2. Step 2: Export the recorded selenium automation script as a Java / JUnit 4 / Webdriver. Eg. Here we export a java as Ą°Login.javaĄą a)Export as java file
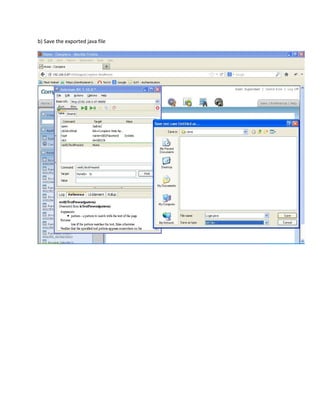
- 3. b) Save the exported java file
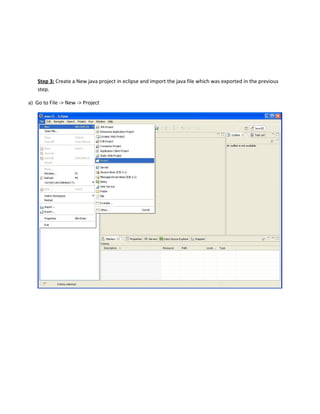
- 4. Step 3: Create a New java project in eclipse and import the java file which was exported in the previous step. a) Go to File -> New -> Project
- 5. b) Select new project as java project c) Enter the project name
- 7. e) Create a new package
- 8. f) Enter the project name.
- 9. g) Right the package and select import option.
- 10. h) Import from directory
- 11. i) Select the java file
- 12. j) After import the java file will been seen with error since the classpath not set for selenium webdriver jars.
- 13. Step 4 : Download Selenium 2 Web Driver from http://seleniumhq.org/download/
- 14. You will get the folder in your download path and keep it there and unzip it so that you can use it in later steps. The files in the folder should look something like this :
- 17. Step 5: Add External Files (Referenced Libraries ) in to the Eclipse. a. Right Click the project and go to Properties. b. Go to Java Build Path -> Library tab -> Add External JARsĄ c. Now add all the jar files d. Check if they are appearing in the Eclipse as below.
- 18. e. After configure the classpath the error will be cleared automatically.
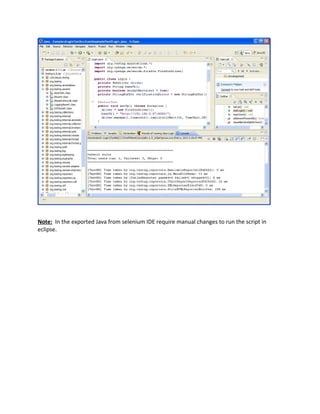
- 19. Step 6: Install TestNG Plug-in in Eclipse. In Eclipse, go to Help -> Install New Software Enter http://beust.com/eclipse in the Work with: field Wait and TestNG will be appeared in the window. Check the box next to TestNG and Click on Next button. Click on Finish and the Restart the Eclipse. Step 7: Change the Junit code to TestNG code.(Exported Login.java) ? Change the annotation from Junit code to TestNG. Eg. @Before replace with @BeforeTest @After replace with @AfterTest ? Remove the Junit import header and replace with appropriate TestNG import header .
- 20. Eg., import org.junit.*; replace with import org.testng.*; and import org.testng.annotations.*; ? If any junit code is used in then replace with appropriate TestNG code. ? verifyTextPresent in a field may require manual changes Eg. try { assertTrue(driver.findElement(By.cssSelector("BODY")).getText().matches("^[sS]*Homern rn[sS]*$")); } catch (Error e) { verificationErrors.append(e.toString()); } replace with try { assertEquals(Ą°HomeĄą,driver.findElement(By.id("WindowName")).getText()); } catch (Error e) { verificationErrors.append(e.toString()); } Step 7 : Run the selenium automation script by right the java file and Run as-> TestNG Test. Step 8 : Verify the test results in the console.
- 21. Note: In the exported Java from selenium IDE require manual changes to run the script in eclipse.



![Eg., import org.junit.*; replace with import org.testng.*; and
import org.testng.annotations.*;
? If any junit code is used in then replace with appropriate TestNG code.
? verifyTextPresent in a field may require manual changes
Eg.
try {
assertTrue(driver.findElement(By.cssSelector("BODY")).getText().matches("^[sS]*Homern
rn[sS]*$"));
} catch (Error e) {
verificationErrors.append(e.toString());
}
replace with
try {
assertEquals(Ą°HomeĄą,driver.findElement(By.id("WindowName")).getText());
} catch (Error e) {
verificationErrors.append(e.toString());
}
Step 7 : Run the selenium automation script by right the java file and Run as-> TestNG Test.
Step 8 : Verify the test results in the console.](https://image.slidesharecdn.com/seleniumwebdriver-180209103050/85/About-Selenium-Webdriver-20-320.jpg)
