Setup OneNote Integration in Microsoft Dynamics CRM Online
- 2. OneNote Integration in CRM Online CRM ONLINE
- 3. OneNote in CRM Online Gather your thoughts, ideas, plans and research in one single place with in Microsoft Dynamics CRM. When you turn on integration in Microsoft Dynamics CRM Online, you have the benefits of using to take or review customer notes from within your CRM records. You can configure in CRM Online when you're also using SharePoint-online. You must have a subscription to Office 365 to use in CRM Online.
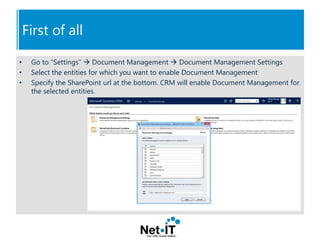
- 4. ŌĆó Go to ŌĆ£SettingsŌĆØ ’āĀ Document Management ’āĀ Document Management Settings ŌĆó Select the entities for which you want to enable Document Management ŌĆó Specify the SharePoint url at the bottom. CRM will enable Document Management for the selected entities. First of all
- 5. Before you can enable OneNote integration, you need to turn on server-based SharePoint integration. Make sure you have the System Administrator security role or equivalent permissions in Microsoft Dynamics CRM. Or, make sure that you have Read and Write privileges on all record types that are customizable. Step 1: Turn on server-based SharePoint integration
- 6. Check your security role Step 1: Turn on server-based SharePoint integration
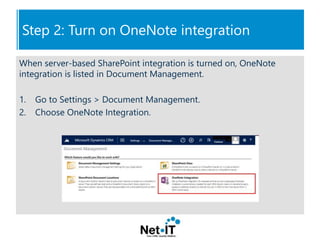
- 7. When server-based SharePoint integration is turned on, OneNote integration is listed in Document Management. 1. Go to Settings > Document Management. 2. Choose OneNote Integration. Step 2: Turn on OneNote integration
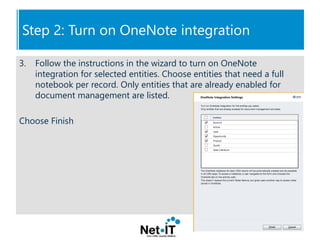
- 8. 3. Follow the instructions in the wizard to turn on OneNote integration for selected entities. Choose entities that need a full notebook per record. Only entities that are already enabled for document management are listed. Choose Finish Step 2: Turn on OneNote integration
- 9. 4. You can also enable OneNote integration for an entity from the customization form, as long as document management has been enabled for that entity. Step 2: Turn on OneNote integration
- 10. 5. A OneNote notebook is automatically created for a record the first time you select the OneNote tab in the activities area in Microsoft Dynamics CRM Online. Once the dedicated OneNote notebook is created for that CRM record, you can view and navigate to that notebook from any CRM client.. Step 2: Turn on OneNote integration
- 11. You can easily access a notebook directly from the activities area in CRM Online. This doesn't replace the current Notes feature, but gives you another way to access notes stored in OneNote. When you add a OneNote section to a notebook, it's shown individually within CRM and in order of last modified time. Note If you aren't signed in to Office 365, you'll go to the Office 365 sign-in page when you select the title of the OneNote notebook. When you sign in, you'll go directly to the notebook. Step 3: Use OneNote in CRM Online
- 12. 1. In the activities area of a record, select OneNote Step 3: Use OneNote in CRM Online
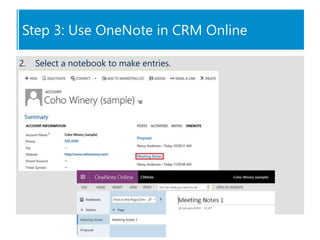
- 13. 2. Select a notebook to make entries. Step 3: Use OneNote in CRM Online
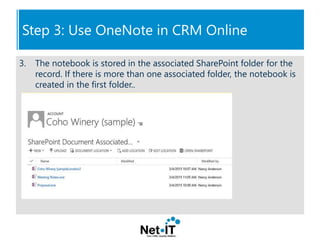
- 14. 3. The notebook is stored in the associated SharePoint folder for the record. If there is more than one associated folder, the notebook is created in the first folder.. Step 3: Use OneNote in CRM Online
- 15. Note ŌĆó You can't edit the OneNote file from within CRM. This can be done only from the OneNote app that opens when you choose the OneNote link. ŌĆó Don't delete any OneNote. onetoc2 or .one file types in the OneNote section in CRM. If you do, you won't be able to access your CRM OneNote notebook. ŌĆó Sections groups that keep related sections together in OneNote aren't supported in CRM. ŌĆó You can only rename a section in the desktop version of OneNote. If you rename a section in OneNote online, you won't see the updated section name in CRM Step 3: Use OneNote in CRM Online
- 16. 1. Go to Settings > Document Management. (How do I get there?) 2. Choose OneNote Integration. 3. In the OneNote Integration Setting dialog box, uncheck all the entities and then choose Finish. Optional: Turn off OneNote integration
- 17. CONTACT US FOR MORE INFO: info@net-it.be | +32 9 361 82 33 | @netit_crm | www.net-it.be

