ºÝºÝߣ

ºÝºÝߣShare a Scribd company logo
1.    Introduction
2.    Objective
3.    Material property of components
4.    CAD model
5.    Unfold CAD model for sheet metal operation
6.    Base FEA assembly model
7.    Load and boundary condition
8.    Displacement results for deferent types of element
      selection
9.    Stress results for deferent types of element selection
10.   Documents of max value of displacement & stress for
      deferent types of element selection
11.   Conclusion of the presentation
Sheet metal assembly verification by fea methods
?   Verification of FEA results by use of deferent
    FEA modeling methods with same element
    pattern and assembly method with same load
    and boundary condition(inertia relief) .
?   It is a exercise of use of deferent testing
    methods and what type of assembly will satisfy
    it in all respect.
Material   Young¡¯s    shear    Poison's
                                          densitY
  naMe     Modulus   Modulus    ratio


aluMinuM
            7.00e4   2.632e4     0.33      2.8e-9
 alloY


 steel      2.10e5   8.203e4     0.28     7.83e-9
Sheet metal assembly verification by fea methods
Hex model of individual component is tHe base model
Mid face of Hex Model of individual coMponent
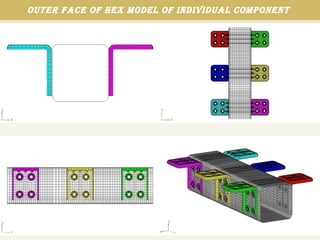
outer face of Hex Model of individual coMponent
tet Model extracted by splitting of Hex Model of
             individual coMponent
Sheet metal assembly verification by fea methods
iMages of area Having HigHer displaceMent value on
                 loading condition
   HEX ELEMENT                   TET ELEMENT


SHELL ELEMENT IN OUTER FACE   SHELL ELEMENT IN MID PLAN
ASSEMBLY ELEMENT      NODE SHOWING MAX   VALUE AND RESULT TO
      TYPE                  VALUE        BE TAKEN FOR REVIEW


    HEX MODEL             1.73E+00


     TET MODEL            7.27E-01


  MID PLANE MODEL         1.81E+00


                                         HIGHER DISPLACEMENT
OUTER SURFACE MODEL       1.82E+00
                                                VALUE
Sheet metal assembly verification by fea methods
ASSEMBLY ELEMENT      ELEMENT SHOWING   VALUE AND RESULT TO
      TYPE               MAX VALUE      BE TAKEN FOR REVIEW


    HEX MODEL             1.66E+02


     TET MODEL            1.14E+02


  MID PLANE MODEL         1.89E+02


                                        HIGHER DISPLACEMENT
OUTER SURFACE MODEL       1.91E+02
                                               VALUE
Sheet metal assembly verification by fea methods
?   The objective is achieved by getting different
    results from assembly by use of deferent
    modeling methods without change of base
    pattern of FEA model.
?   Same assembly has to go for dynamic inertia
    relief test to gather output results variation.

More Related Content

Sheet metal assembly verification by fea methods

  • 1. 1. Introduction 2. Objective 3. Material property of components 4. CAD model 5. Unfold CAD model for sheet metal operation 6. Base FEA assembly model 7. Load and boundary condition 8. Displacement results for deferent types of element selection 9. Stress results for deferent types of element selection 10. Documents of max value of displacement & stress for deferent types of element selection 11. Conclusion of the presentation
  • 5. ? Verification of FEA results by use of deferent FEA modeling methods with same element pattern and assembly method with same load and boundary condition(inertia relief) . ? It is a exercise of use of deferent testing methods and what type of assembly will satisfy it in all respect.
  • 6. Material Young¡¯s shear Poison's densitY naMe Modulus Modulus ratio aluMinuM 7.00e4 2.632e4 0.33 2.8e-9 alloY steel 2.10e5 8.203e4 0.28 7.83e-9
  • 14. Hex model of individual component is tHe base model
  • 15. Mid face of Hex Model of individual coMponent
  • 16. outer face of Hex Model of individual coMponent
  • 17. tet Model extracted by splitting of Hex Model of individual coMponent
  • 21. iMages of area Having HigHer displaceMent value on loading condition HEX ELEMENT TET ELEMENT SHELL ELEMENT IN OUTER FACE SHELL ELEMENT IN MID PLAN
  • 22. ASSEMBLY ELEMENT NODE SHOWING MAX VALUE AND RESULT TO TYPE VALUE BE TAKEN FOR REVIEW HEX MODEL 1.73E+00 TET MODEL 7.27E-01 MID PLANE MODEL 1.81E+00 HIGHER DISPLACEMENT OUTER SURFACE MODEL 1.82E+00 VALUE
  • 25. ASSEMBLY ELEMENT ELEMENT SHOWING VALUE AND RESULT TO TYPE MAX VALUE BE TAKEN FOR REVIEW HEX MODEL 1.66E+02 TET MODEL 1.14E+02 MID PLANE MODEL 1.89E+02 HIGHER DISPLACEMENT OUTER SURFACE MODEL 1.91E+02 VALUE
  • 28. ? The objective is achieved by getting different results from assembly by use of deferent modeling methods without change of base pattern of FEA model. ? Same assembly has to go for dynamic inertia relief test to gather output results variation.